If you’re currently missing one tooth or more, you’re definitely not alone, as it’s estimated over
120 million Americans are in your exact same position. Thankfully, Dr. Lorenzana is able to provide a solution that
can make you look and feel like your teeth never went missing in the first place: dental implants. Using his decades
of experience and the finest dental materials available today, he can rebuild your smile, your bite, and your
confidence for a lifetime to come. To learn more about dental implants in San Antonio, and what it could do for
you,
give us a call today
.
Why Choose Lorenzana Periodontics For Dental Implants?
Board-Certified Periodontist & Implant Specialist for 20+ Years
Sedation Dentistry Guarantees a Comfortable Visit Every Time
100% Personalized Treatment Plans for Each Patient
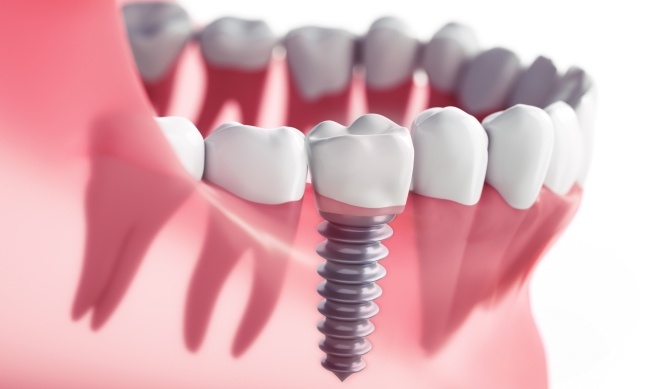
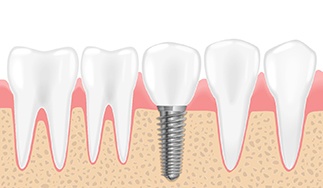
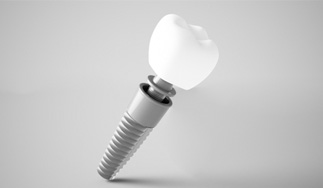
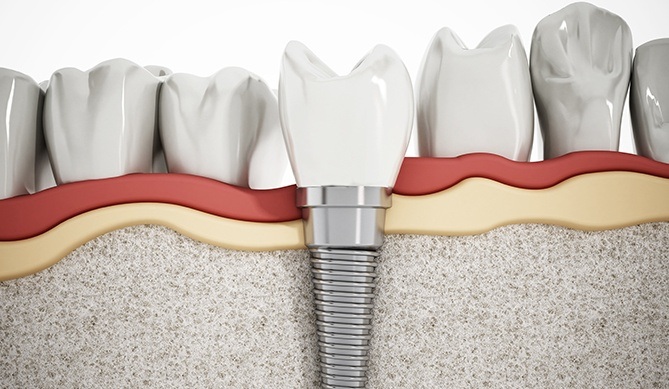
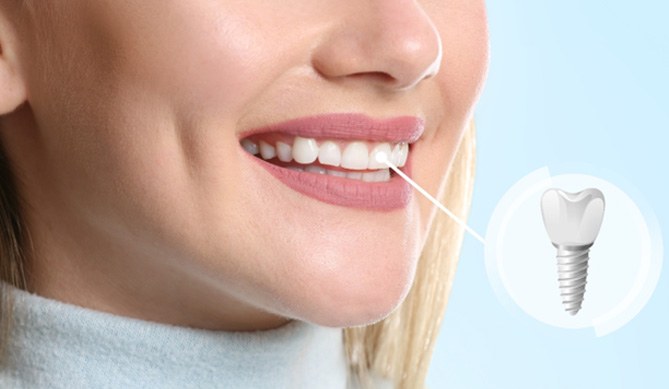
What Are Dental Implants?
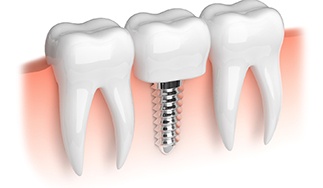
A dental implant is actually a prosthetic tooth root made of titanium and zirconium. It is inserted directly
into the jawbone in the space left by the missing tooth, and then it is topped with a custom-made crown, bridge,
or denture. Once in place, the implant actually bonds directly to the adjacent bone much like a real root,
ensuring it will provide trusted support for the new teeth, in most cases, for life.
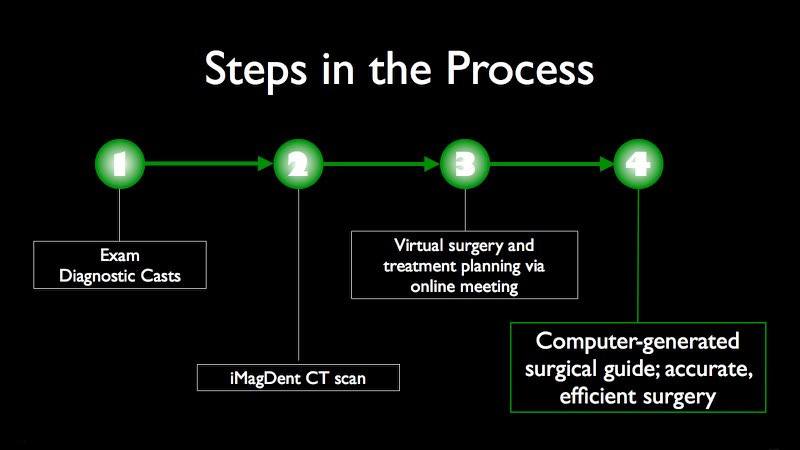
The 4 Step Dental Implant Process
While some dental practices claim that they can provide all dental implant services by one doctor from surgery
to restoration, Dr. Lorenzana is a board-certified periodontal and dental implant specialist with over 25 years
of experience in the surgical aspects of dental implant placement and aesthetics. What this means to you as a
patient is that you will have a surgeon in Dr. Lorenzana with the highest degree of training, board
certification, and experience to handle the most advanced and complex situations, particularly in the aesthetic
zone. It is important that you are familiar with the training and certifications of your implant surgeon to
avoid costly and potentially disfiguring complications. Below are the basic steps that go into placing and
restoring dental implants. During your consultation, Dr. Lorenzana will present your individualized custom
treatment plan.
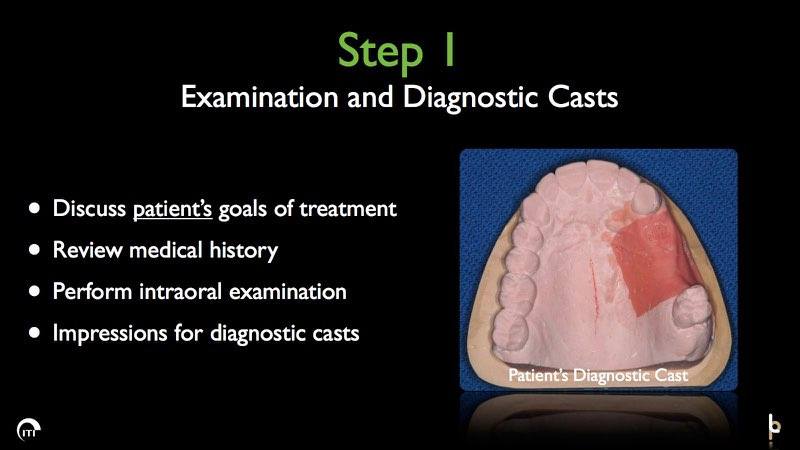
Initial Dental Implant Consultation
Dr. Lorenzana will need to perform an in-depth exam and consultation to confirm if you are eligible to
receive dental implants. He’ll examine your mouth and facial structures as well as your current gum
and bone health. In some cases, patients need to complete preparatory procedures before they can undergo
dental implant treatment. After these procedures (such as bone grafts, gum disease therapy, gum grafting,
etc.) have been completed, he can schedule you for your implant surgery.
Dental Implant Surgery
Placing dental implants is a relatively straightforward process. After administering local anesthetic to
numb the mouth (as well as any sedation, if requested), he’ll create a small incision in your gum
tissue, then create a tiny hole in your jaw so the implant has room to integrate. Once the implant has been
placed, the gums will be sutured shut so the post can begin to heal. A protective cap is also placed over
the implant to maintain the shape of your gums and shield the implant as it heals.
Over the next six to twelve weeks, the osseointegration process will occur. This step is essential to the
longevity of your tooth replacement. Osseointegration is when the titanium post physically fuses with your
bone tissue. After the post has fully integrated, you’ll come back to our office to have an abutment
attached. This small metal connector acts as the foundation for your permanent restoration. Your gum tissue
will need a few additional weeks to heal around the abutment before the crown, bridge, or denture can be
placed.
Delivery of Dental Implant Restorations
Your referring dentist will design your permanent restoration based on impressions taken of the implant or
implants after they have healed. Whether you need to have a crown, bridge or denture placed, you can expect
it to fit and feel incredibly natural once it is in place. Your dentist will work with a trusted dental
laboratory to create your ideal implant restoration and we will work together with your referring dentist to
make sure that you are happy with the final outcome.
Who Dental Implants Can Help
Ultimately, almost anyone with missing teeth can get dental implants. All you need to qualify (besides tooth
loss) is
good oral health and stable bodily function. That said, you can only confirm your candidacy by consulting with
Dr.
Lorenzana. He’ll assess your situation to see if implants could really work for you. If you’d like, we at
Lorenzana
Periodontics will happily tell you more. Just keep reading or call our office for the details!
Who is a Good Candidate for Dental Implants?
At your consultation, Dr. Lorenzana will perform an oral exam and review your medical history. Doing so lets
him
see if you have the qualifying factors for implants. These typically include:
Good General Health – Unlike other dental services, implant placement counts as
minor
surgery. As such, your body must be physically well enough to undergo it.
Great Oral Health – Cavities and gum disease can cause implant failure, so they
should be treated before placement surgery.
Sufficient Jawbone Density – Implants rely on a solid jawbone for support. As
such,
your jaw must have enough healthy bone tissue for treatment to work.
Still, you shouldn’t panic if you aren’t a good candidate initially. Our team could give you
preliminary services that help you qualify later – tooth extractions, gum disease therapy, bone
grafting,
etc. We’ll also help you schedule such procedures. From there, our office will create an implant
treatment
based on the number of missing teeth.
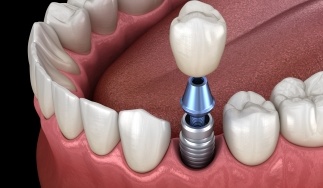
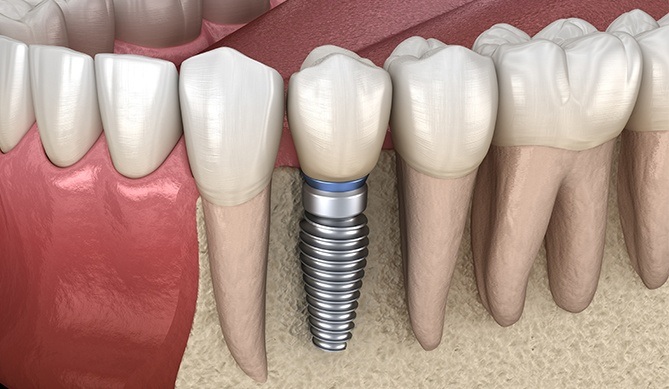
Missing One Tooth
If you only lack one tooth, a single implant post with an attached crown will fix things. This solution is
sturdier and longer-lasting than alternative restorations. Plus, it doesn’t require a dentist to
remove
healthy enamel from adjacent teeth.
Treatment works by inserting the implant’s titanium base into the empty jaw socket. Once this post has
sufficiently fused with the jawbone, the dentist will place a customized crown. The final result will match
the
surrounding teeth and blend seamlessly with your smile.
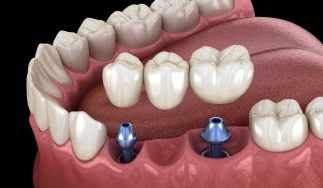
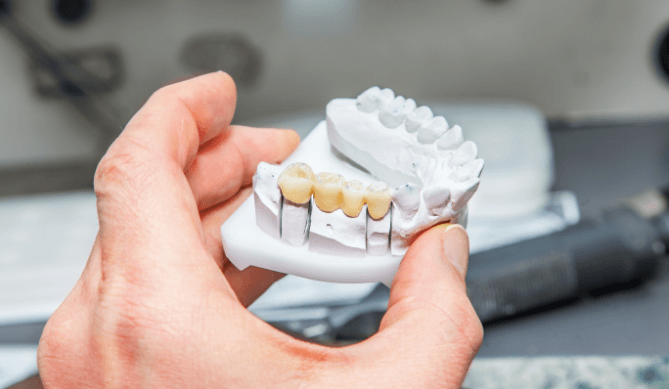
Missing Multiple Teeth
Those who lack multiple teeth can do better than just several single implants. Instead, such patients can opt
for
an implant bridge or partial denture.
Per the name, an implant bridge is supported by two implant posts. It thus doesn’t rely on healthy
teeth
like the more traditional ones. Plus, it tends to be more secure and stable.
Should you lack teeth throughout your mouth, a few implants could anchor a partial denture in place. You
could
thus use your new teeth without fear of them slipping. Better yet, these artificial chompers would restore
more
of your bite force.
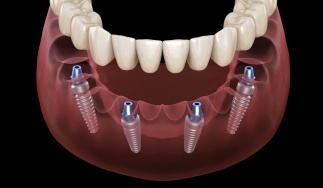
Missing All Teeth
These restorations could even help if you’re missing all your natural teeth. After all, you’d be
a
good candidate for all-on-4 dental implants in that case.
Unlike other prosthetic work, this treatment is ideal for patients with inadequate jawbone density. (A
patient
may have been missing their teeth for a while.) It anchors a full denture securely with just four
strategically
placed dental implants. You’d then enjoy a whole new row of teeth that look natural, feel secure, and
can
work for decades.
In truth, dental implants could keep your smile strong and complete for a lifetime. That’ll only happen,
though, if you give them proper care and maintenance. They’ll likely fail from damage or infection
otherwise. In that case, you’d then need to get replacements. Thankfully, we at Lorenzana Periodontics can
help: below are some tips on dental implant care in San Antonio. Read them over so you can enjoy your
newly-restored grin for years to come.
Make Oral Hygiene a Priority
As you might know, implants can’t get cavities. They’re artificial, after all, being made of
titanium and porcelain. However, they still need good oral hygiene to work well.
Remember: implants sit next to your teeth and gums. As such, it’s easy for the latter group’s
problems to affect the former. Gum disease, for instance, may cause an implant to loosen and fail. The
condition can erode the tissue supporting your prosthetic tooth.
Given these facts, you’ll need to make oral care a priority. Tooth or gum issues will affect your
implants if you don’t. So, always brush twice daily, floss once daily, and rinse with mouthwash often.
Eat a Healthy Diet
Since implants strengthen your bite, they’ll let you eat various foods. If possible, then, follow a
mouth-healthy diet from now on.
You see, not all items are implant-friendly. Hard foods – especially crunchy pretzels and nuts –
can chip restorations. Sticky and sugary stuff, meanwhile, wedge between implants and decay nearby teeth.
In contrast, foods with mouth-healthy nutrients help implants last. Fruits, veggies, lean proteins, and leafy
greens are especially good. These contain calcium, phosphorus, and other vitamins and minerals that prevent
gum disease and strengthen your jaw.
Break Bad Habits
If you’re not careful, bad oral habits could damage your implants. Therefore, try and quit these unsafe
practices quickly.
Just look at smoking, for example. Tobacco-laced cigarettes and cigars slow your recovery from implant
surgery. Furthermore, they promote gum disease – a known cause of implant failure. As a result,
continuing to smoke will doom your new smile.
Chewing on hard objects also isn’t a good idea. Doing so can chip implants, even if you’re simply
biting an ice cube. So, avoid it as best you can.
Protect Your Dental Implants
True enough, implants are durable. However, they’re not invincible; excessive force can easily damage
them. With that said, you’ll need to protect them with the right tools.
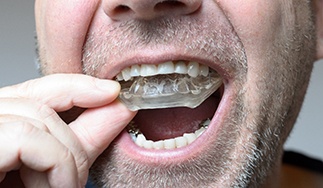
In particular, make sure to wear the right oral appliances. A mouthguard for sports would prevent implant
damage due to collisions. Similarly, a nightguard for sleep protects implants from tooth grinding.
Schedule Regular Dental Checkups
To ensure successful implants, visit your dentist every six months. Regular checkups address problems your
home care might miss.
Preventive care will stop potential threats to your implants. Checkups, after all, let a dentist assess your
oral health and spot problems early. The result is that your small dental issues won’t put your
implants at risk.
Understanding the Cost of Dental Implants
Every dental implant treatment provided by Dr. Lorenzana is completely customized based on the particular needs
of each patient. As such, the overall price of getting dental implants is different for everyone. During your
initial consultation, we’ll give you an estimate of how much you can expect to pay for dental implants.
Then, we’ll work with you to find a way to make the treatment as affordable as possible.
Preliminary Treatments & Dental Implant Surgery
We may recommend having bone grafting and other preparatory treatments performed before you have dental
implants placed. These procedures might add to the overall cost of the implant process, but they’re
often necessary to make sure that your implant posts can integrate with the jawbone.
Naturally, implant surgery has its own cost to consider. The exact price will vary based on a few factors,
such as where the implants need to be placed and whether sedation was used during the treatment. We’ll
make sure you are aware of the different variables that are being taken into account when calculating the
final cost of your implants.
The Parts of Your Dental Implant
How much will you pay for the implants themselves? That largely depends on:
The exact number of implants required. For example, a patient who has only lost one tooth will only need
to pay for a single implant; meanwhile, a patient who has lost an entire arch of teeth can expect to pay
for four or more implants.
The type of restoration that the implants support. Smaller restorations like single crowns cost less
than bridges or dentures.
The materials used to make the implants. Titanium is the most traditional option, but nowadays zirconium
is also a viable choice.
The brand of the implant. Different implant manufacturers design their products to meet specific needs.
Our team will be happy to explain the benefits of the brand of implant that we’ll use to rebuild
your smile.
How Dental Implants Can Save You Money
Dental implants might cost more than other types of tooth replacement, but in the long run, they often prove
to be the better investment. While dentures and bridges usually need to be replaced after 7 to 10 years,
dental implants can stay in your mouth for decades with minimal maintenance. That means you won’t have
to pay for replacements as often, and you don’t have to worry about buying special solutions to keep
your new teeth clean.
Does My Dental Insurance Cover Dental Implants?
Most of the time, dental insurance companies do not pay for the actual implant posts but are willing to cover
parts of the final restoration or certain preliminary procedures. If you’re not sure what coverage is
available under your plan, reach out to your insurance provider today. Our team will gladly file any
necessary claims so that you can take full advantage of your benefits.
Making Dental Implants Affordable
If you’re not sure that you can pay the entire cost of the implant process all at once, we can help you
apply for financing through CareCredit or LendingClub. You can choose a plan that breaks the cost of care
into smaller monthly payments that won’t break your budget. Feel free to ask us about your financing
options during your initial consultation.
Dental Implant Technology
We’re proud to use the latest dental implant technology in San Antonio to ensure you’re able to
enjoy the longest lasting, best results from your treatment. From our 3D cone beam scanner that allows us to
precisely plan the placement surgery to our antibacterial coated implants that reduce your risk of infection and
implant failure, we want you to enjoy a smile that serves you for a lifetime. Learn more about the advanced
instruments we use in our practice to make sure the one defining word of your journey is “success.”
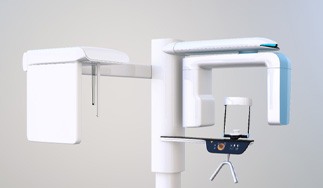
3D Cone Beam Imaging
The placement of your dental implants in San Antonio is a delicate process. To ensure that we place them in
the best possible position within your jawbone, we’ll capture a
3D cone beam scan
of your facial structure during your
initial consultation
.
Unlike traditional X-rays, our CT scanner allows us to view your complete facial structure in intricate
detail, including your jawbone density, nerves, sinuses, and more. This allows us to go into the surgery
with a thought-out, precise plan on where we’ll place your implants so they can receive the best
support. Not only does this technology lead to higher success rates, but it also provides you with
peace-of-mind that you’re receiving the highest quality of care from start to finish.
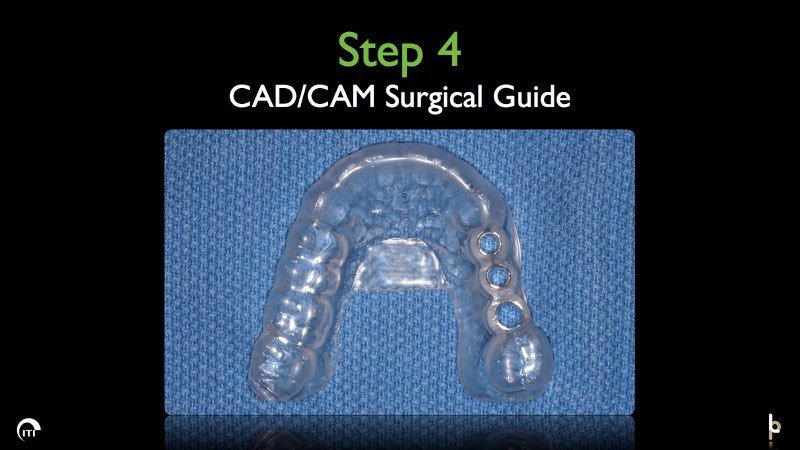
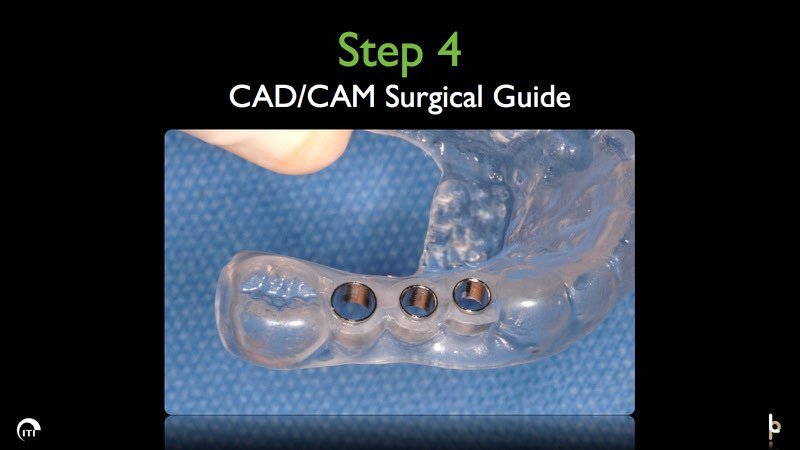
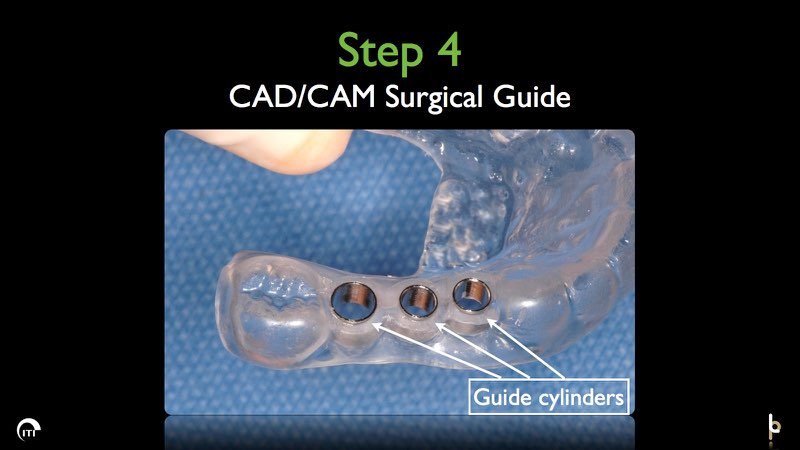
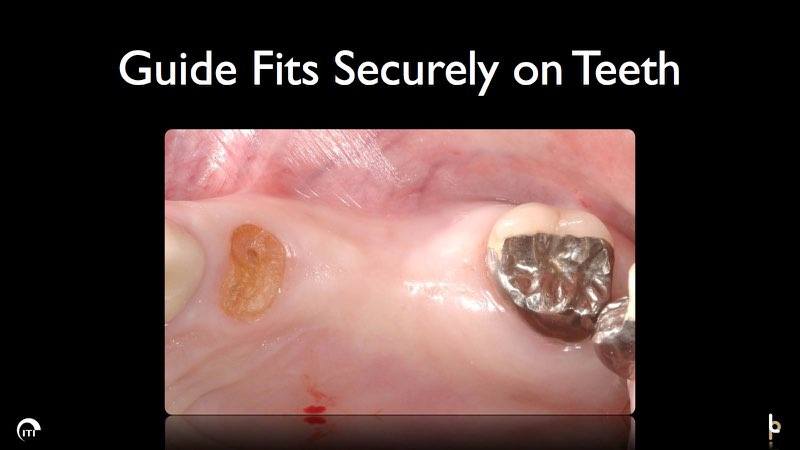
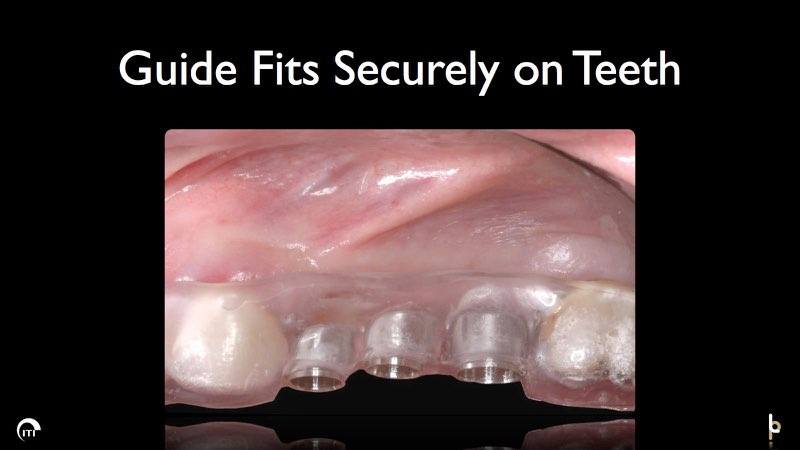
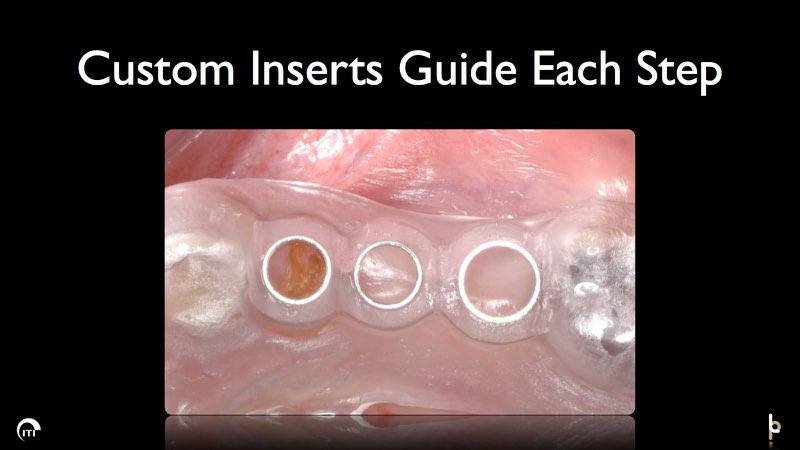
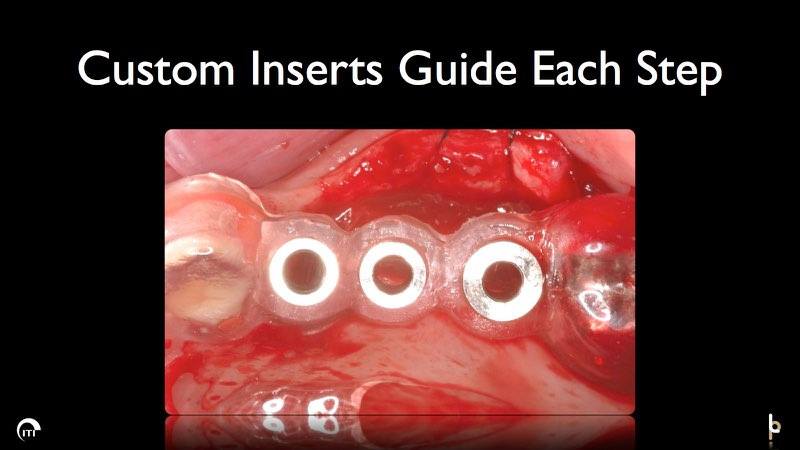
Guided Dental Implant Surgery
Another piece of technology that allows precise placement of your dental implants are our 3D surgical
guides. Based on our oral scans, we’ll create a surgical guide so your periodontist in San Antonio
places the implants at the ideal depth and position in your jaw for a long-lasting smile.
Antibacterial Coating
While dental implant failure isn’t common, it often occurs due to infections that develop as a result
of harmful oral bacteria in the mouth that keep the implants from successfully fusing with the jawbone. To
further minimize your risk of this occurring, we coat all of our implants with an antibacterial film before
placing them in your mouth. Studies show that this helps reduce chances of infection and inflammation,
improving overall treatment outcomes.
Advanced Dental Implant Procedures
After a tooth goes missing, it’s normal for the jawbone in the area to start to deteriorate, gradually
shrinking and changing shape. Over time, this can make the bone extremely brittle and unable to support dental
implants. In the past, a patient in this situation would simply have to get a removable prosthetic if they
wanted to replace their teeth, but at Lorenzana Periodontics, we can actually help someone build up and
strengthen their jawbone so they can get the most reliable tooth replacement available today. If you’ve
been told that you’re NOT a good candidate for dental implants in the past, we can change that, so
give us a call today
to learn more about advanced dental implant procedure in San Antonio, TX.
Bone Grafting
Having a strong, healthy jawbone is a necessity before implant placement as well as certain other
procedures. However, if the jaw has broken down due to bone loss, then it will need to be restored before
moving on with the main treatment. A periodontal specialist such as Dr. Lorenzana can expertly perform a
bone graft in-house while helping you stay comfortable throughout the process.
If the jawbone is weakened or damaged in any way, it can be repaired and strengthened by adding new
material. Said material is usually taken from another part of your body, but it can also be provided by a
donor. Artificial material is also sometimes used. Whatever the case, the goal of a bone graft is to have
the jaw integrate the new material to make up for any tissue that has been lost. After the surgery, it takes
the jaw a few months to heal; implant placement can be performed once the recovery is complete.
Different bone graft procedures might be performed depending on the extent of the damage. Particulate grafts
are used for more minor cases; the material is applied to the jaw in a powdered form. For a more extensive
treatment, block grafts – where an entire block of material is placed – are used instead.
Ridge Preservation
In many cases, a patient needs to have one or more failing teeth removed so they can be replaced with dental
implants. To shorten the time needed between the extraction and implant placement, Dr. Lorenzana can perform
ridge preservation right after a tooth is removed. This simply serves to strengthen and protect the bone
that’s located right around a tooth and helps hold it in place. By keeping this bone strong, it will
not only enable a patient to get their implants relatively quickly, but the bone can also be relied upon to
support the implant and new tooth for many years to come.
Bone Regeneration
In addition to the gums, periodontal disease also breaks down the underlying jawbone that supports the
teeth. This can lead to deformities developing in the bone that make it unable to hold a dental implant
safely. Dr. Lorenzana can correct these kinds of problems using bone regeneration. After removing any weak
or infected bone, he can place a grafting material in the area which will stimulate new tissue growth. After
a few weeks, the bone will be like new, and a patient will be able to receive their new implant with
confidence.
Benefits of Dental Implants
Dentures and dental bridges remain reliable options for replacing teeth, but there are several reasons why so
many
patients are starting to favor dental implants instead. There are several benefits that you can only enjoy from
new
teeth that are supported by stable, reliable dental implants acting as new tooth roots. We can go over these
benefits in more detail during a consultation, but for now, here are a few of the biggest reasons to use
implants to
complete your smile.
Day-to-Day Benefits
You’ll use your dental implants every day to eat, speak and smile. As such, you’ll be able to enjoy the
following benefits regularly:
No Diet Restrictions: Dental implants have chewing power that’s comparable to
real
teeth, so you’ll be able to eat whatever you want.
No Slipping: While dentures might occasionally slip and move, dental implants will keep
your new teeth anchored in place.
Increased Confidence: Dental implants look and feel natural, which can go a long way
towards improving your overall self-image.
Easy Maintenance: Dental implants can be brushed and flossed as if they were natural
teeth,
which makes maintaining good oral hygiene a simple matter.
Health Benefits
Dental implants offer several unique health benefits due to the way they interact with your jawbone. Some of
the
most important advantages include:
Better Nutrition: Being able to eat all of your favorite foods makes it easier to
keep up a healthy, balanced diet.
Prevent Bone Loss: Dental implants stimulate the jawbone whenever you bite or chew.
This encourages blood flow to the area and helps stop the bone loss that normally occurs when
natural teeth are lost.
Improved Jaw Strength: By stopping bone loss, dental implants help you maintain a
stronger jaw that can support your facial features so that they don’t collapse prematurely.
Better Oral Health: Since dental implant maintenance is relatively simple, they can
make it easier for you to avoid gum disease, cavities, and other common oral health issues.
Long-Term Benefits
While dental implants have a notable impact on your everyday life as well as your oral health as a whole,
they
also have many long-term benefits that you wouldn’t see with more traditional tooth replacement options:
High Success Rate: Dental implants have an extremely high success rate of roughly 95%.
They
remain reliable even after 10 or even 20 years of use.
Long Lifespan: When they receive the right kind of care, dental implants can
potentially
last the rest of your life.
Cost-Effective: Patients who are looking to save money on new teeth will be happy to
know that dental implants don’t need to be replaced as often as dentures and bridges. This makes them
the
more cost-effective option even if they have a higher initial price.
Dental Implants Post-Op Instructions
As with any type of oral surgery, dental implant placement is followed by an important recovery period, and our
team here at Lorenzana Periodontics is happy to assist you with every step of this process! Directly after your
surgery, we’ll provide you with a detailed set of post-op instructions to help ensure a speedy and
stress-free recovery. Below we’ve listed out some general guidelines that can give you an idea of what to
expect while you recuperate. Of course, don’t hesitate to
contact us
with any questions or if you experience any complications.
What To Do Directly After Dental Implant Surgery
The actual implant surgery is one of the most taxing parts of this entire process, but with the right care
and proper maintenance, you should be able to make a swift and comfortable recovery. One of the most
important things you can do during the initial recovery period is protect the blood clots that form over
your surgical sites, so that your gums can properly heal around the implant(s). To help with this, be sure
to avoid:
Spitting (use tissues instead, or simply swallow your saliva)
Drinking through straws
Smoking or using tobacco products
Touching the surgical site with your tongue or fingers
Common Side Effects When Recovering from Dental Implant Placement
If you’ve never undergone oral surgery, it might be difficult to determine what symptoms are normal
and which ones you should be concerned about. It’s not uncommon for patients to experience things like
gradual and intermittent bleeding, swelling, and general discomfort; however, these symptoms should all
disappear on their own over time. If you’re experiencing lasting or worsening symptoms, don’t
hesitate to contact us for help! In the meantime, here are some ways you can manage your side effects:
If bleeding occurs, you can apply gentle pressure to the area with a clean piece of gauze.
To reduce swelling, use a cold compress on the affected side of your cheek.
Take your prescribed or over-the-counter pain medications to assist with pain.
Your Diet After Dental Implant Surgery
You’ll need to stick to a soft diet immediately following your surgery, but within a few days
you’ll be able to slowly reintegrate solid foods as long as you avoid chewing directly on the implant
surgery site. Here are some foods that we suggest stocking up on for those first few days following surgery:
Soups and broths (as long as they aren’t too hot)
Mashed potatoes
Scrambled eggs
Yogurt
Pudding
Pasta
Ice cream
Smoothies and protein shakes
Post-Op Health & Oral Hygiene
It’s incredibly important to keep your mouth clean after your surgery to make sure that your dental
implants are able to successfully integrate with your jawbone. Consider the following:
You can brush your teeth as you normally would the day after your surgery, but you should show extra
caution and care while brushing near the surgery site.
Rinse your mouth with salt water two to three times every day, ideally after eating. A prescription
mouthwash will also suffice.
Avoid any mouthwashes that contain alcohol.
What To Do After Your New Teeth Are Attached
Once your implants have bonded with your jawbone and your mouth has healed up, the hard part is
over—and all that remains is simply attaching the prosthetic! You may experience some mild sensitivity
in your gum tissue, but with pain medication you should be able to manage it. You should also contact us
immediately if you notice any swelling or bleeding following this step; these aren’t typically
side-effects that you should experience after the restoration has been attached, so it might indicate a
problem.
Dental Implant Failure & Salvage
Dental implants are consistently successful. In fact, they thrive in more than 95% of cases! Of course, that
does still leave the slightest chance that something can go wrong with them. Due to an infection or other sad
circumstances, some patients even face dental implant failure. If you ever believe that is happening to you, get
in touch with us right away. We will evaluate the situation, determine what is causing the problem, and
recommend your next steps. We want to get your oral health back on track as soon as possible!
Even though dental implants might already sound like the perfect solution for you, we’re sure you still have plenty of questions! We love educating patients about their treatment options so they can feel confident about every care decision they make. If you want to learn more about dental implants, follow the link below to find our responses to some of the most popular questions we receive every day.
Will I Need a Bone Graft to Get Dental Implants?
The reason bone grafting is usually performed before implant placement is that tooth loss can directly lead
to jaw deterioration. Once the tooth is gone, the bone that supported is considered unnecessary, so
it’s resorbed by the body in order to use the materials elsewhere. As a result, the volume of the
jawbone will dramatically decrease to the point where it might not be able to support or join with a dental
implant post. Thus, we may have to perform a graft in order for implant placement to be viable at all.
Even if bone loss hasn’t occurred yet, Dr. Lorenzana might still perform a bone graft in order to
preserve the jaw so that it’s ready for implants in the future. This is called socket preservation,
and it’s normally done immediately after tooth extraction.
Are Dental Implants Better Than Traditional Bridges & Dentures?
When it comes to aesthetics, durability, and longevity, dental implants leave every other kind of tooth
replacement far behind. The materials used to make them are extremely high-quality and strong, and because
they replace the whole tooth and sit within the jawbone, they are able to last multiple times longer than
your typical bridge or denture as well. Basically, with implants, it doesn’t feel like you’ve
replaced your teeth, but that you’ve gotten your natural teeth
back.
How Long Does It Take to Get Dental Implants?
The timeline for implant treatment can vary quite a bit from patient to patient depending on their
particular needs. For example, a patient replacing just one tooth who has healthy, abundant bone may be able
to complete the process in as little as 6 to 8 weeks. But, for someone who needs all of their teeth replaced
and/or bone grafting and periodontal therapy, it may take 12 weeks to a year. Dr. Lorenzana can go over what
your specific timeline will look like during a one-on-one consultation so you’ll know exactly what to
expect.
Does Getting Dental Implants Hurt?
Not with Dr. Lorenzana! Thanks to his decades of experience as an implant specialist and use of the latest
techniques, our patients report feeling a little pressure during the implant placement procedure, but
nothing that resembles pain. Like with any type of oral surgery, a little bit of swelling and tenderness is
common afterward, but these symptoms are usually minor and can be managed with an OTC medication.
How Much Do Dental Implants Cost?
The cost of getting dental implants will be different for each patient depending on their situation. In
general, the more implants a patient needs/wants, the more expensive the procedure. Thankfully, implants are
widely considered one of the best investments in all of dentistry, as they have been shown to last for 30+
years on average (regular bridges/dentures typically have a lifespan of seven to ten years).
Why Should I Visit A Periodontist to Get Dental Implants?
A periodontist is a type of dental specialist who has completed at least 3 years of additional training
after completing dental school. A big part of this training is focused on dental implant surgery and bone
grafting techniques. Compared to a regular dentist, a periodontist will have much more experience and skill
when it comes to placing dental implants, leading to a more comfortable procedure as well as a much higher
rate of success. When placed by a board-certified periodontist like Dr. Lorenzana, implants have an
impressive 98% success rate.
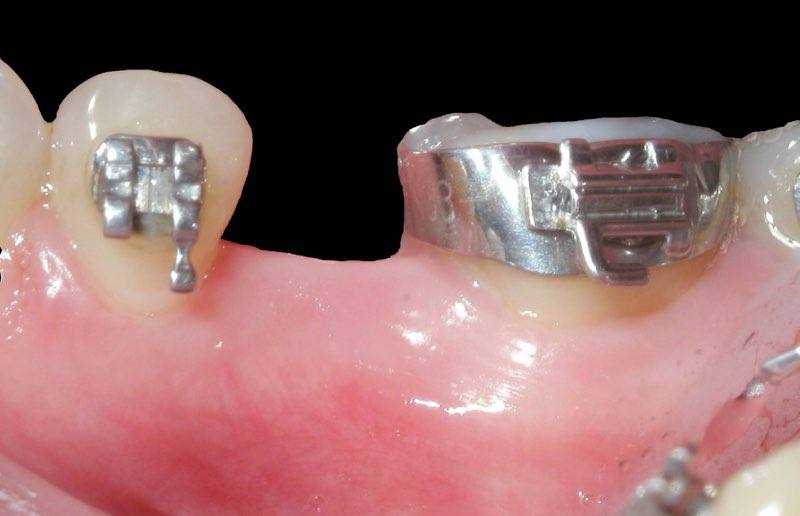
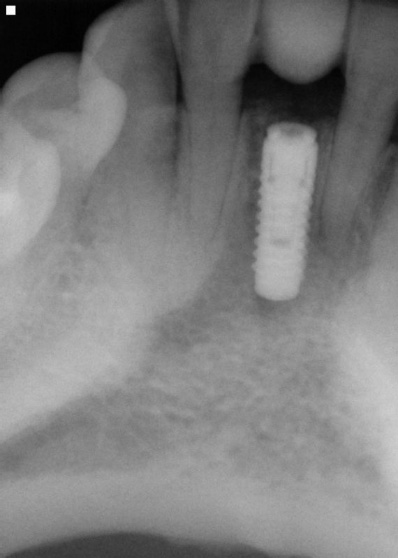
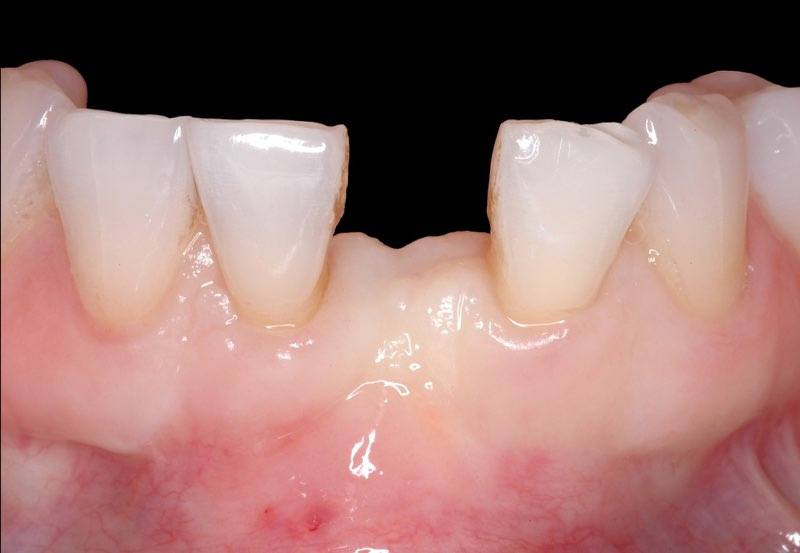
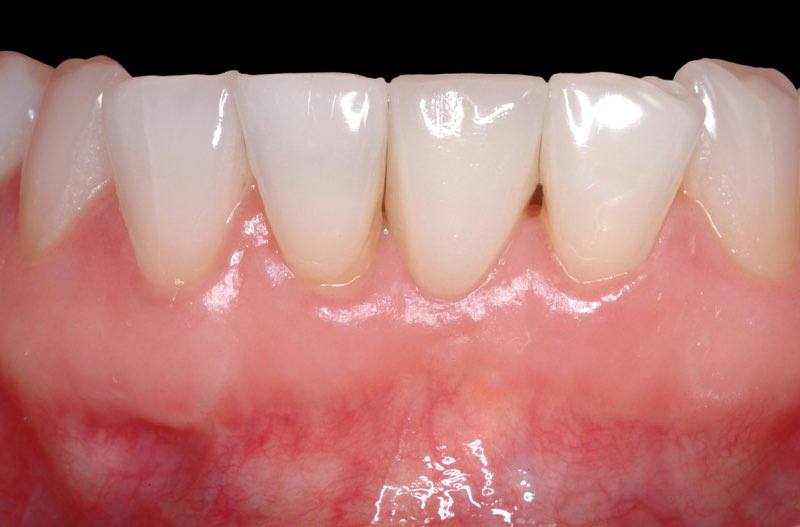
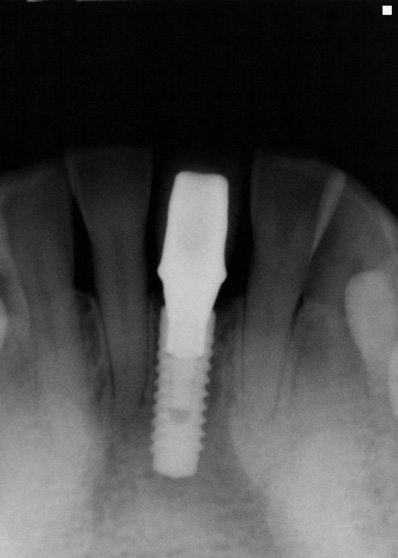
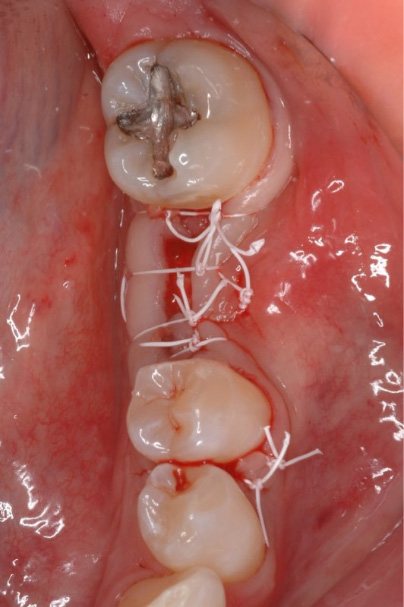
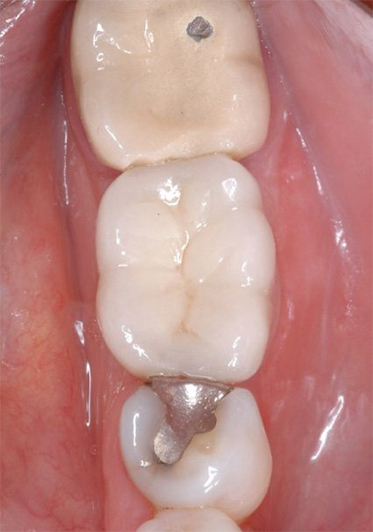
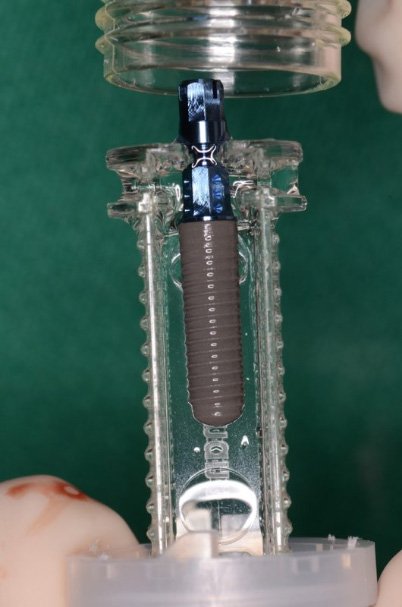
Our patient was born missing her lower left second premolar (#20). She did not want to damage her natural adjacent teeth in order to make a bridge so a dental implant was her first choice. Orthodontics (braces) were used to obtain the optimal space and, following appropriate radiographs and treatment planning, a single dental implant was placed.
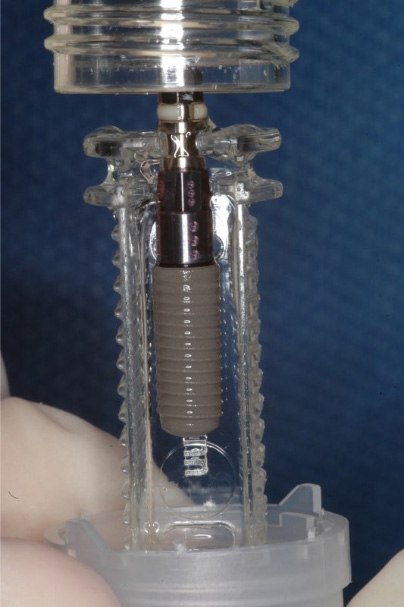
Illustrations courtesy Straumann AG
Restorative work by: Dr. Jason Gillespie (San Antonio, TX)
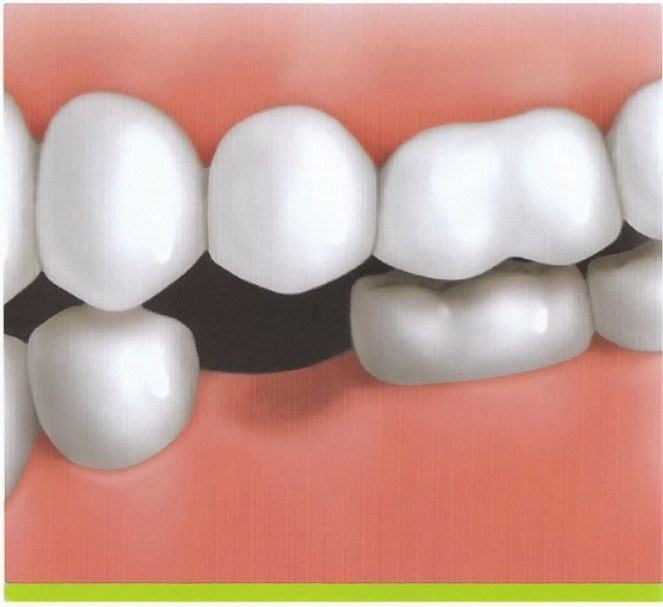
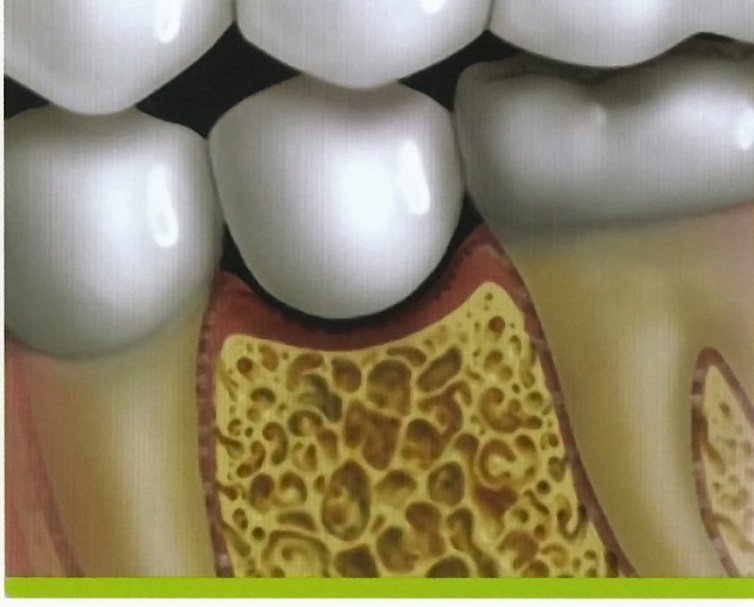
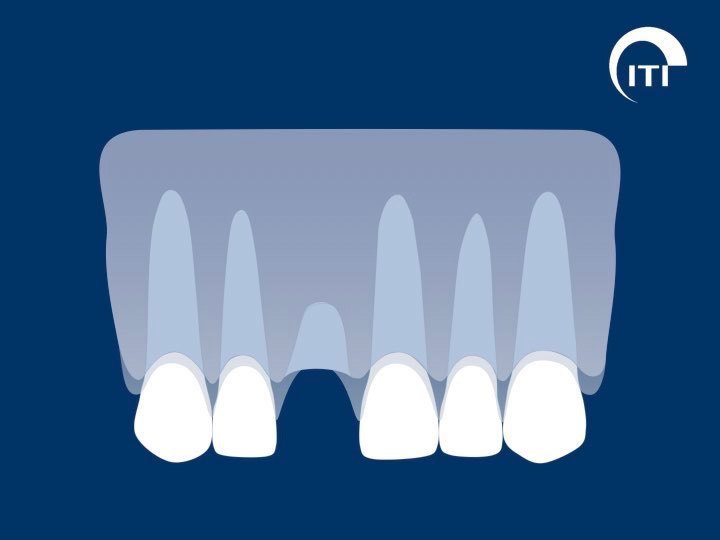
Initial Presentation - Born missing tooth #20
Options: Bridge vs. implant
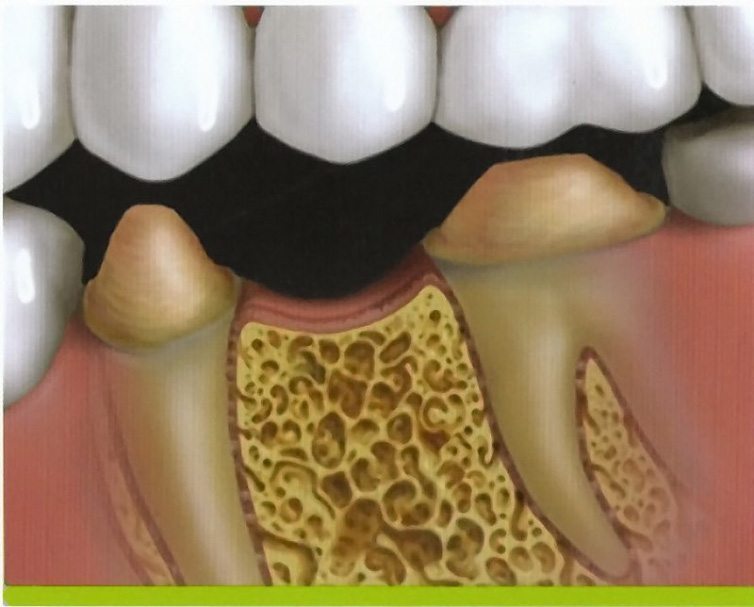
For a “bridge” the teeth must be “cut down.”
Then a three-piece bridge is cemented in place.
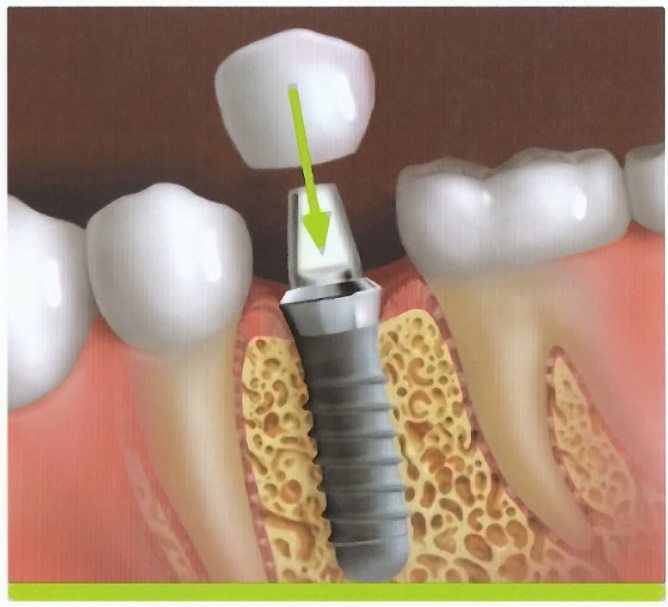
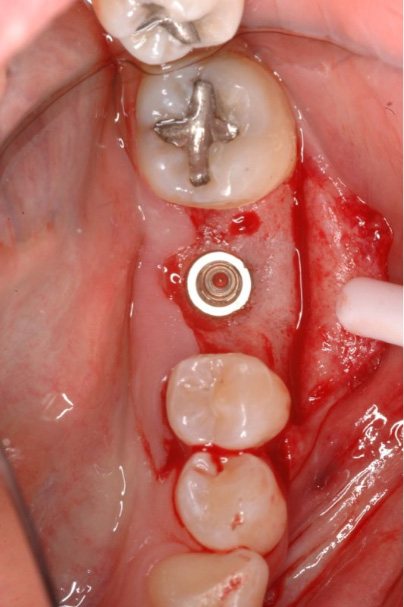
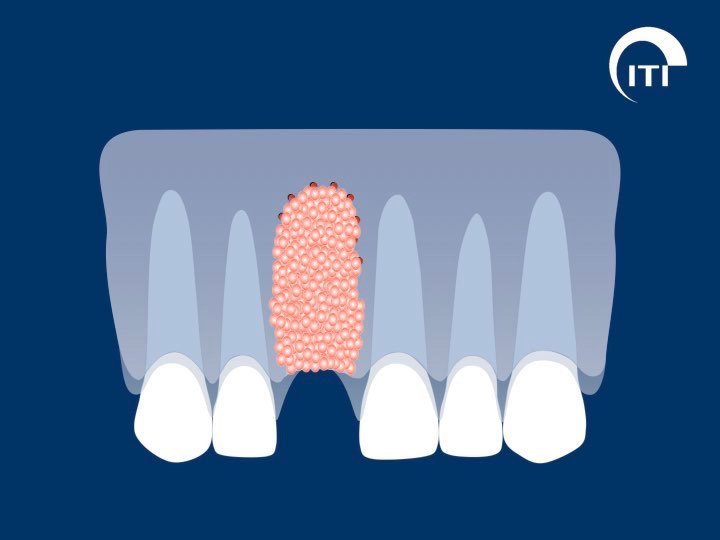
A dental implant is a new titanium “root.”
The teeth are not touched.
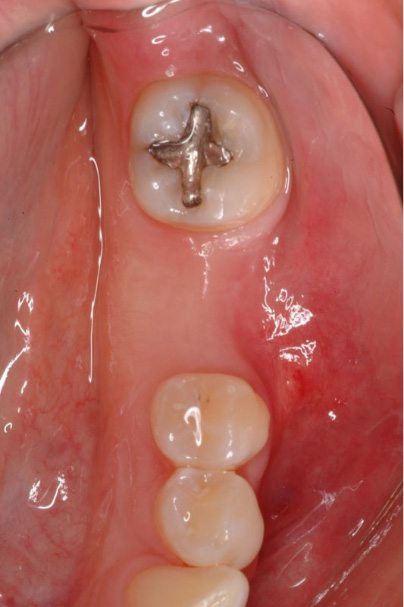
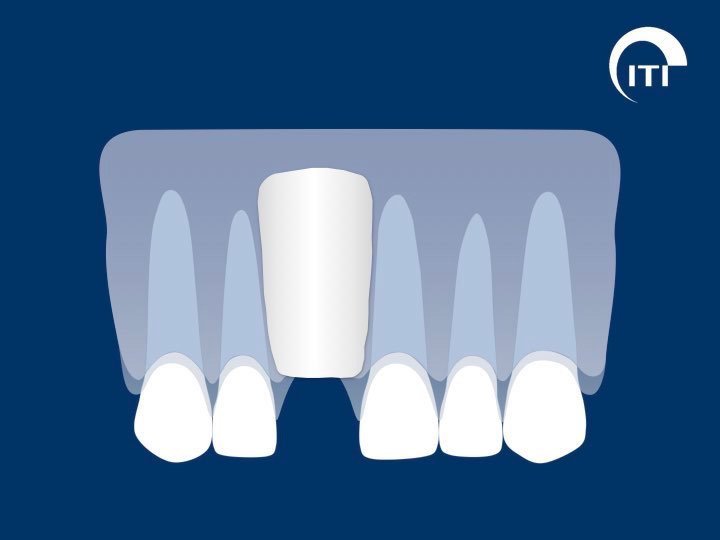
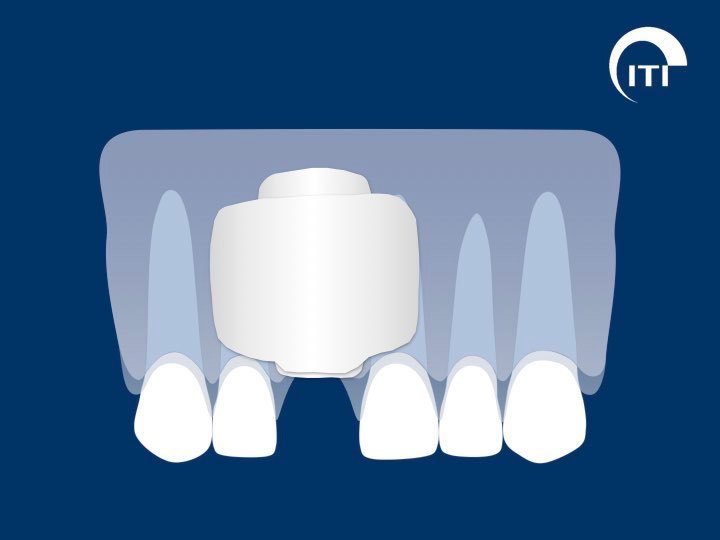
When healed, the dentist makes a crown on the implant.
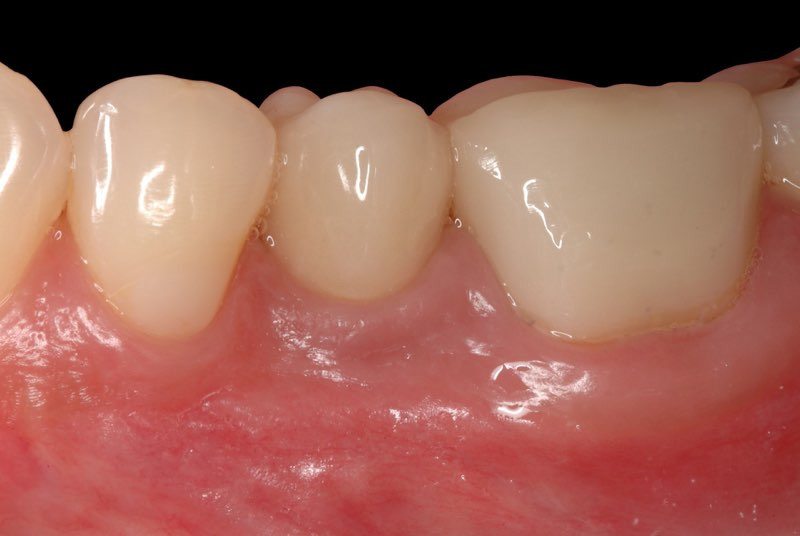
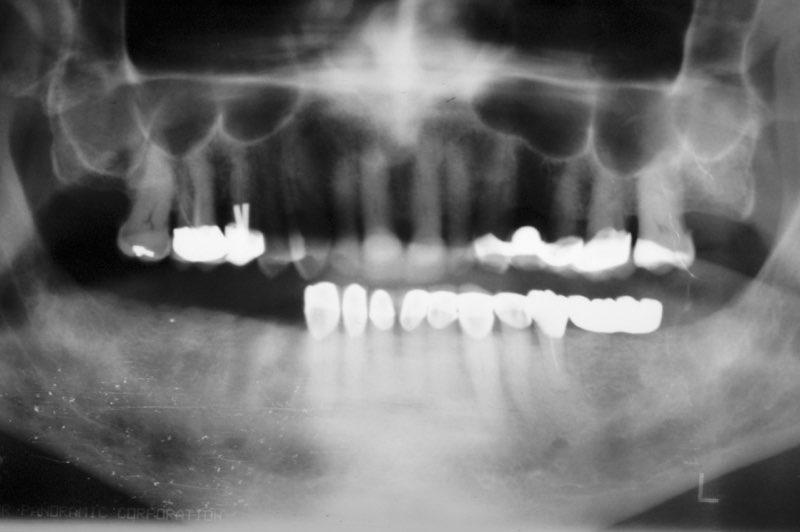
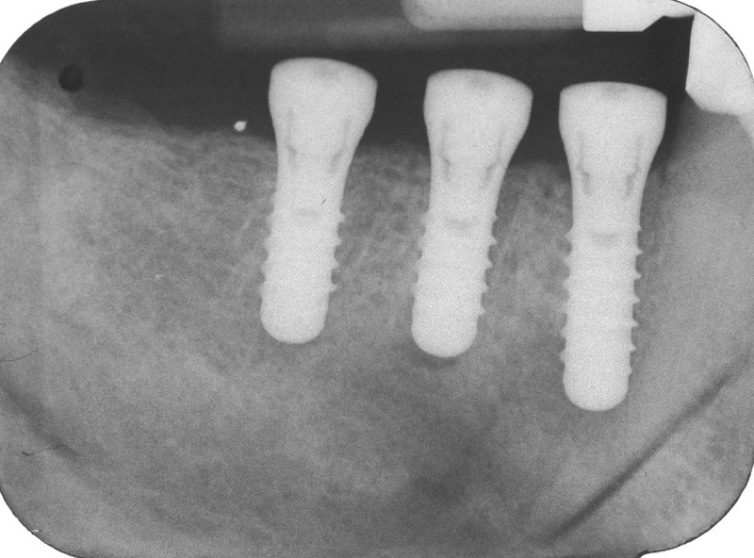
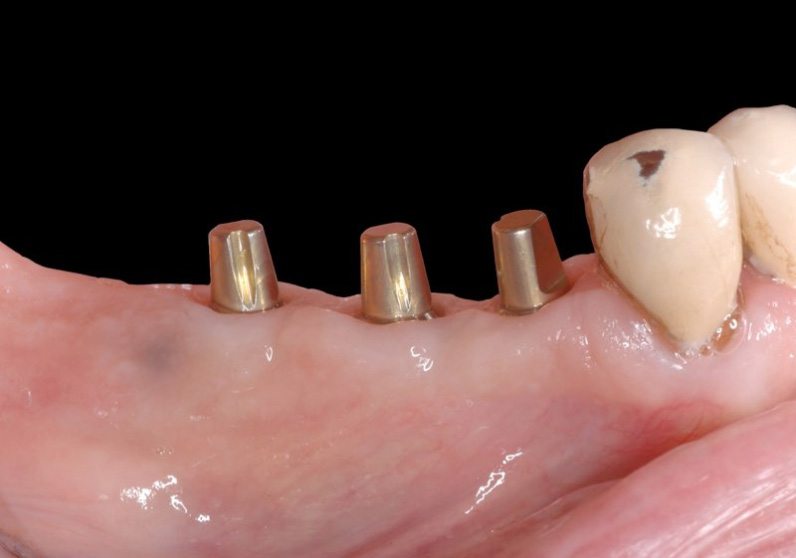
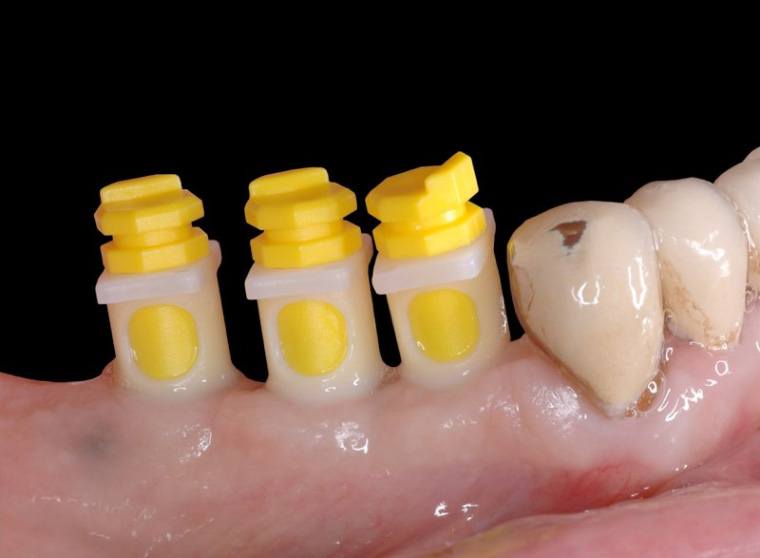
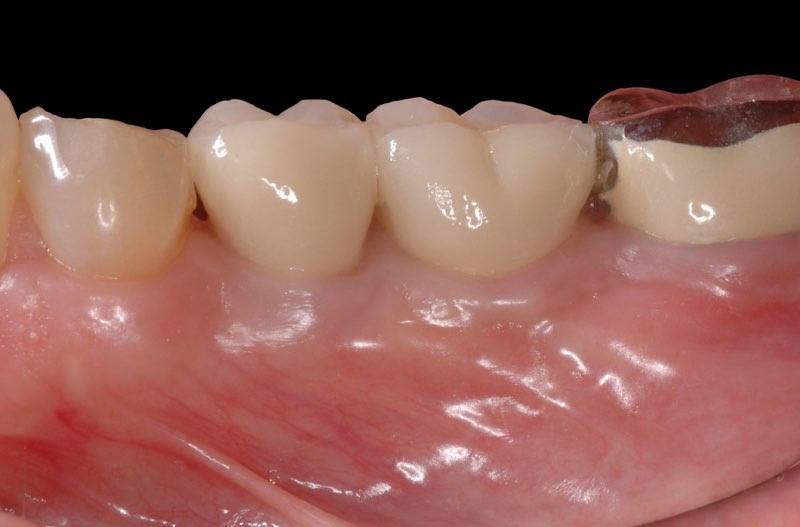
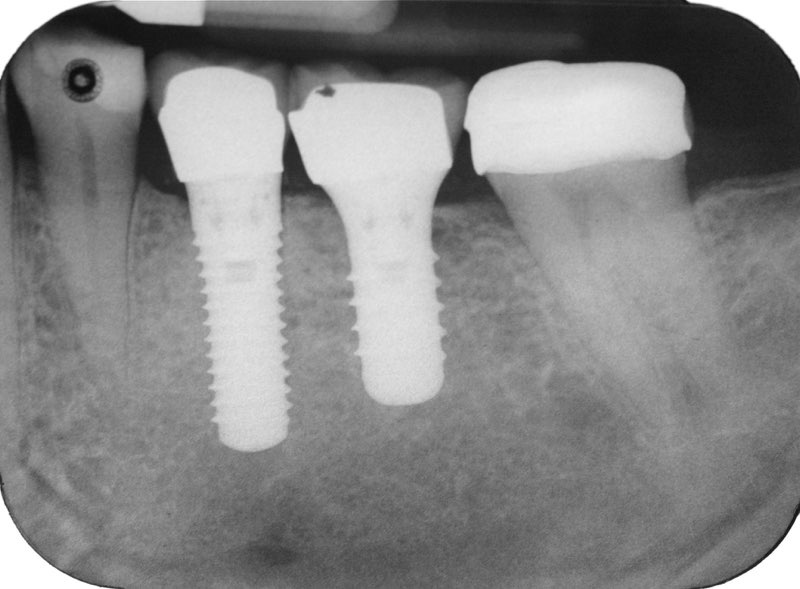
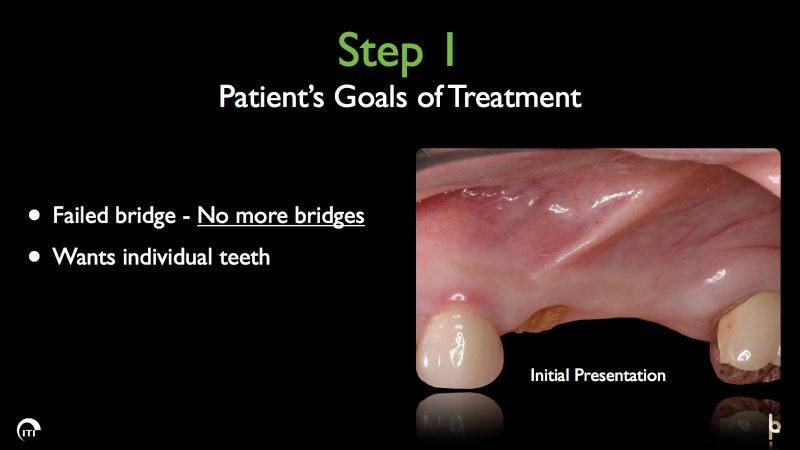
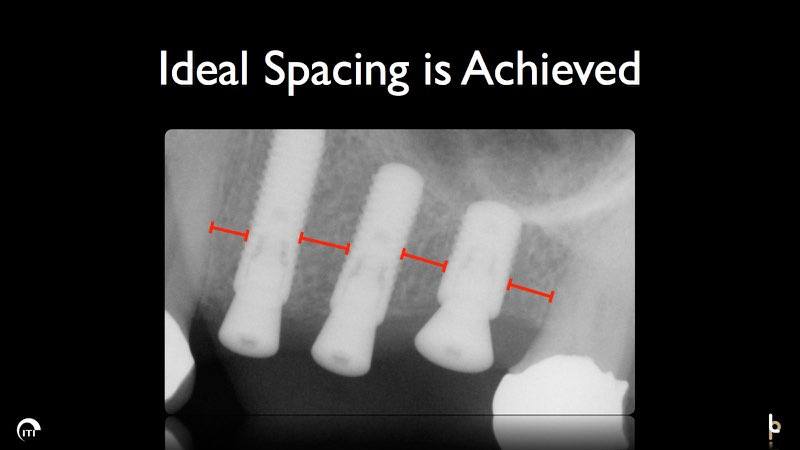
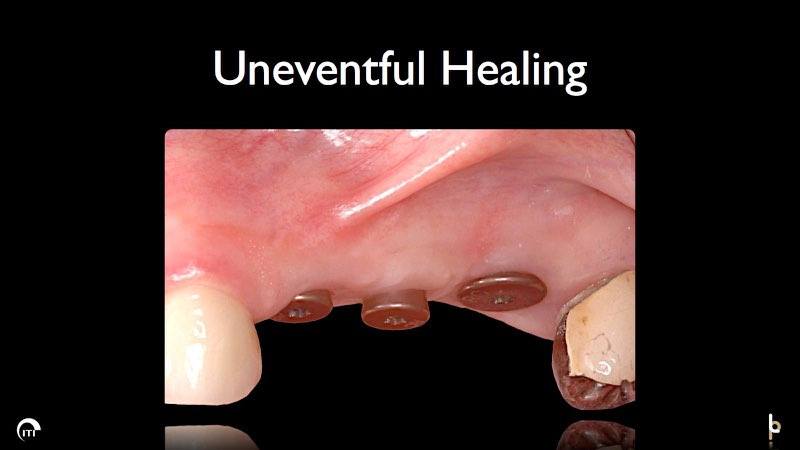
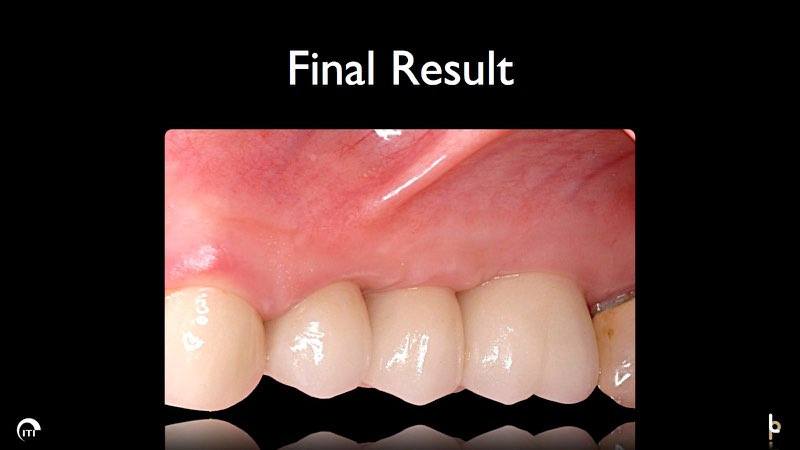
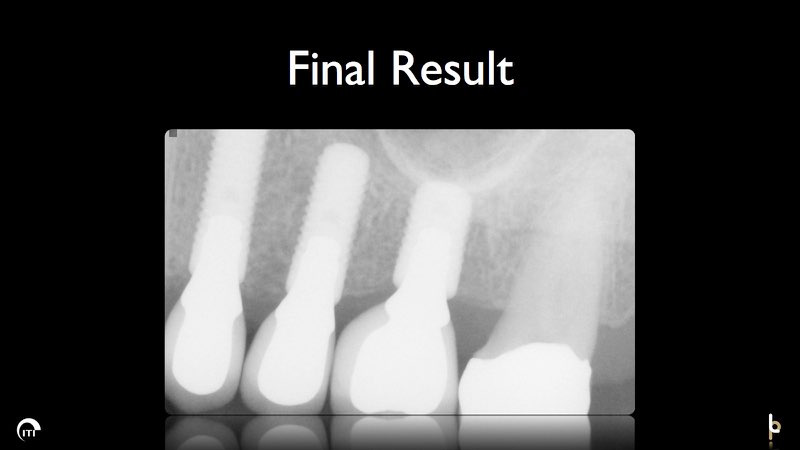
When this patient found himself missing three teeth in his lower left jaw after his bridge had failed, he had one simple request: He had not had teeth he could floss normally for over fifty years due to the bridges he’d been wearing so could we please give him something close to what he had way back when.
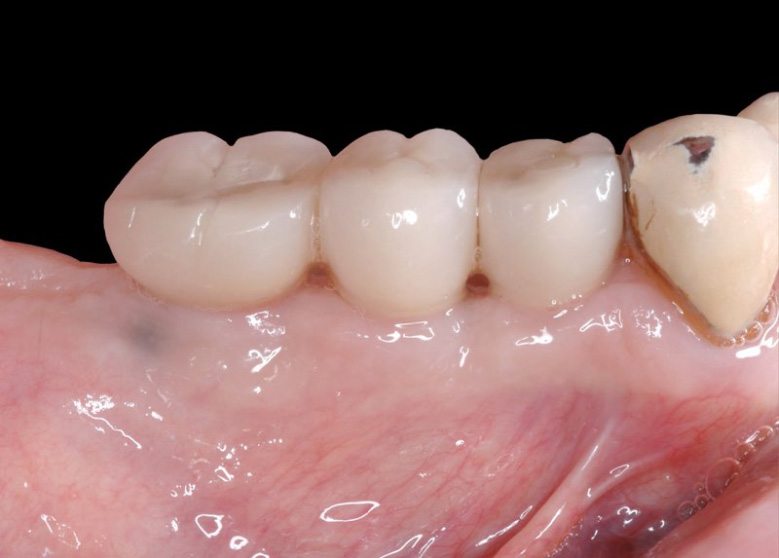
That’s just what we did. Three dental implants so that he could have three single teeth, just like when he was a young man.
Restorative work by: Dr. Michael Miller (San Antonio, TX)
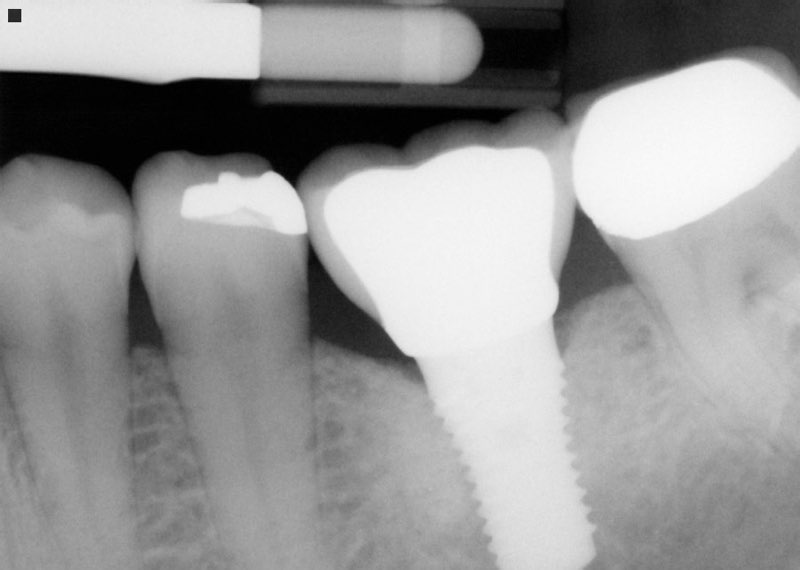
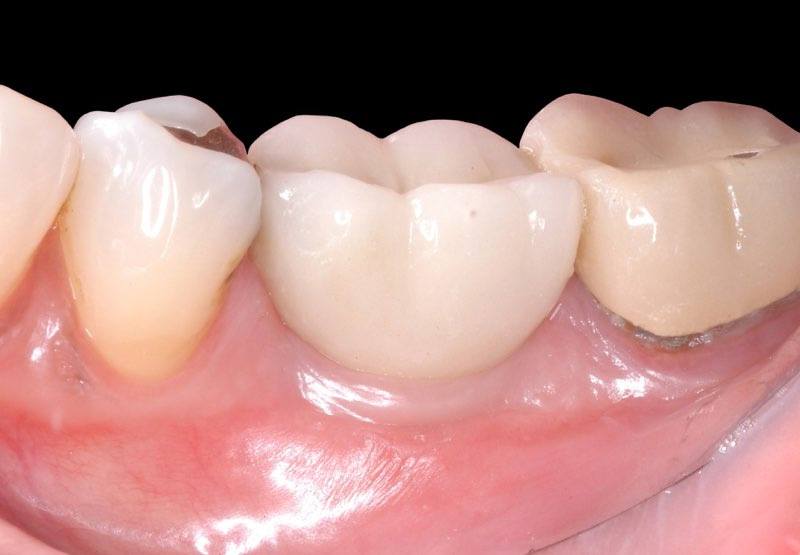
Theresa presented to our practice upon referral from her General Dentist, Dr. Diane McKeever, after failure of her previous three-unit bridge. Her options were:
(A) A new bridge, but making it a four or five unit span. This would require changing one crown and cutting down one or two virgin teeth.
(B) A partial denture that is removable and comes in and out of her mouth.
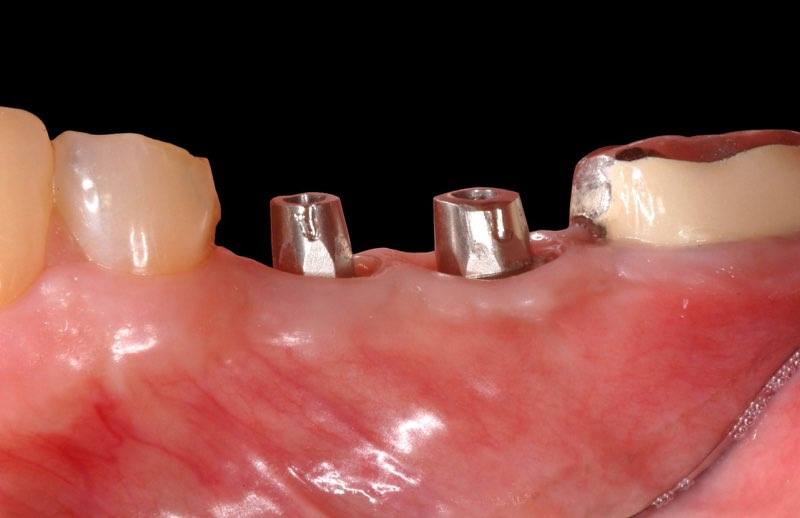
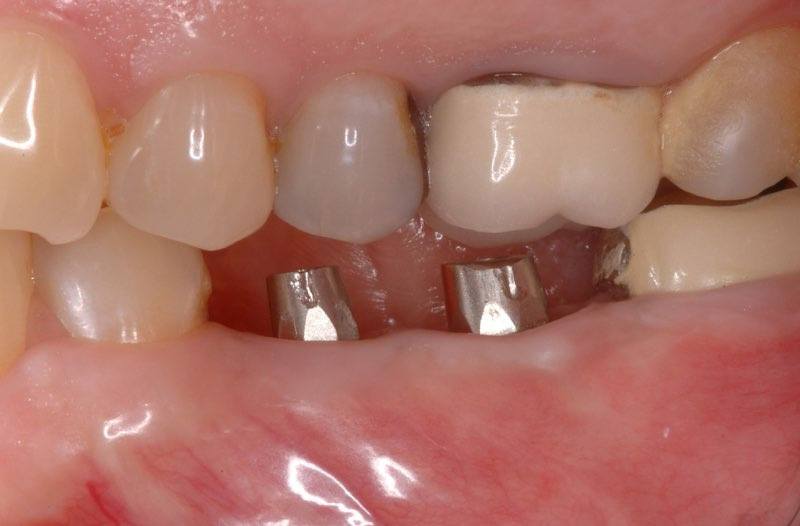
(C) Two implants replacing the two missing teeth, making each tooth self-supporting.
Theresa decided that two implants were a more cost-effective way to replace her two missing teeth because:
(A) She could save money by leaving one crown alone;
(B) She could keep her two unrestored virgin teeth from being cut down in any way;
(C) She would once again be able to floss each tooth individually;
(D) She would save money in the long term because long-span bridges are known to not last as long as implant-supported crowns and bridges. In fact, after 7 years, implants are cheaper to maintain than conventional bridgework.
It is true that implants are not for everyone but talk to your dentist about your options or call our office for a consultation.
Restorative work by: Dr. Diane McKeever (San Antonio, TX)
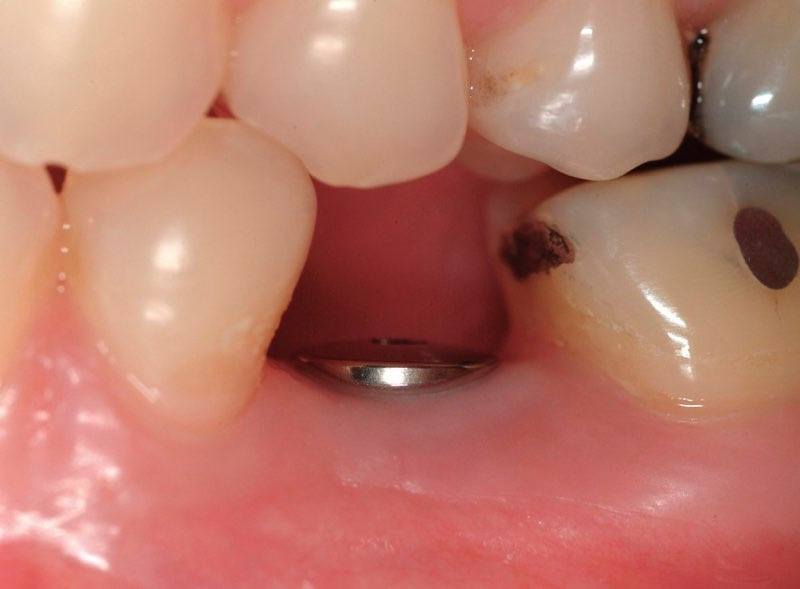
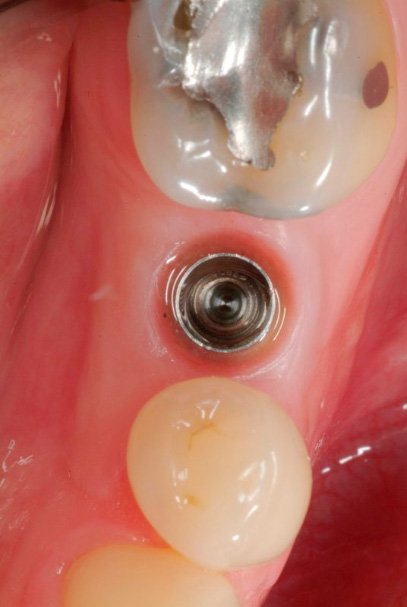
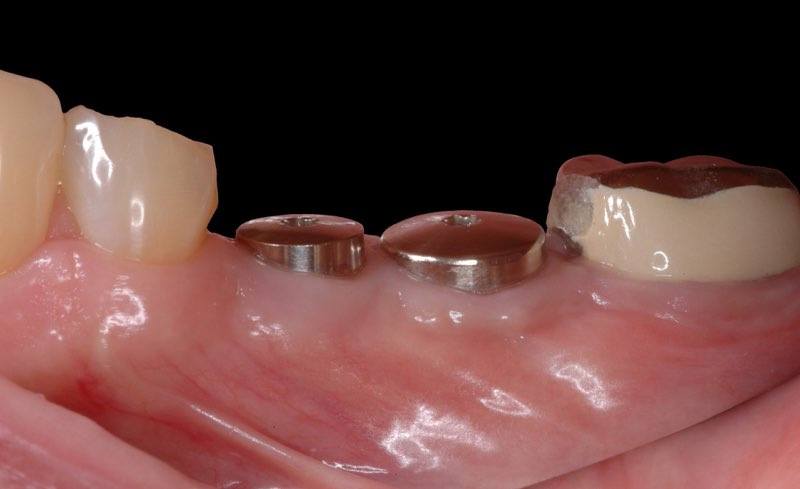
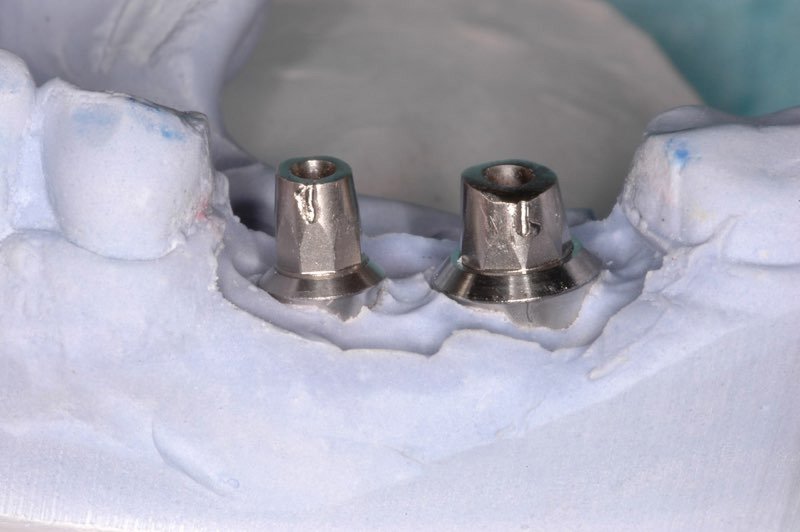
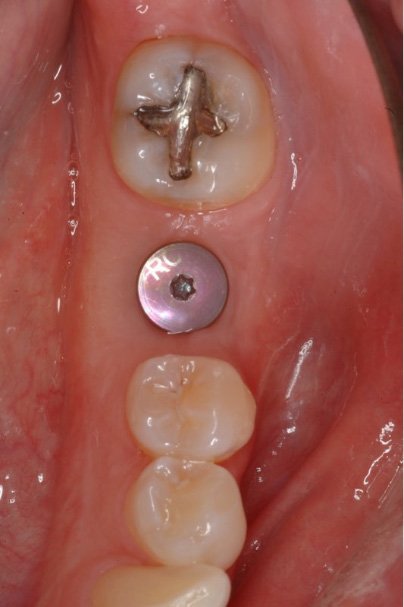
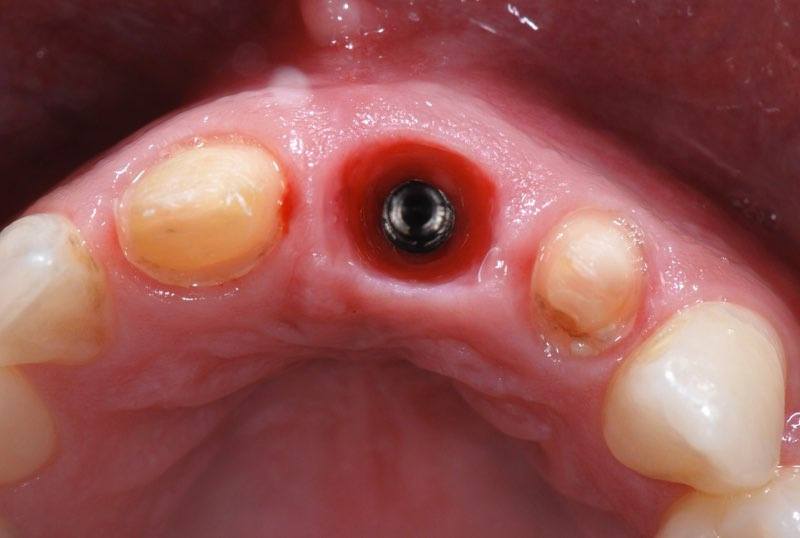
Healed implants in place
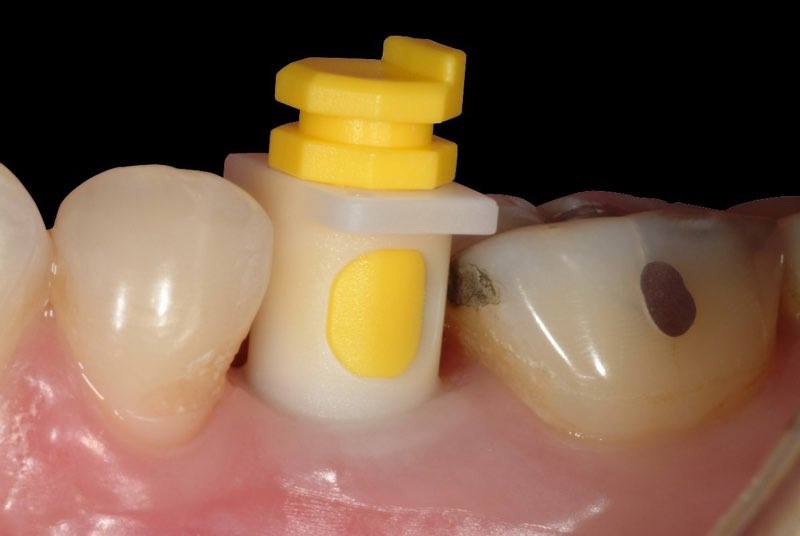
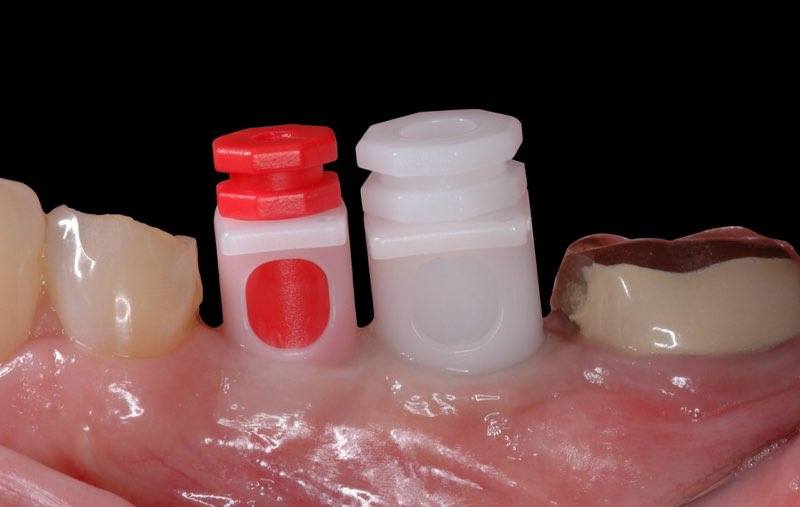
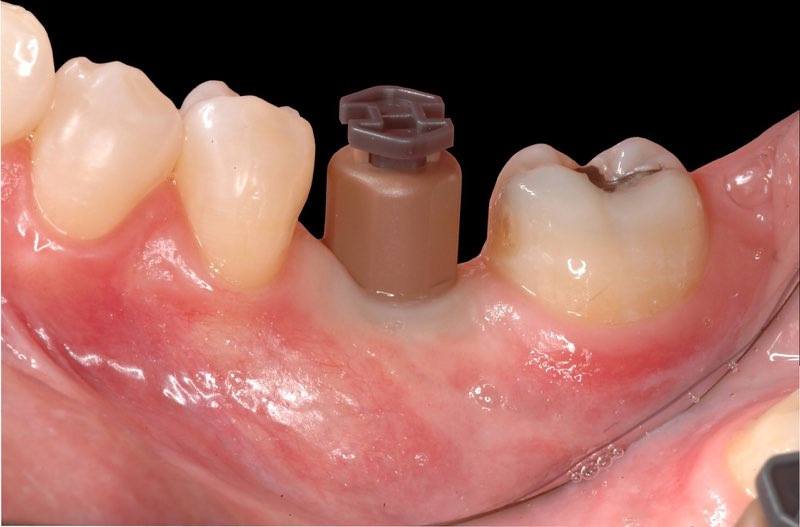
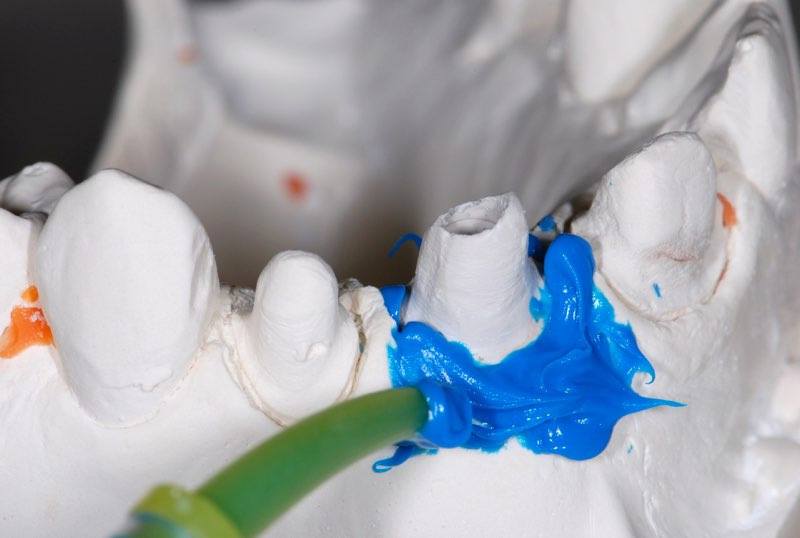
Impression components
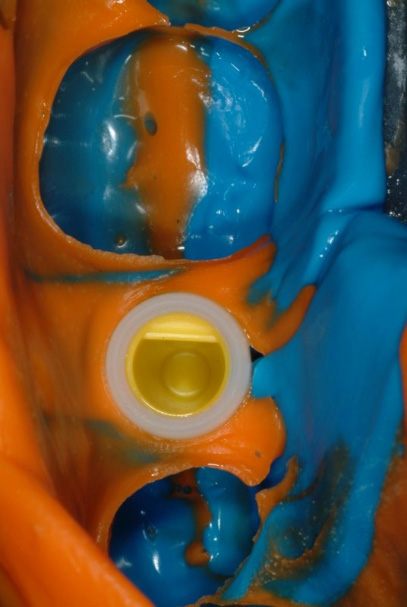
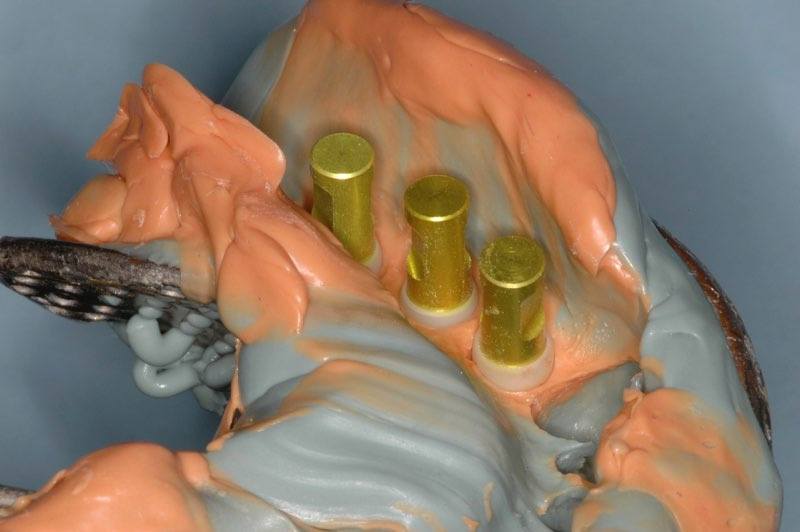
Impression taken
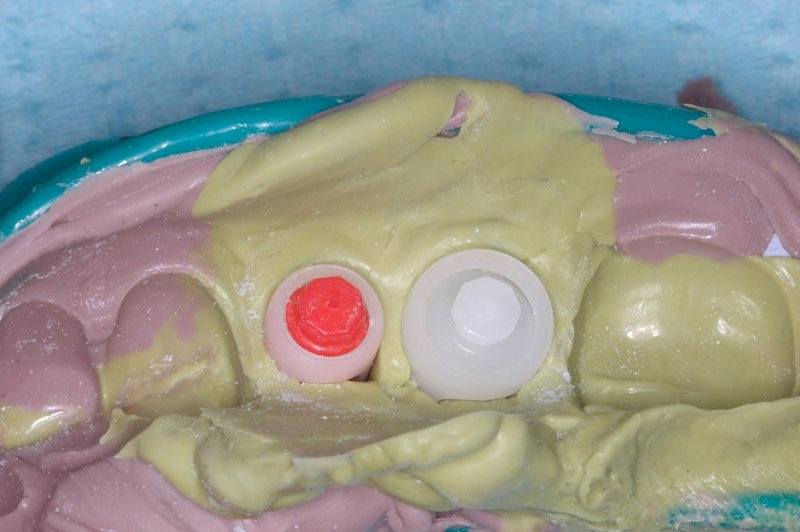
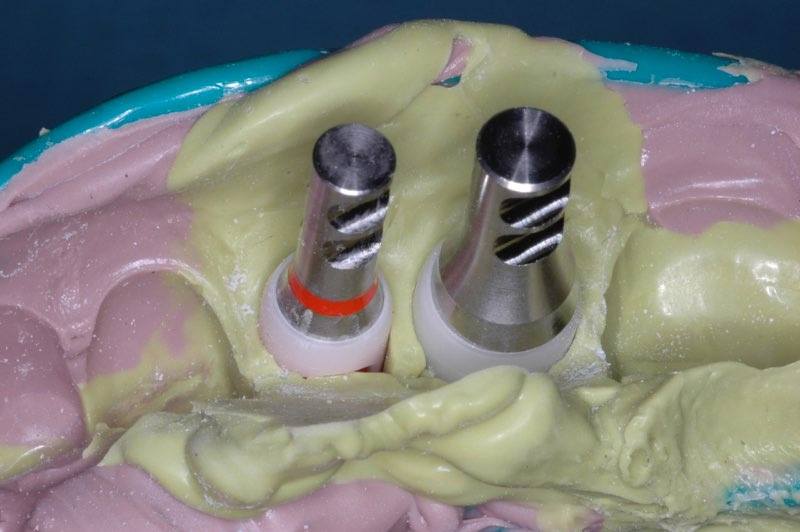
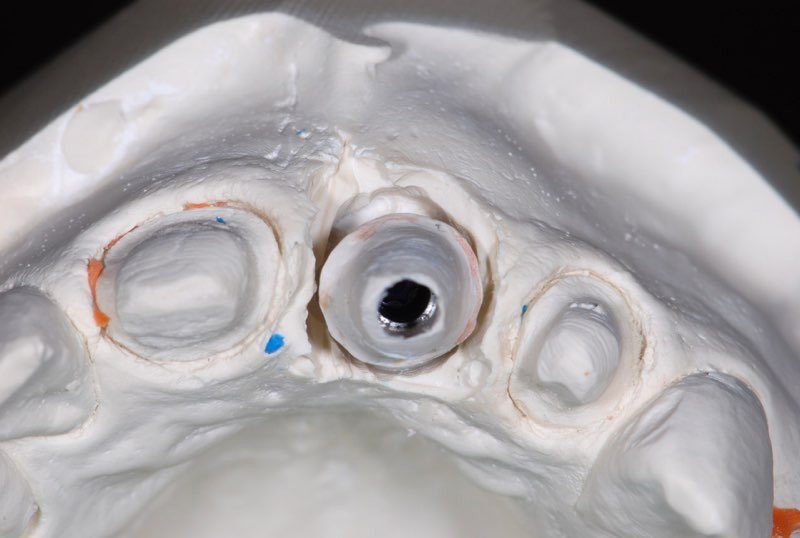
Implant analogs in place in impression
Master cast with implant analogs
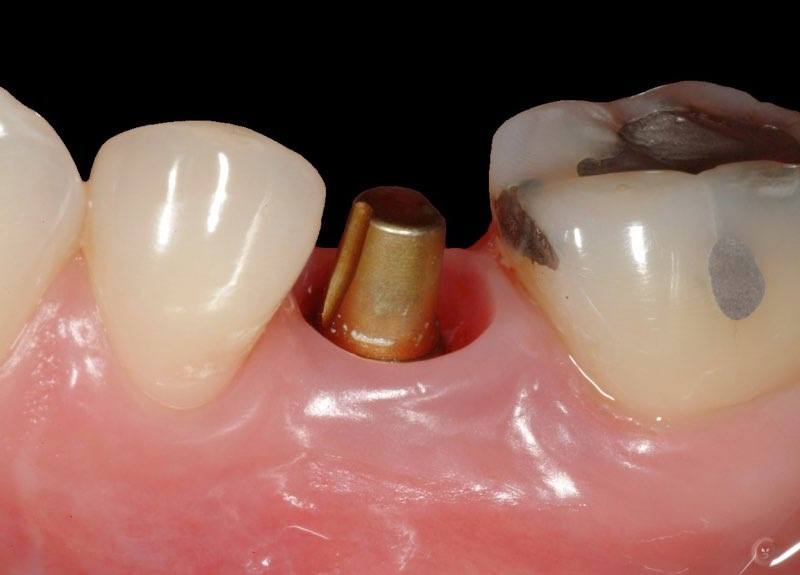
Customized abutments on master cast
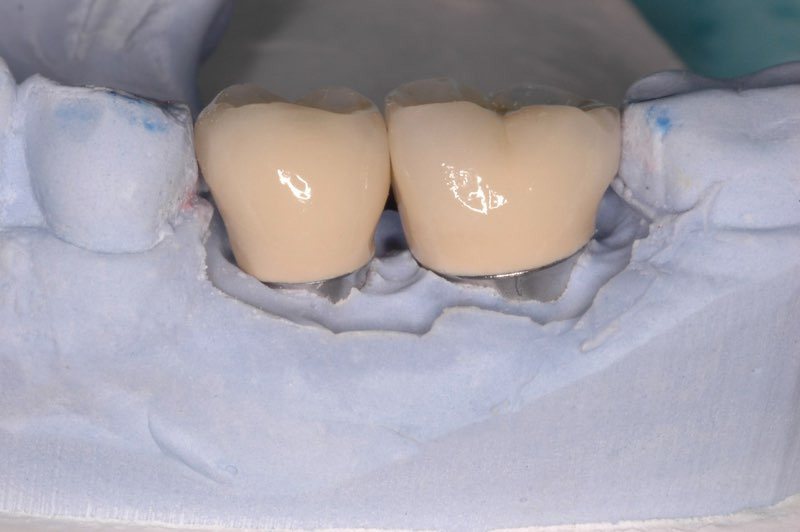
Final crowns on master cast
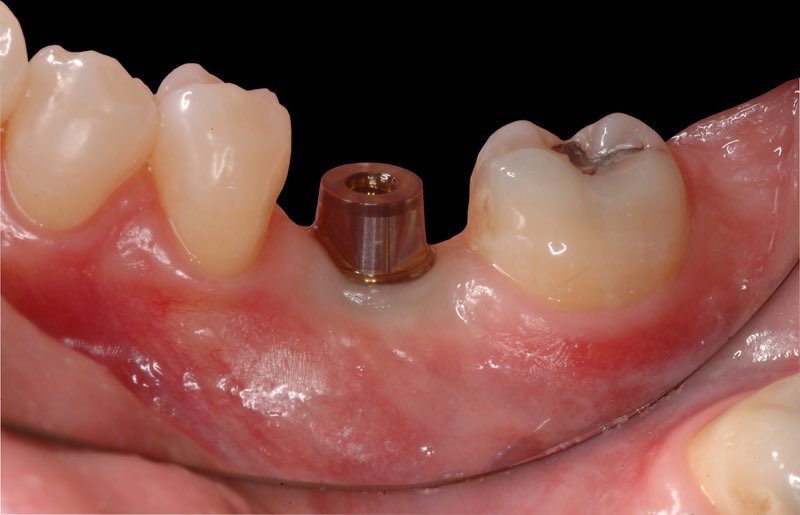
Abutments in place
Photo showing limited inter-arch space
Final crowns in position
Crowns in occlusion
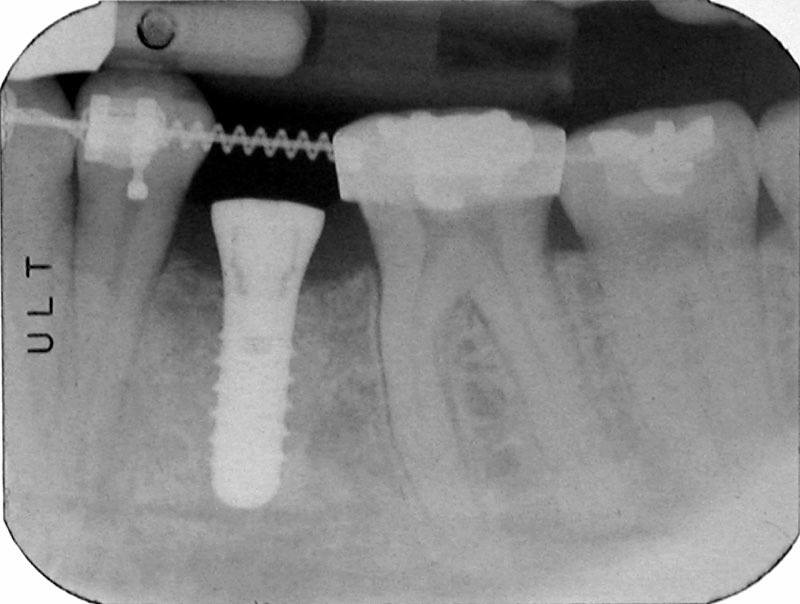
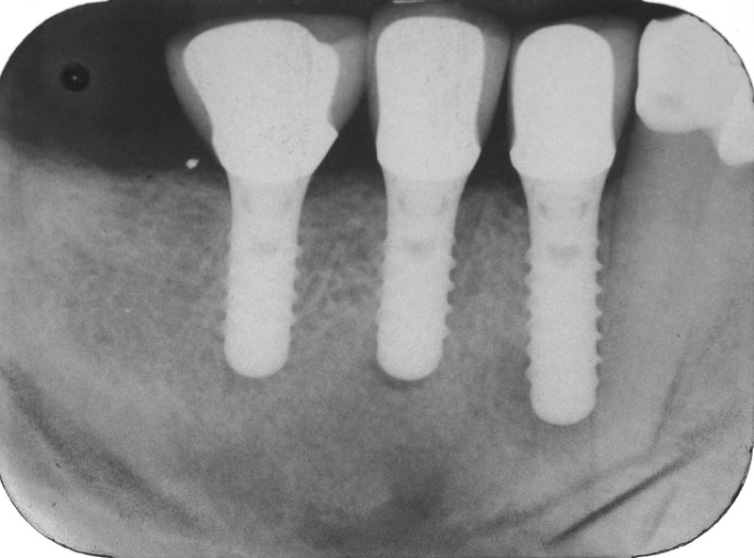
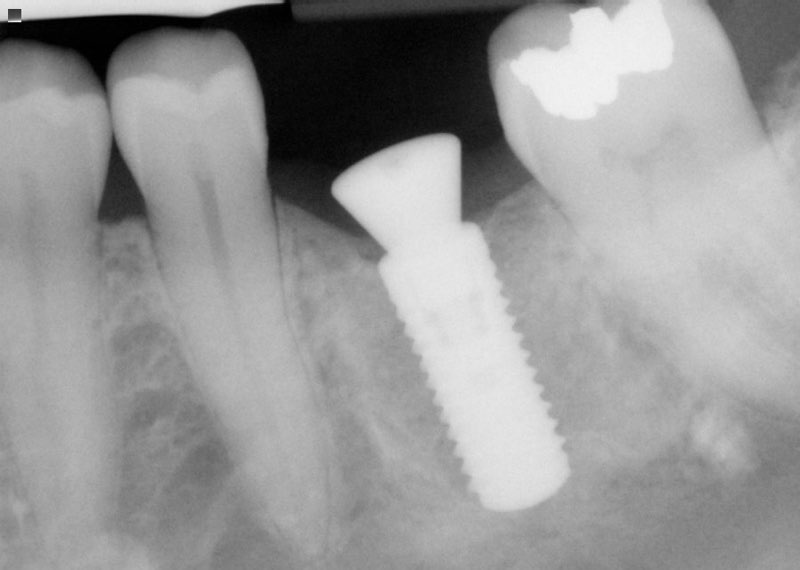
2-year radiograph
Advanced Solutions
Implants placed at time of extraction in non-esthetic situations
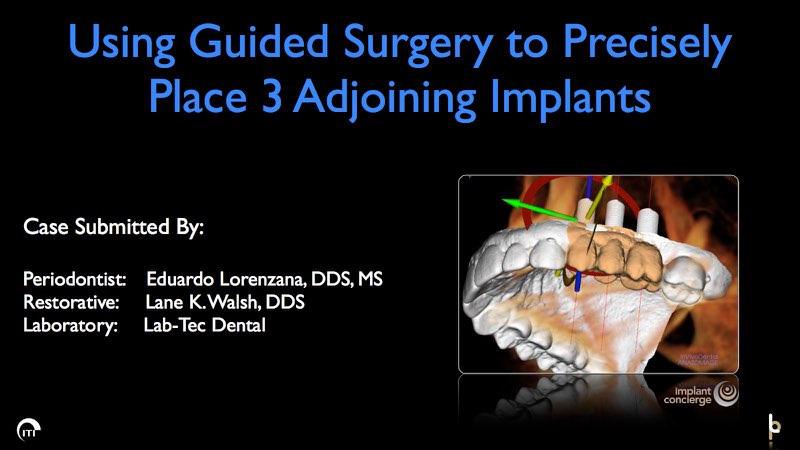
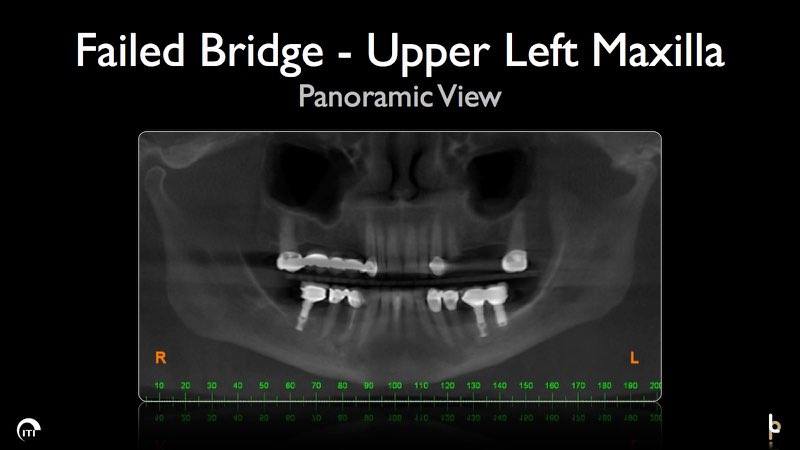
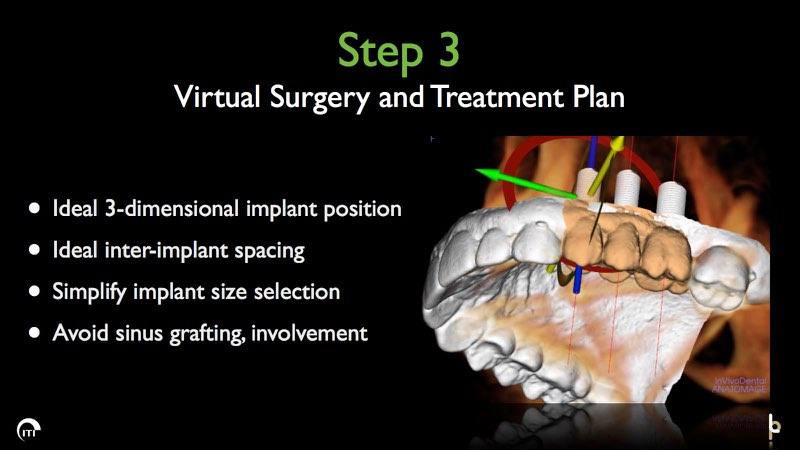
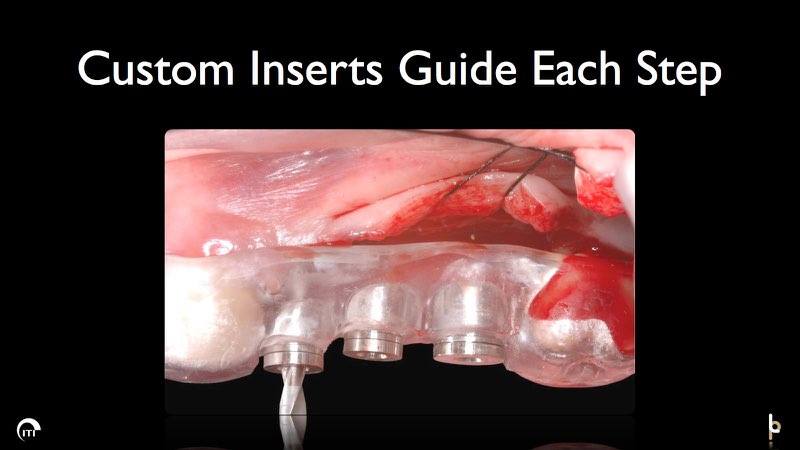
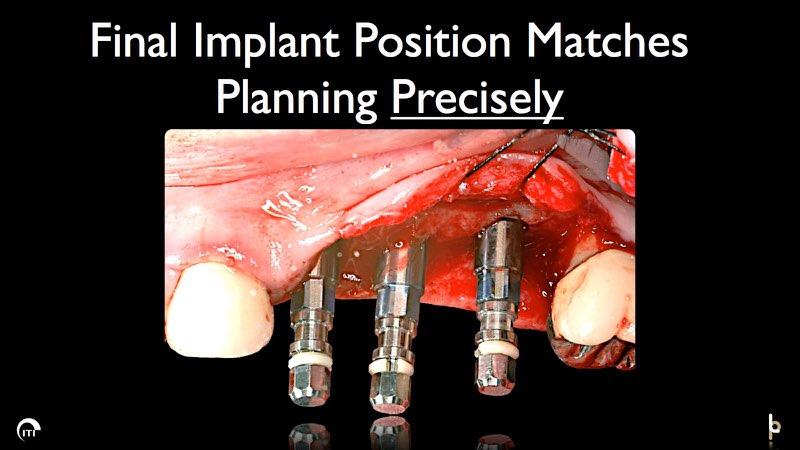
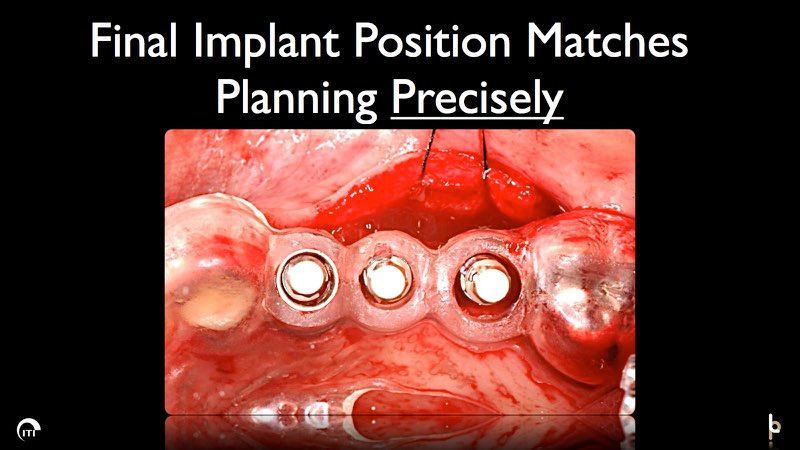
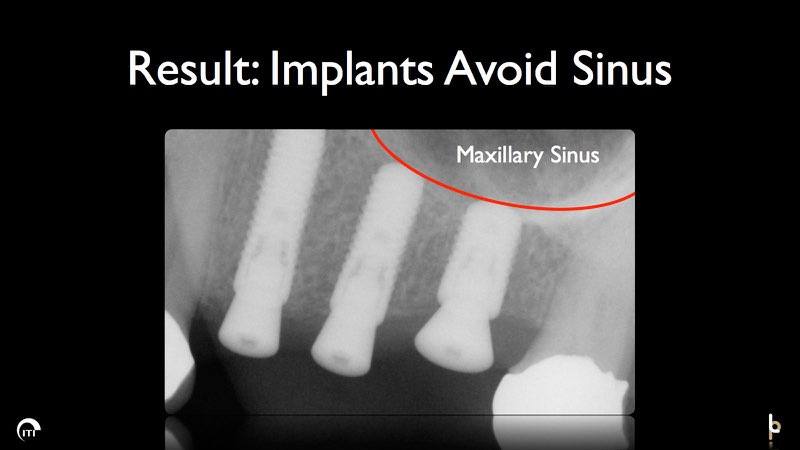
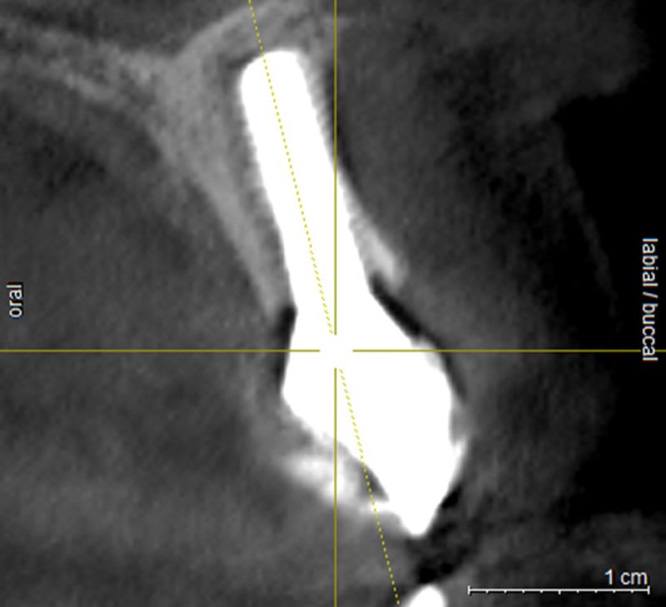
With today’s digital technology, challenging clinical situations can oftentimes be precisely planned using CT scans with minimal radiation exposure, also known as Cone-Beam CT scans, implant planning software, and CAD/CAM technology. This gives the restorative dentist and periodontist implant surgeon the utmost control in 3-dimensional implant placement. the result is improved precision, reduced surgical time, and increased satisfaction with the overall outcome in difficult situation.
Guided surgery is not necessary in every case, but Dr. Lorenzana may recommend it if there is minimal bone available, if multiple implants are being placed simultaneously in close proximity to each other, or in esthetically demanding situations.
Restorative work by: Dr. Lane Walsh (San Antonio, TX)
CT scan imaging by iMagDent (San Antonio, TX)
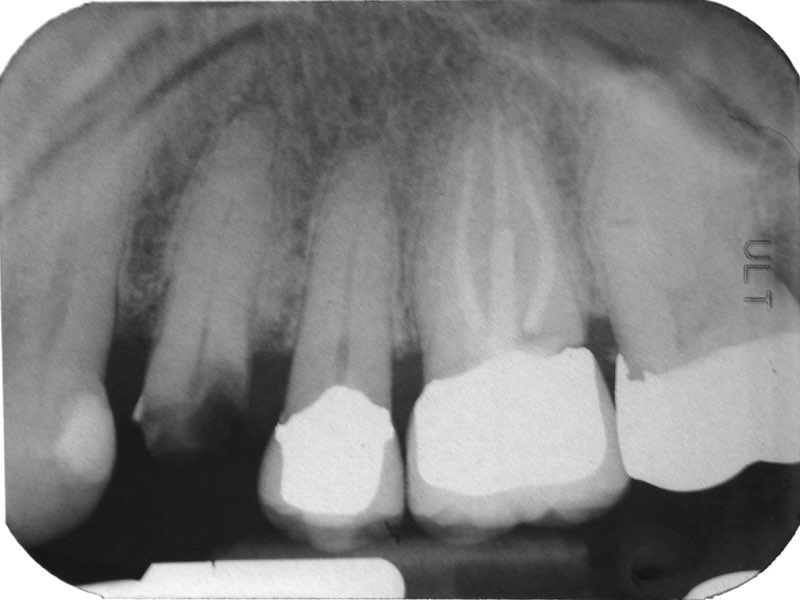
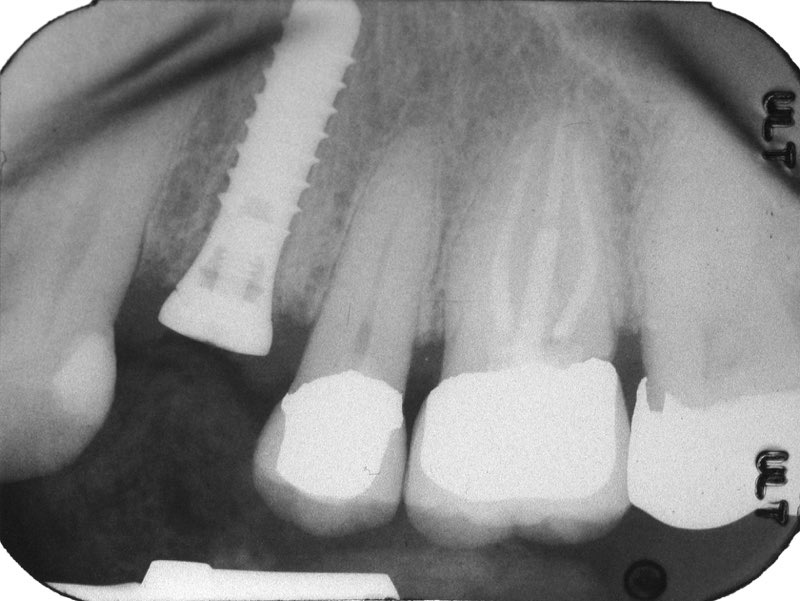
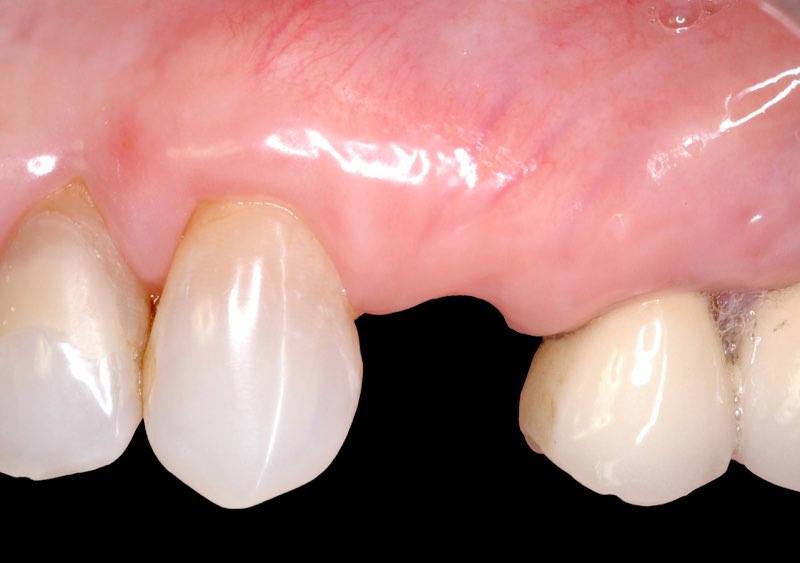
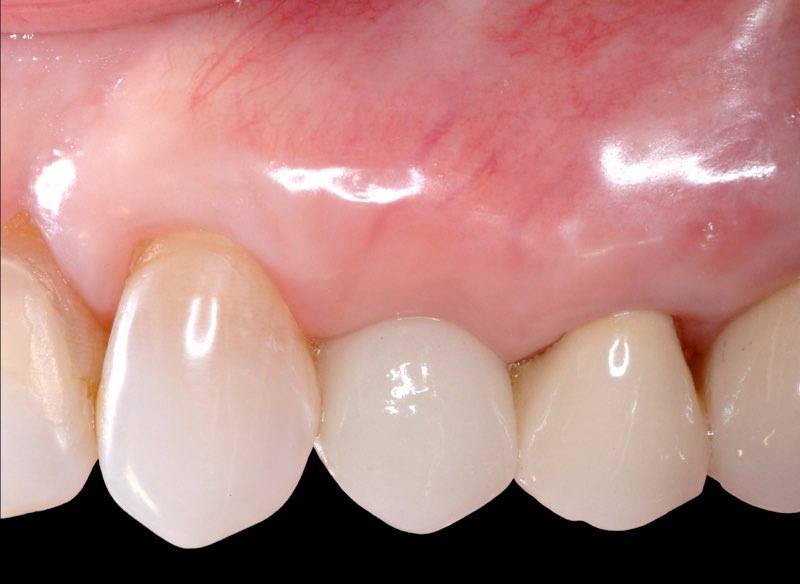
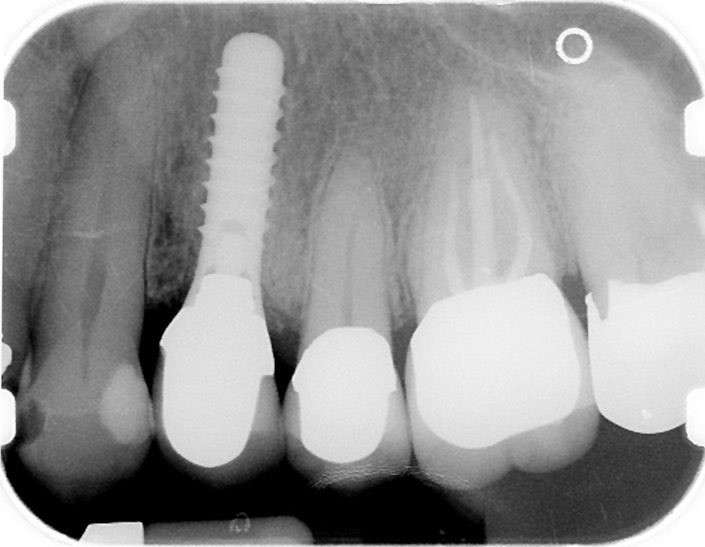
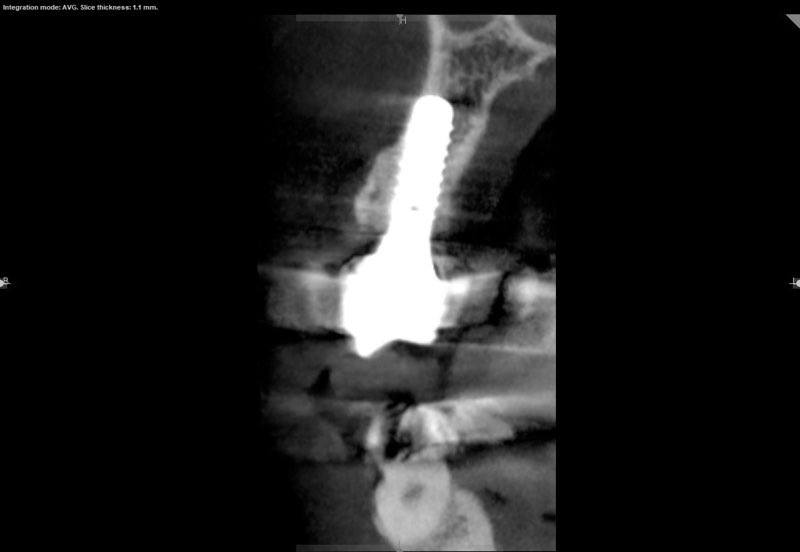
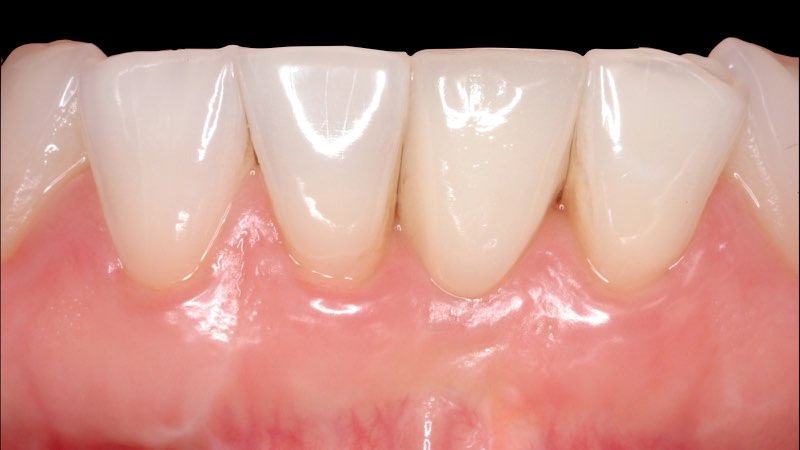
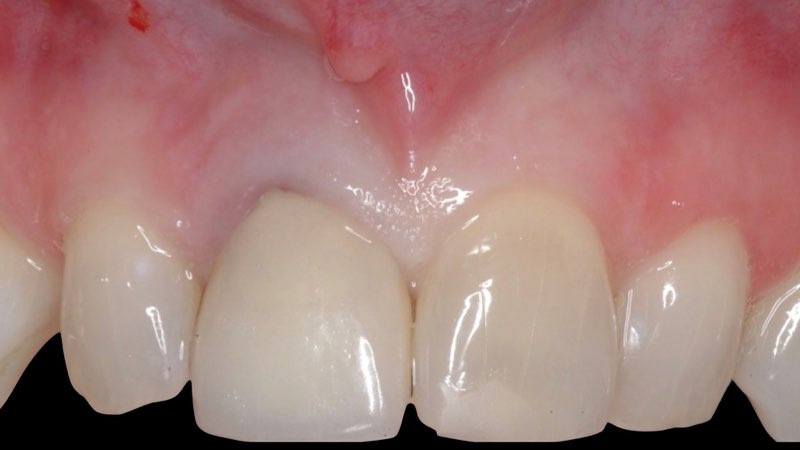
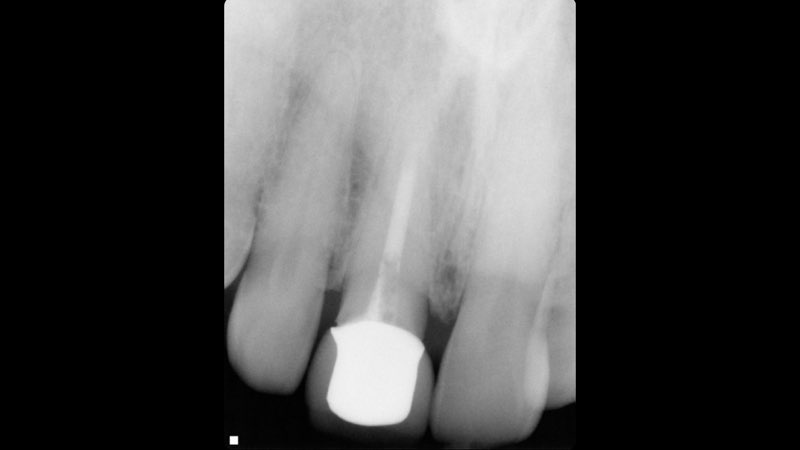
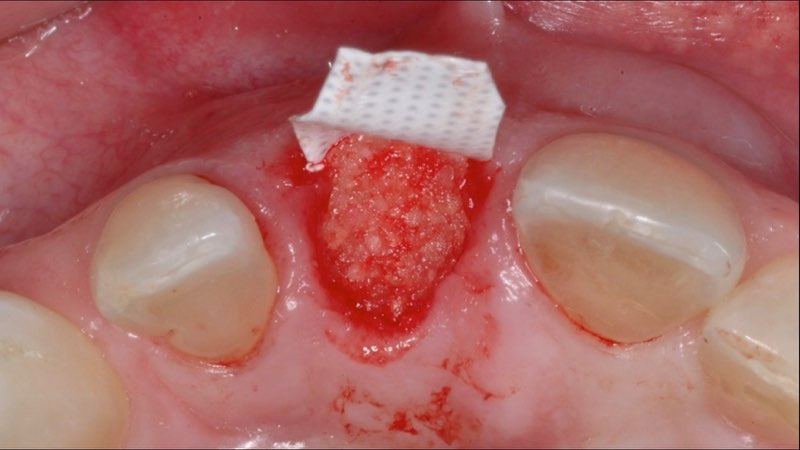
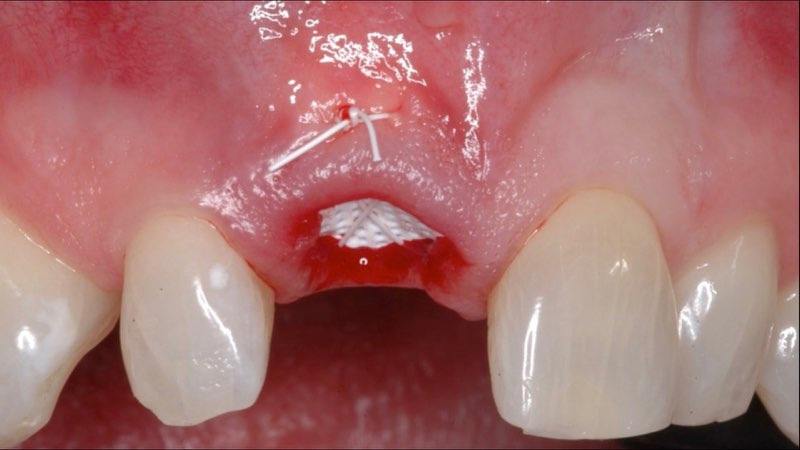
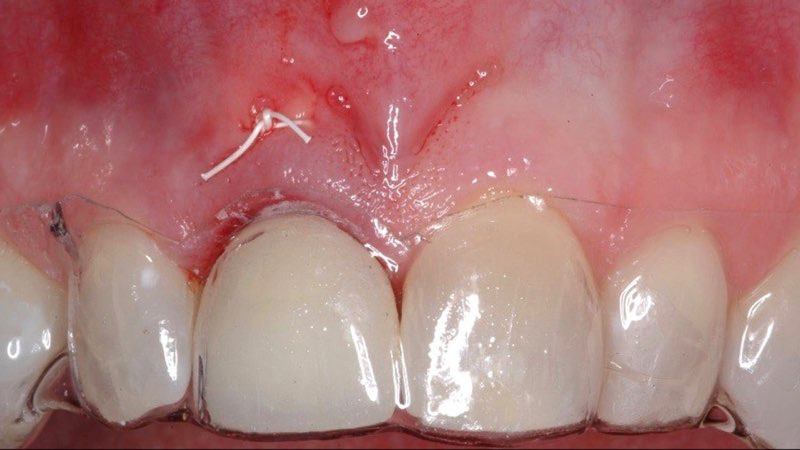
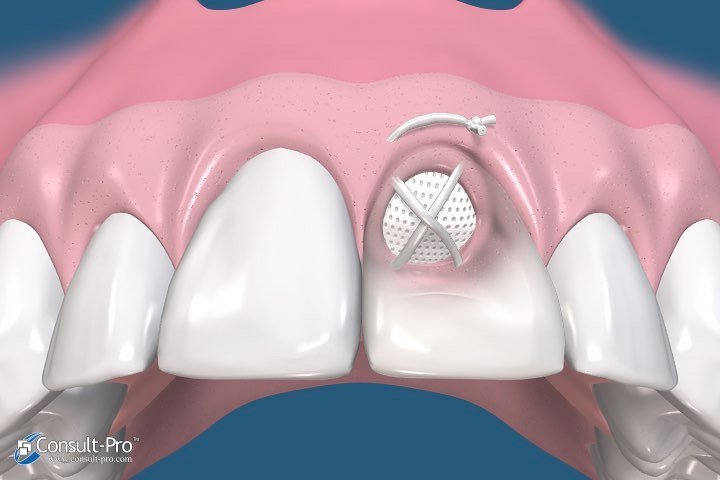
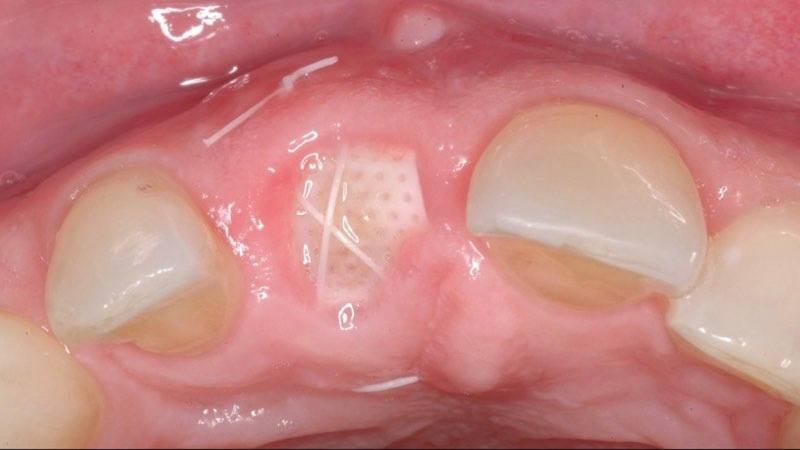
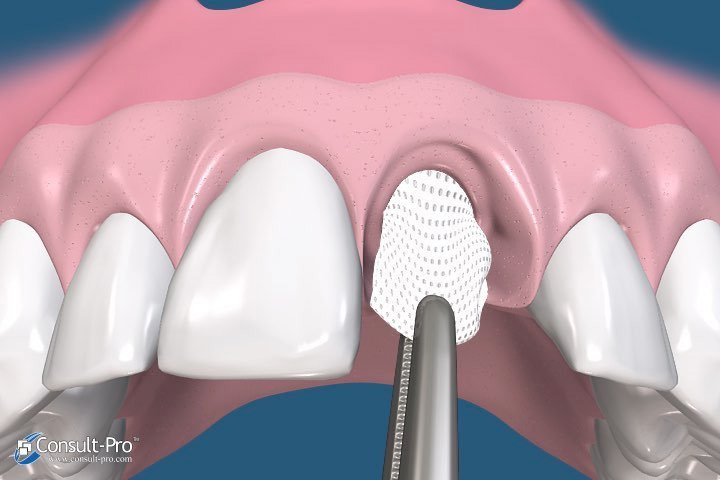
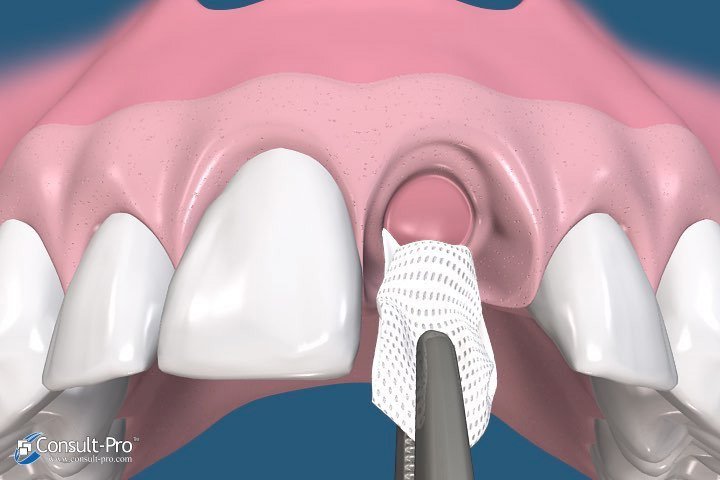
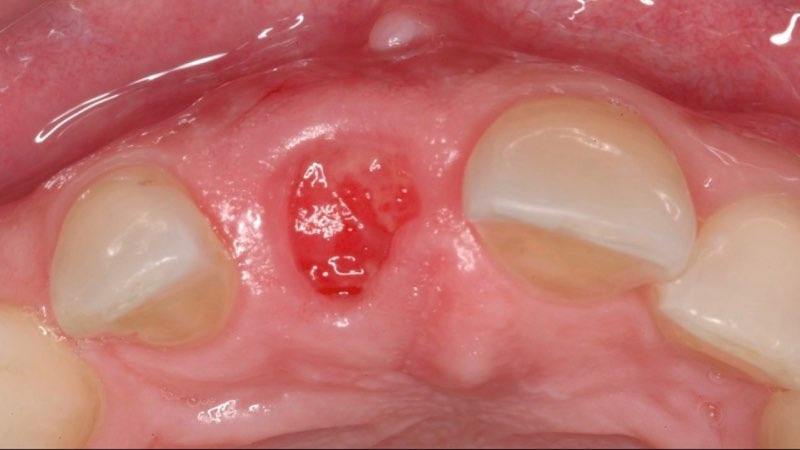
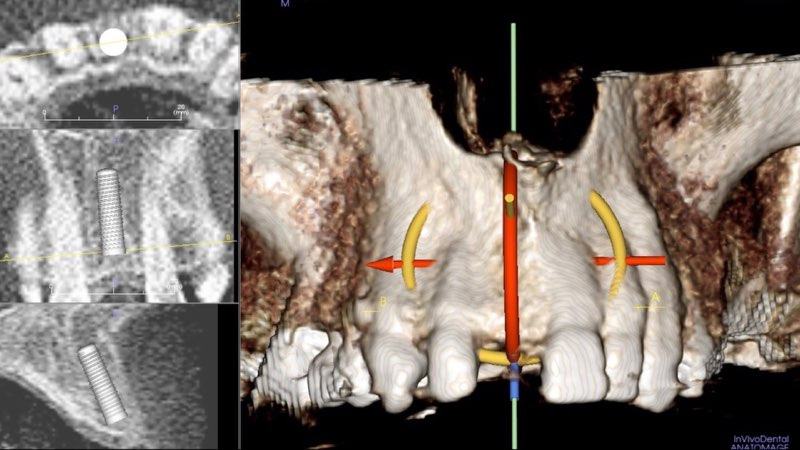
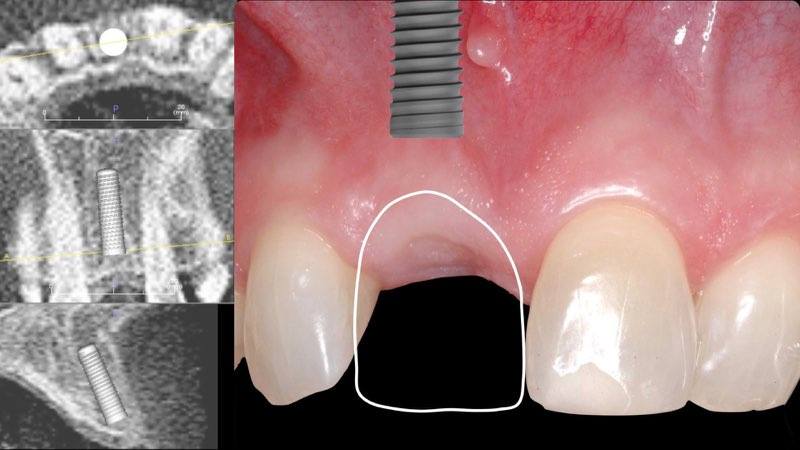
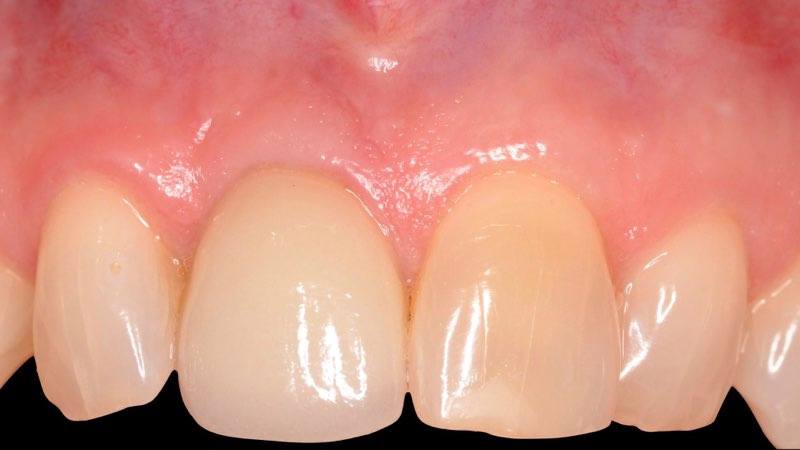
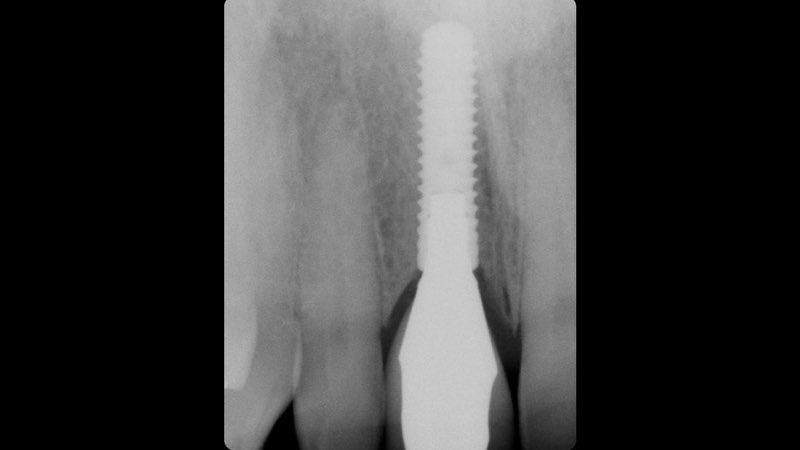
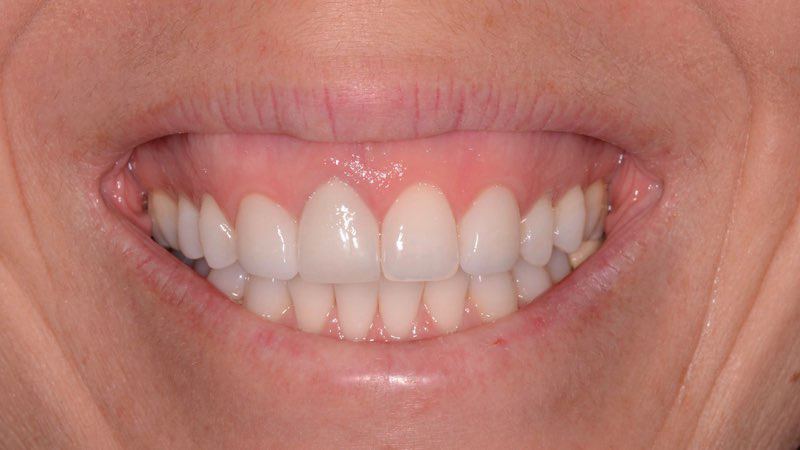
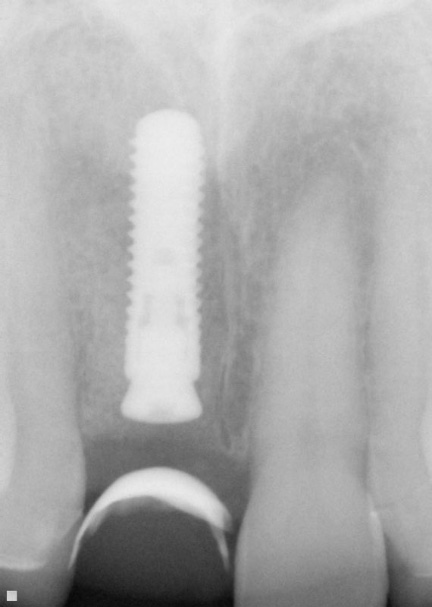
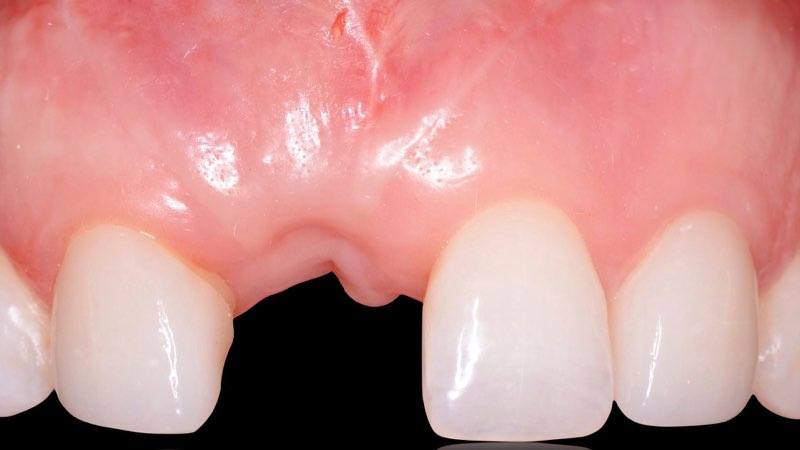
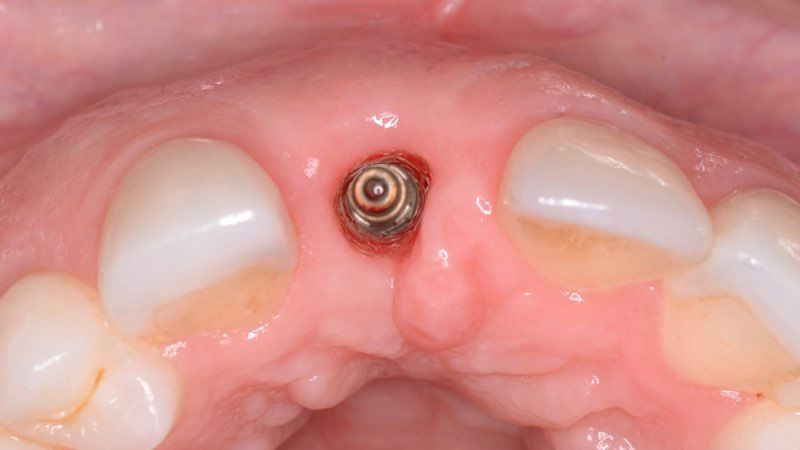
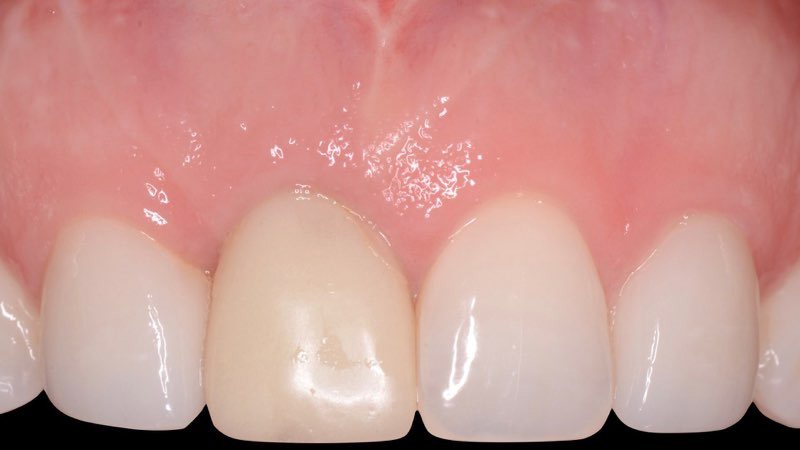
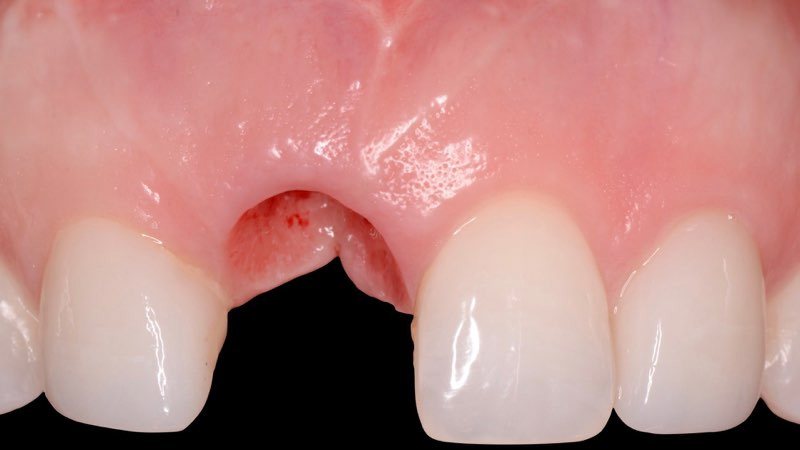
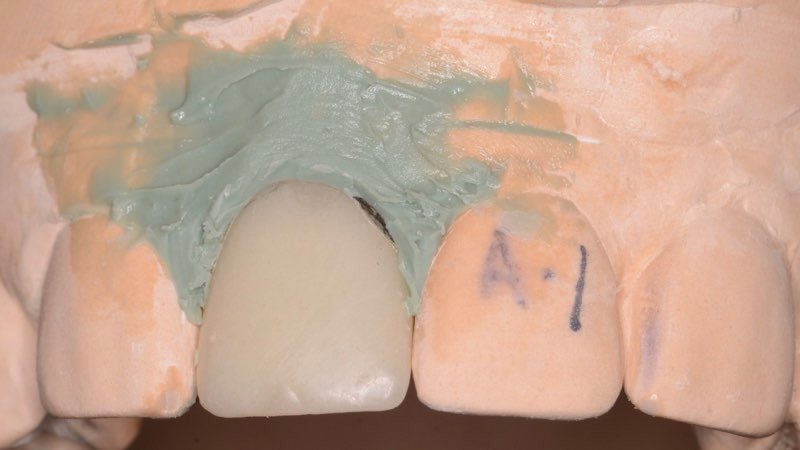
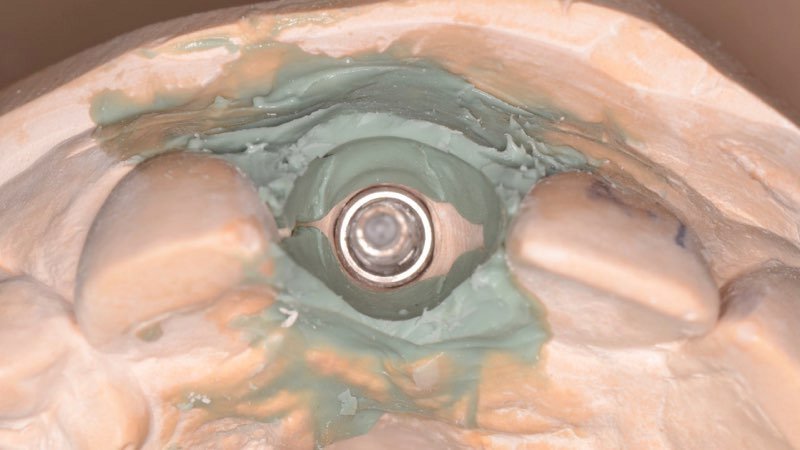
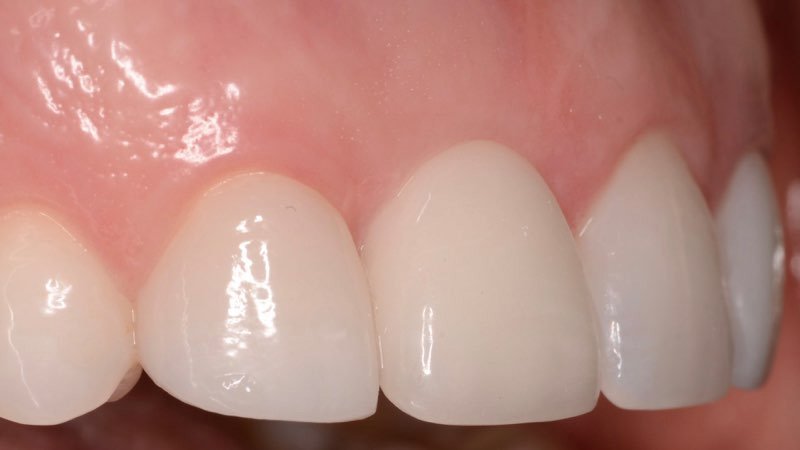
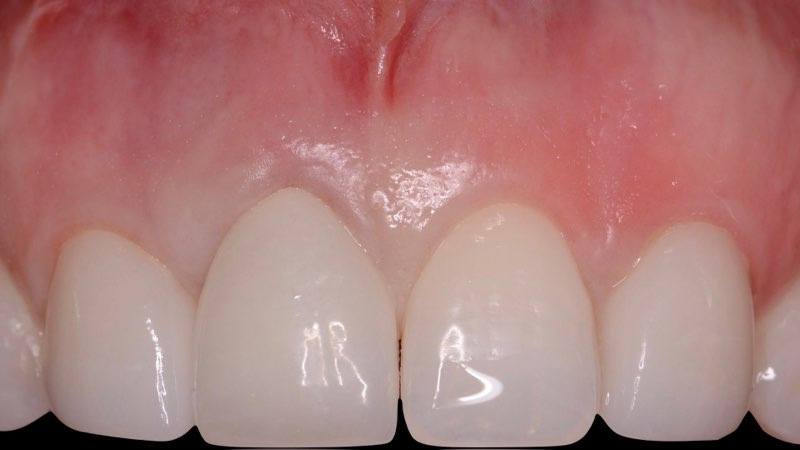
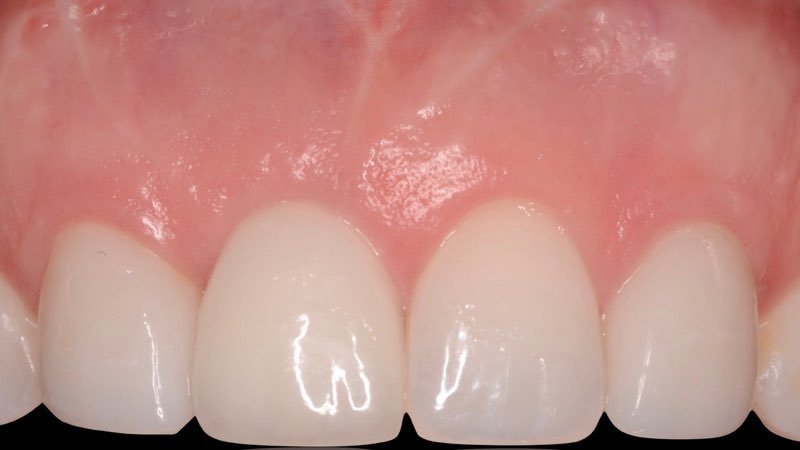
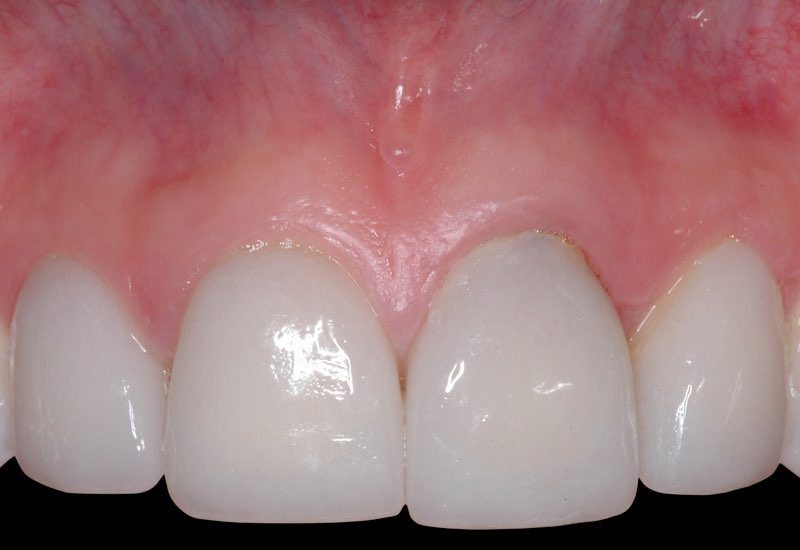
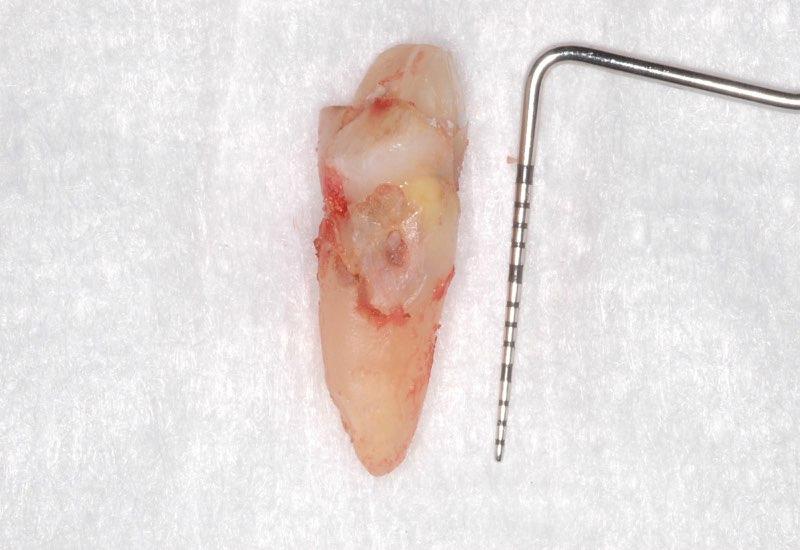
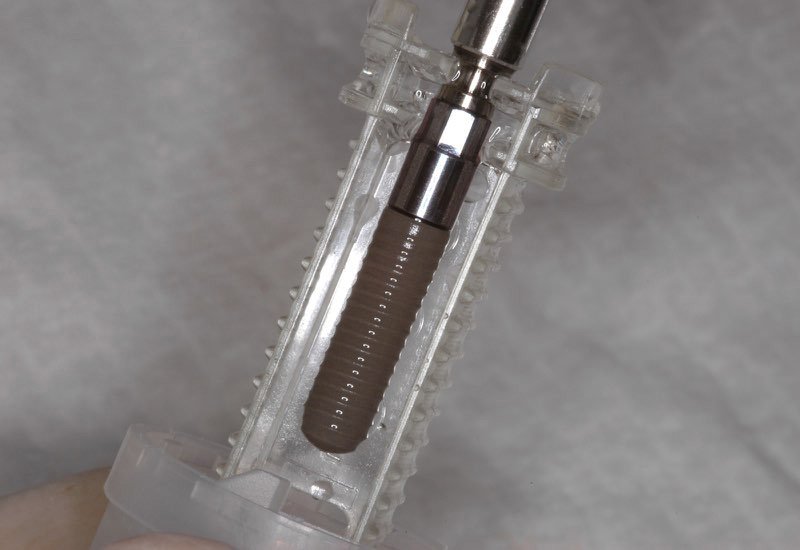
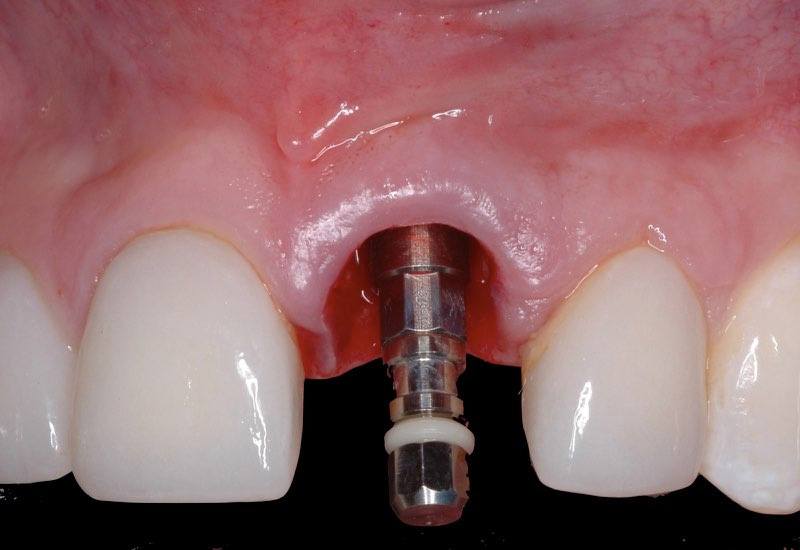
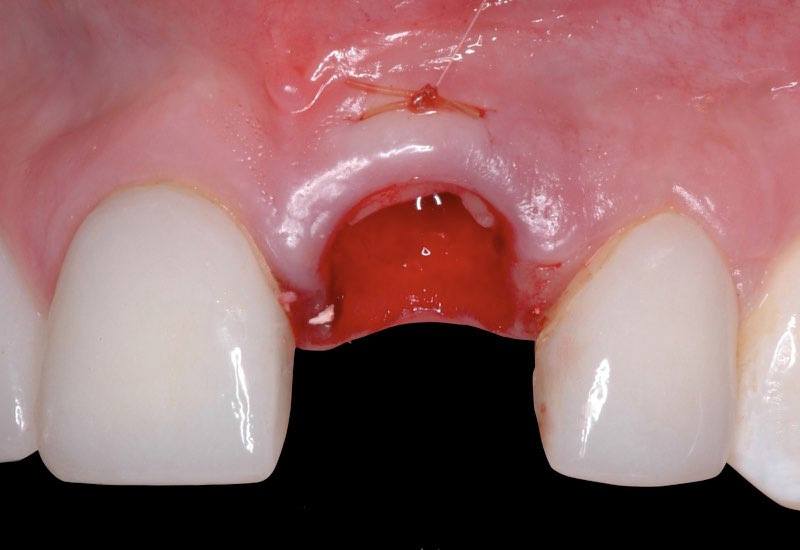
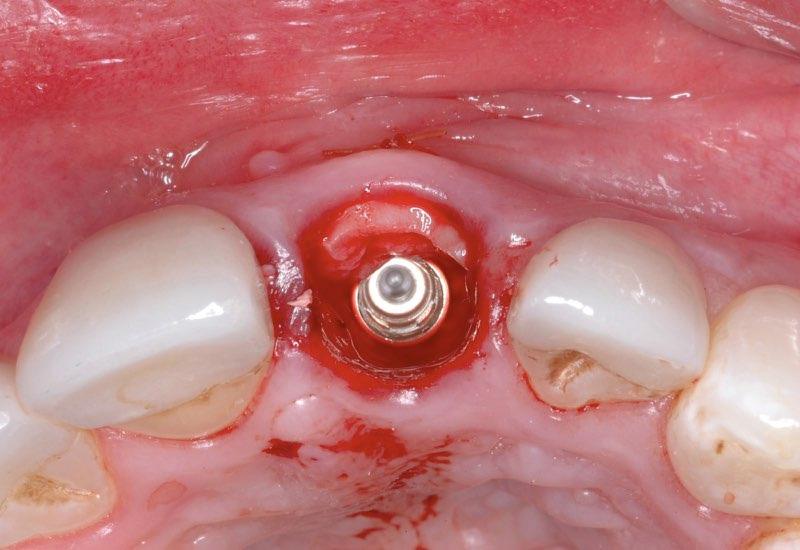
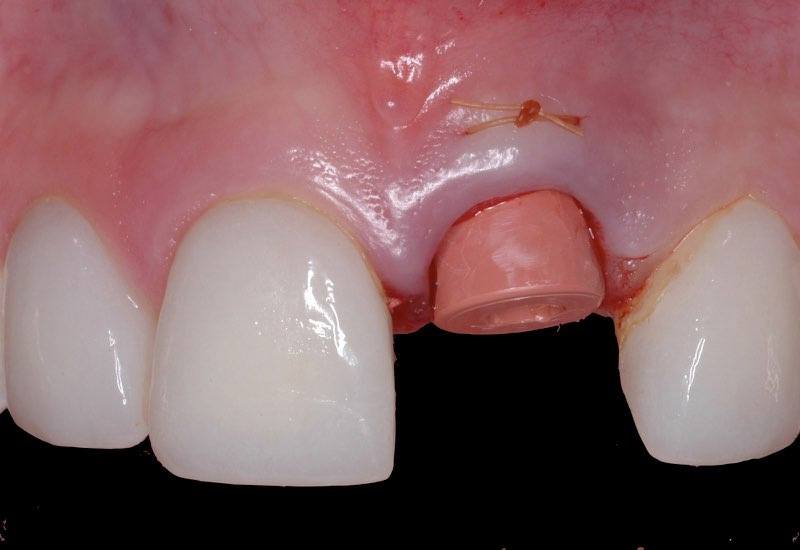
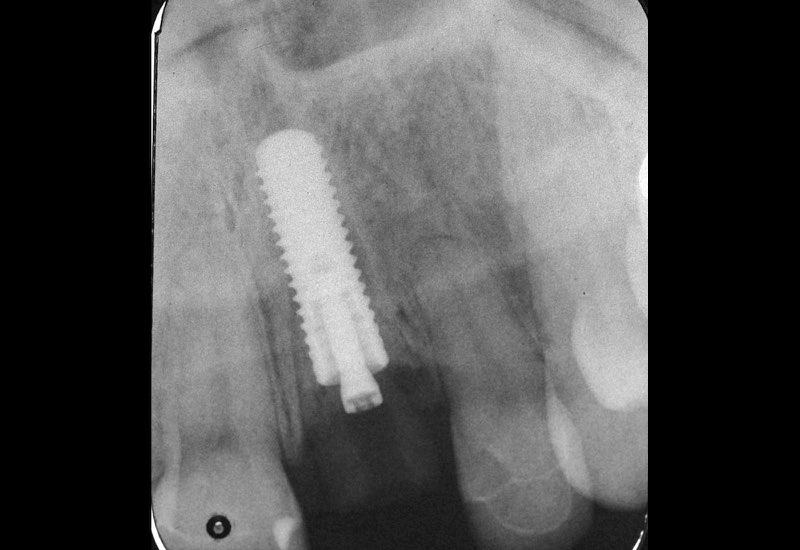
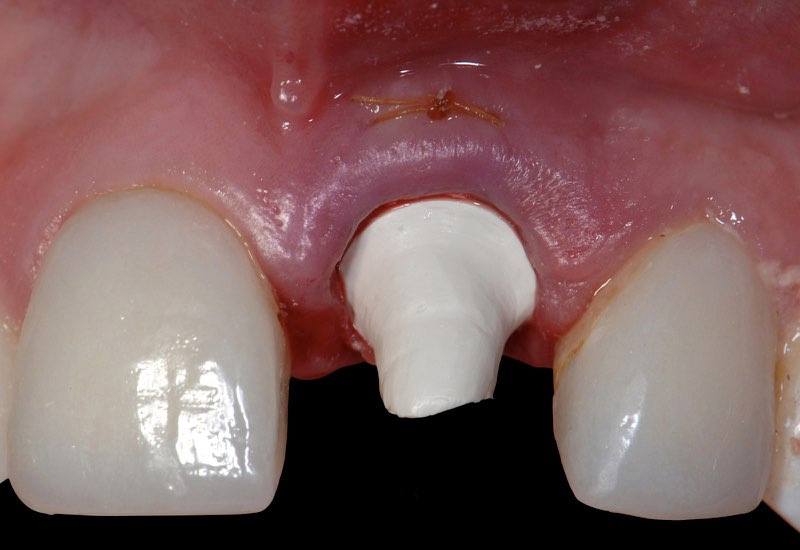
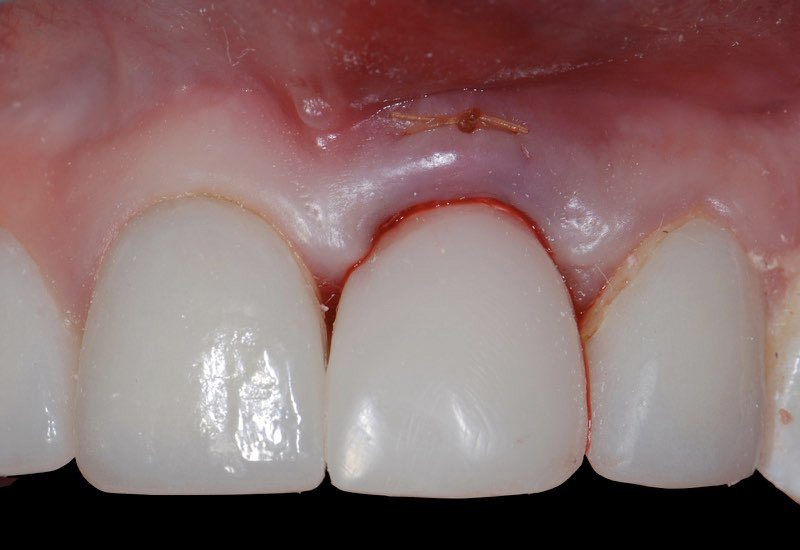
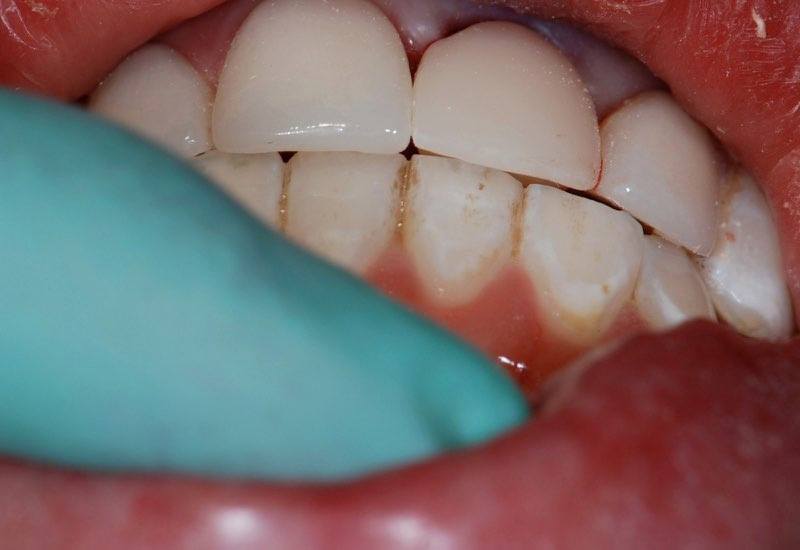
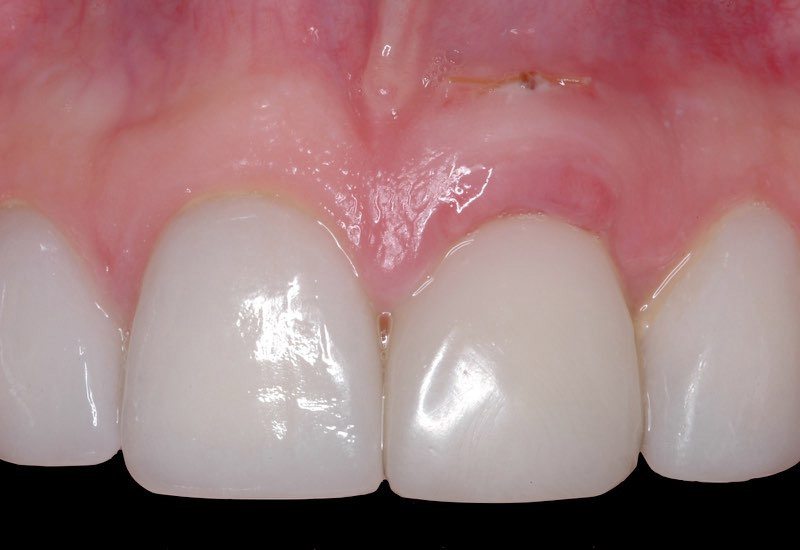
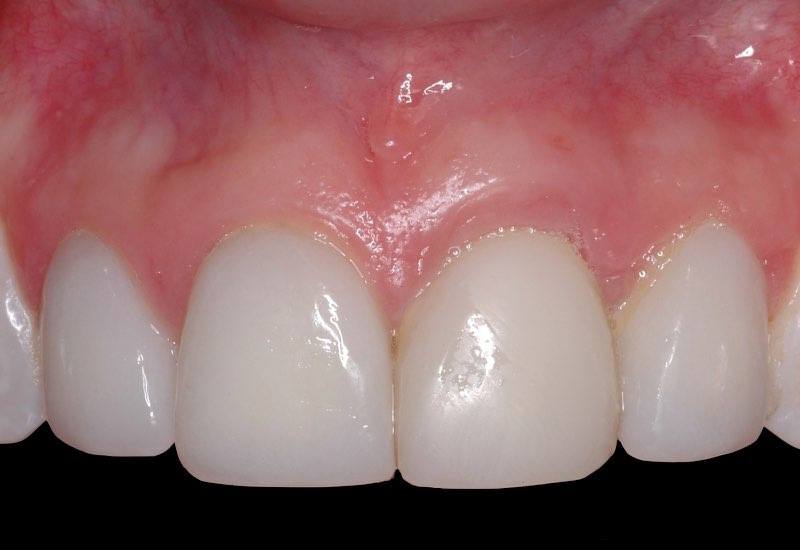
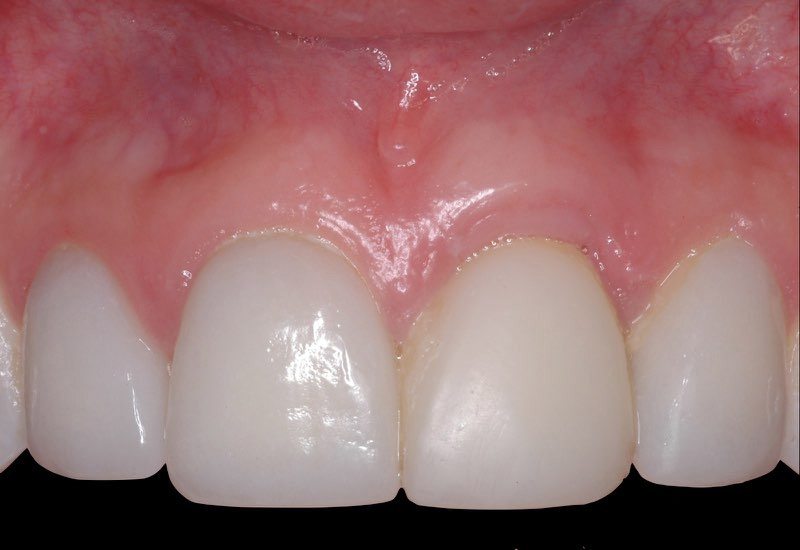
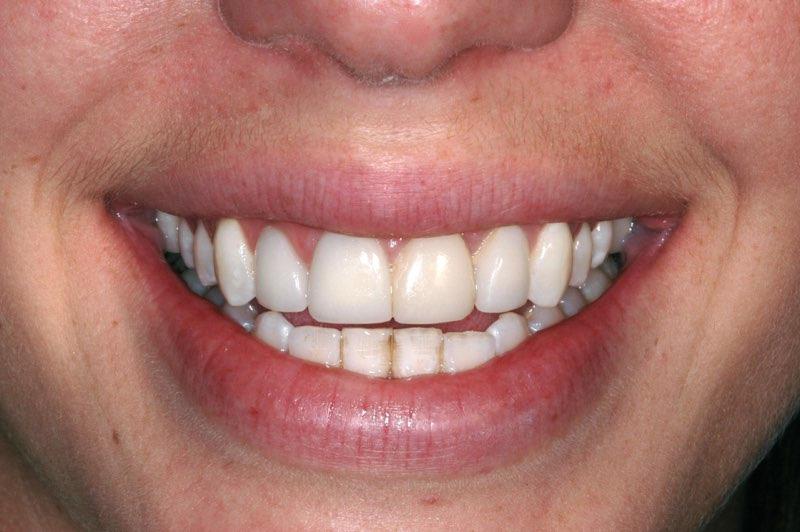
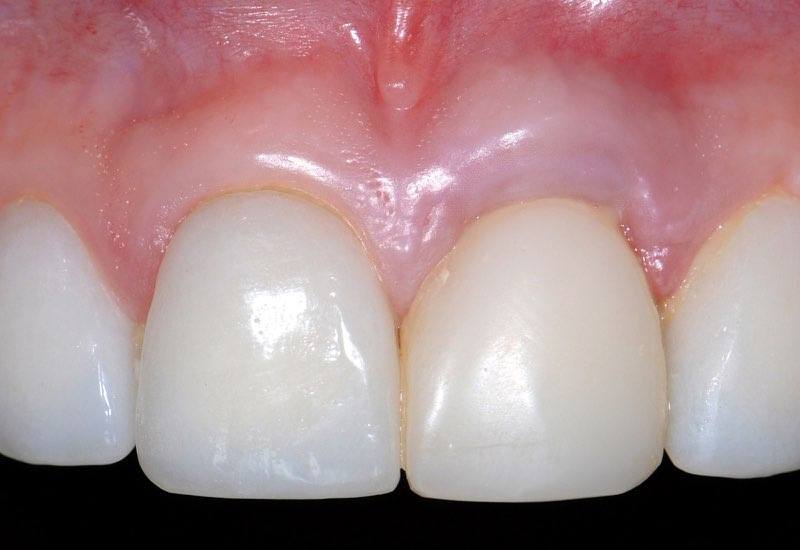
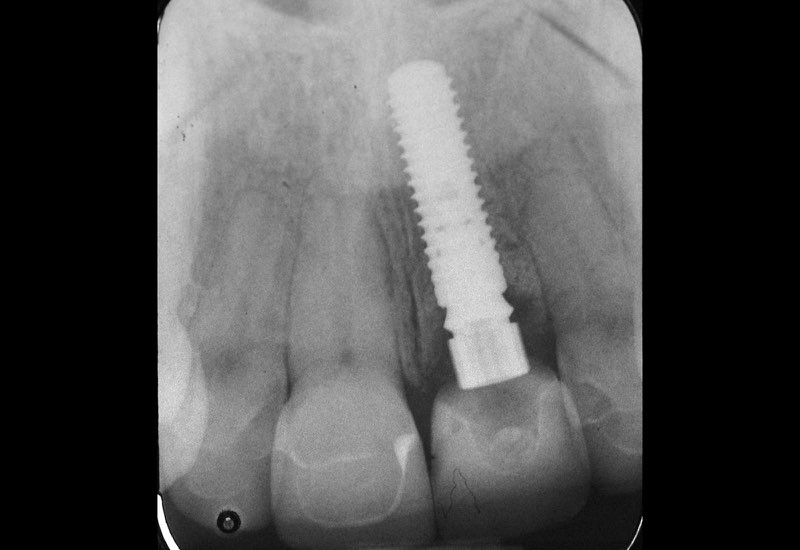
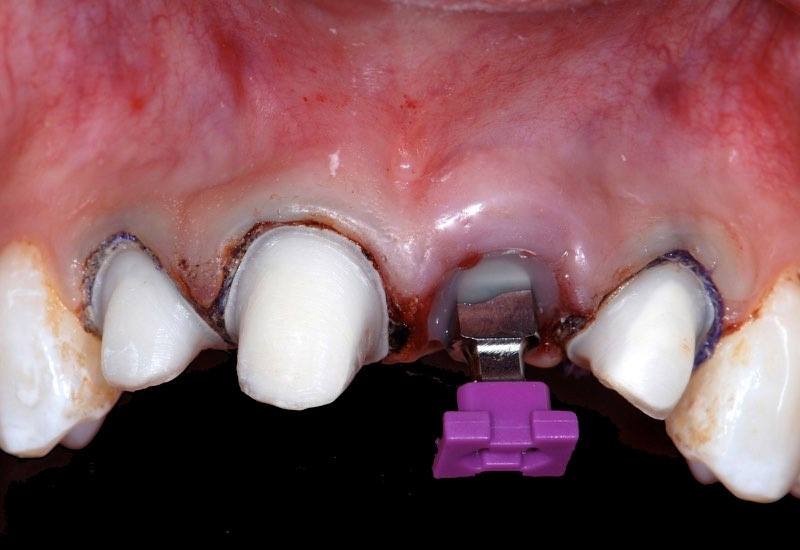
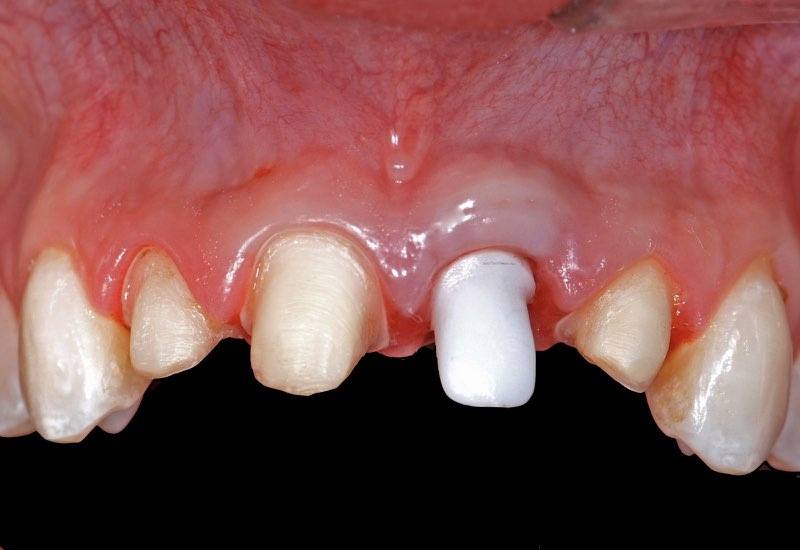
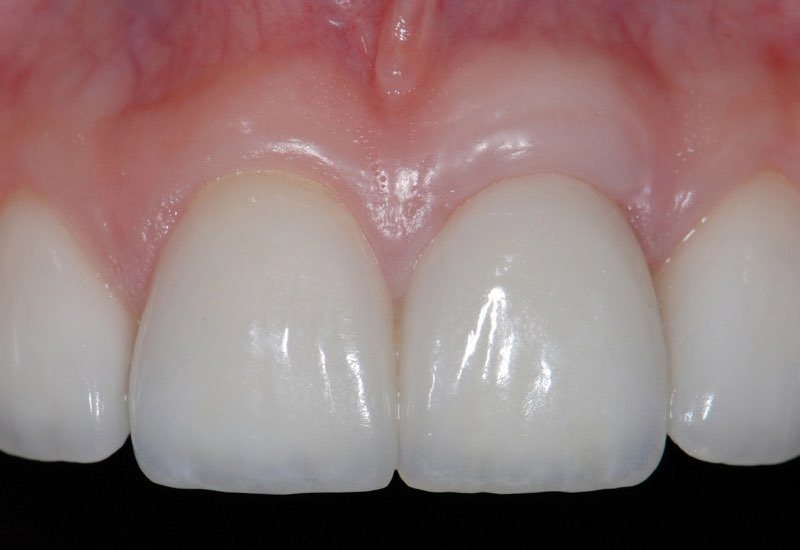
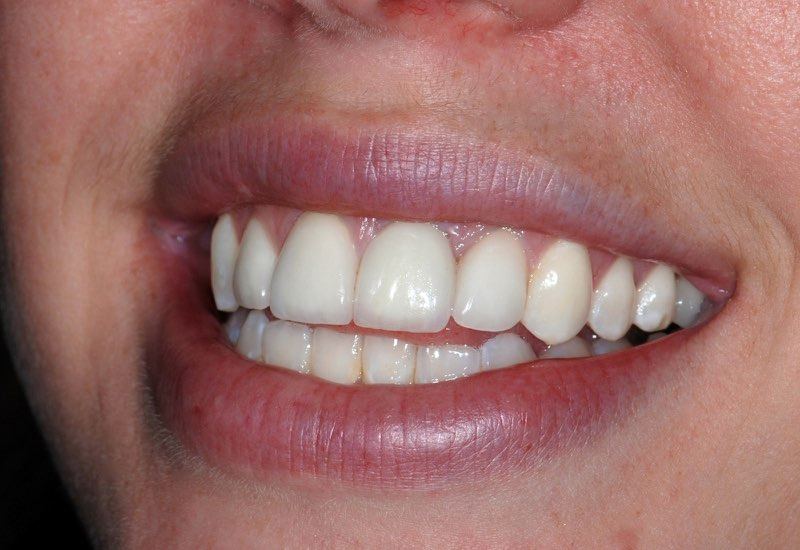
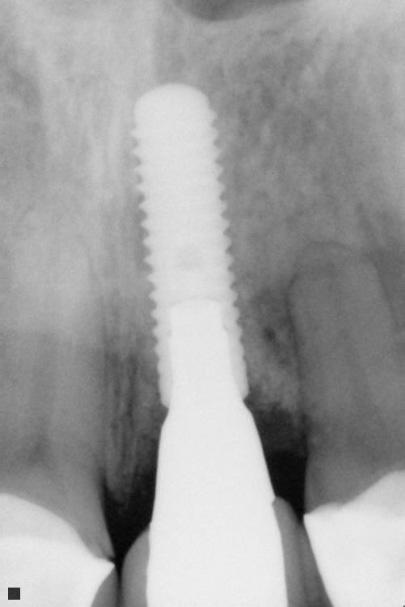
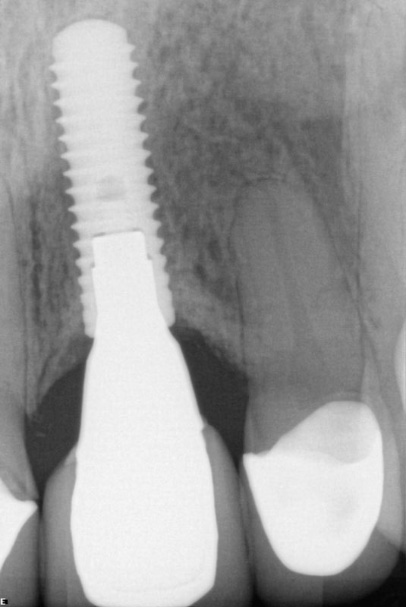
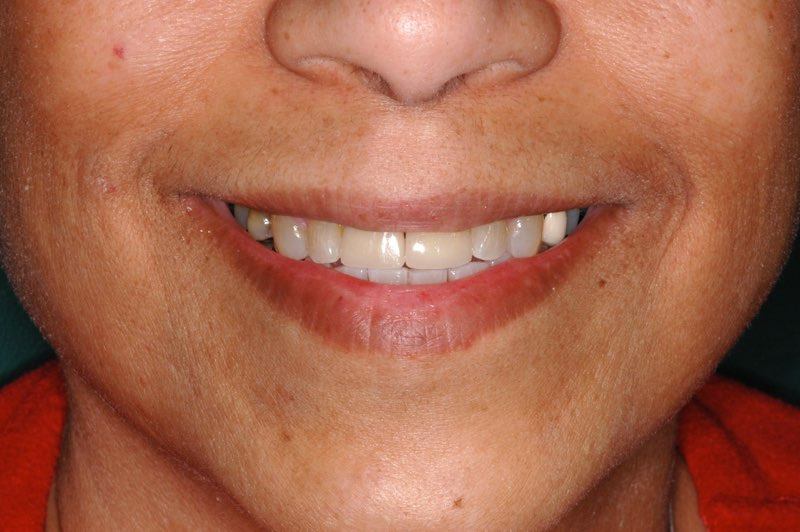
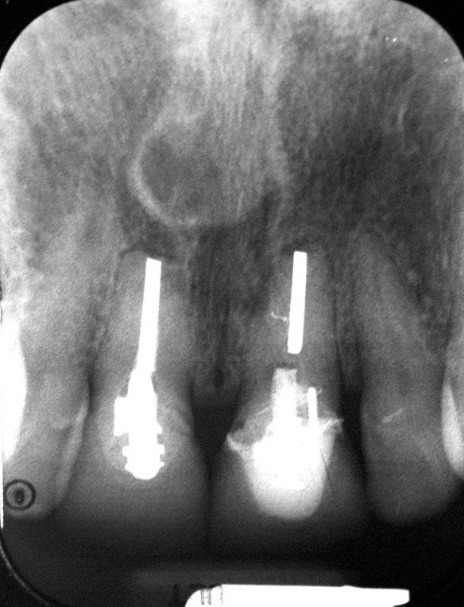
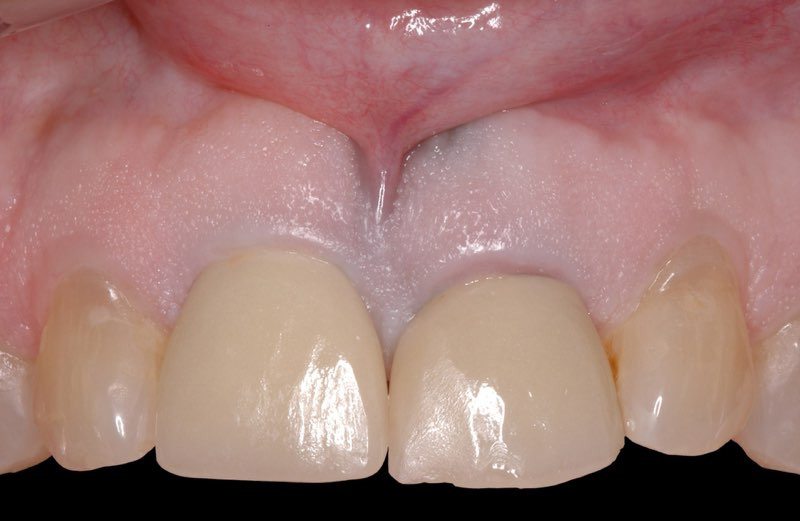
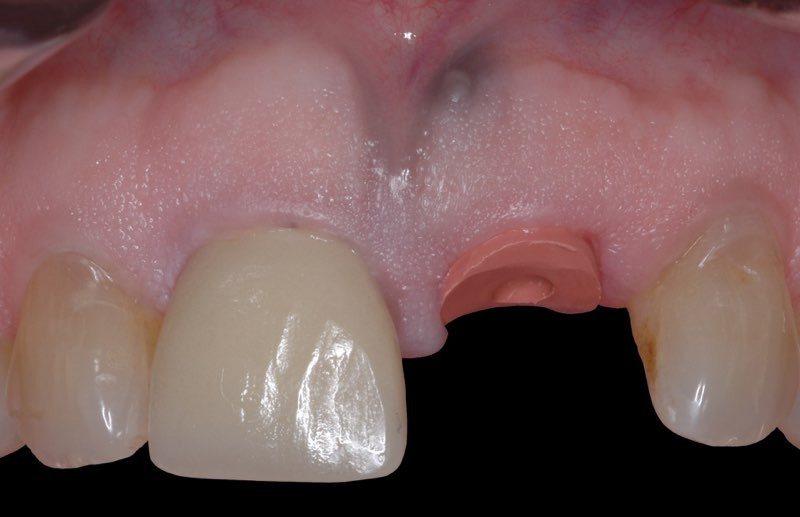
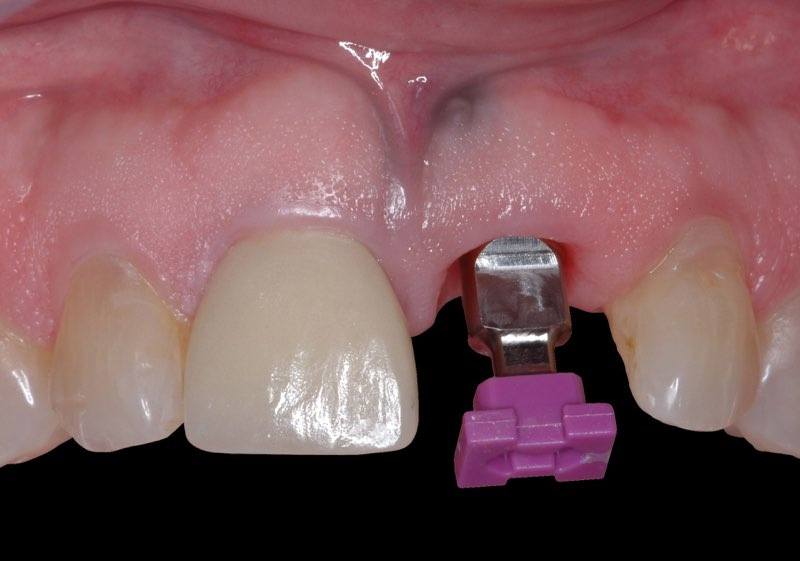
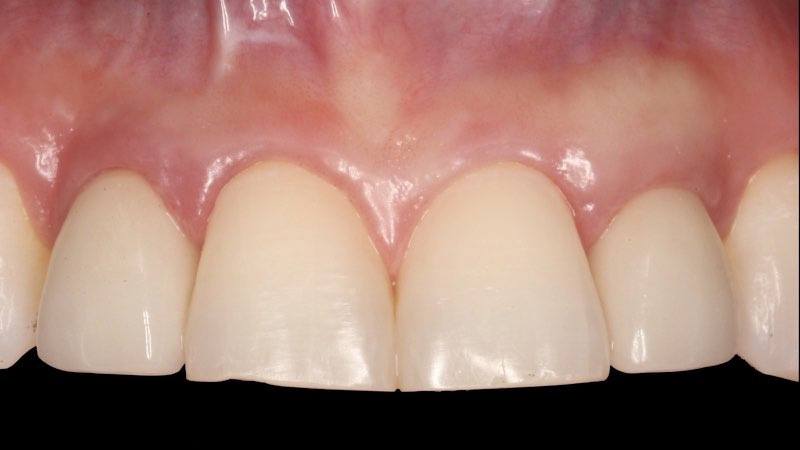
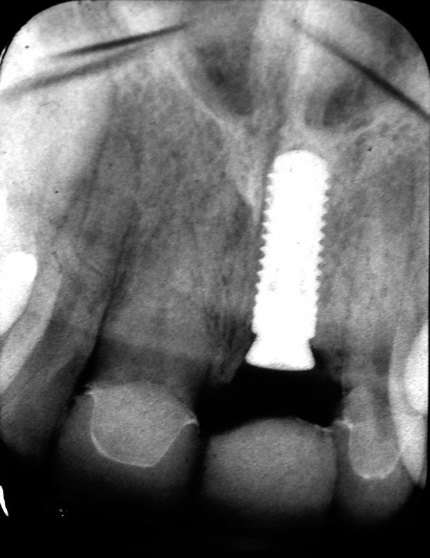
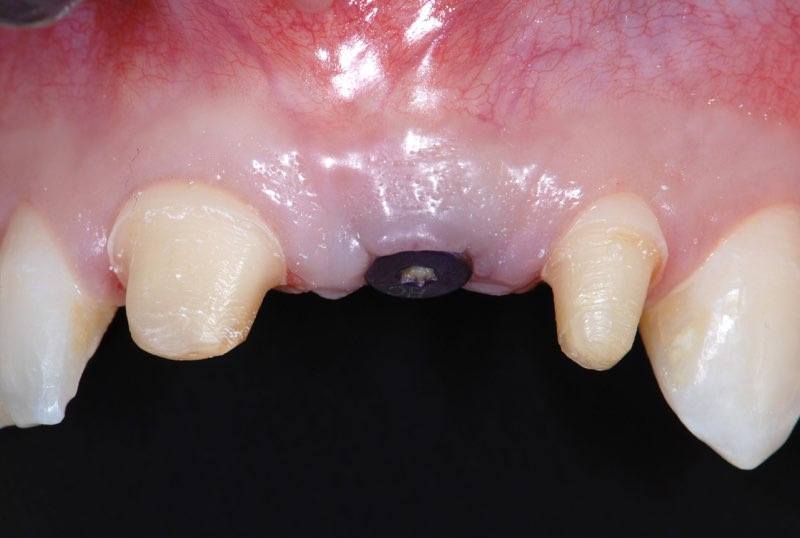
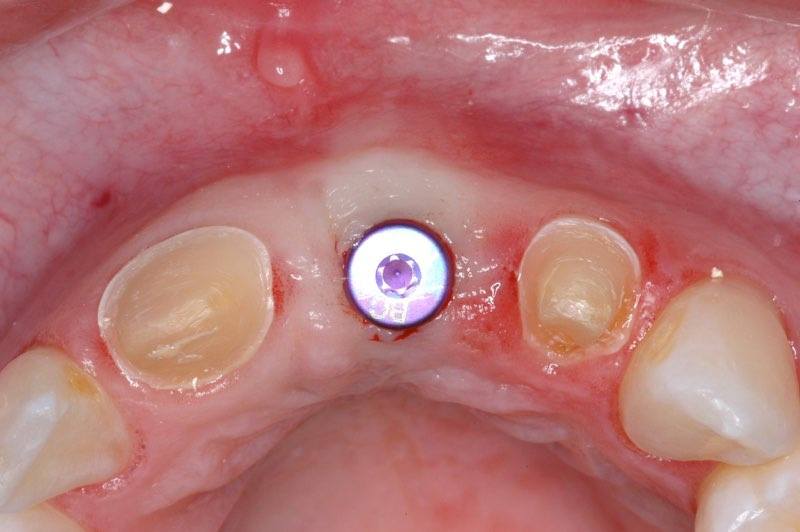
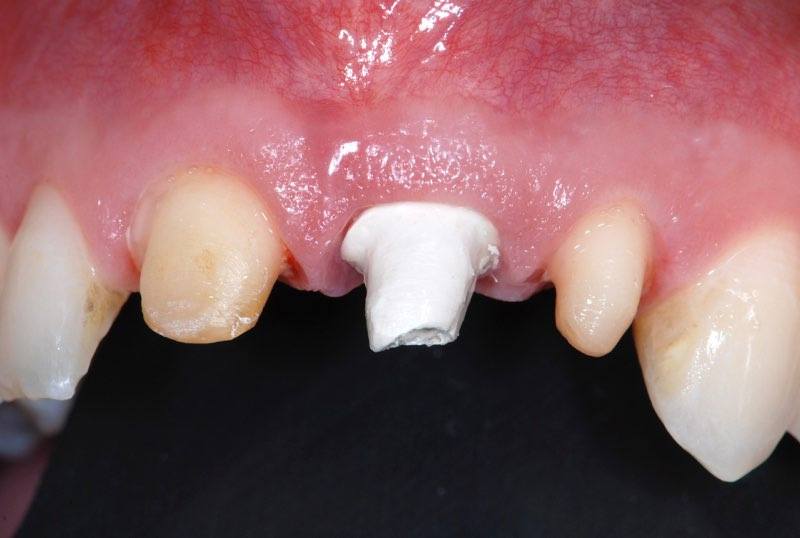
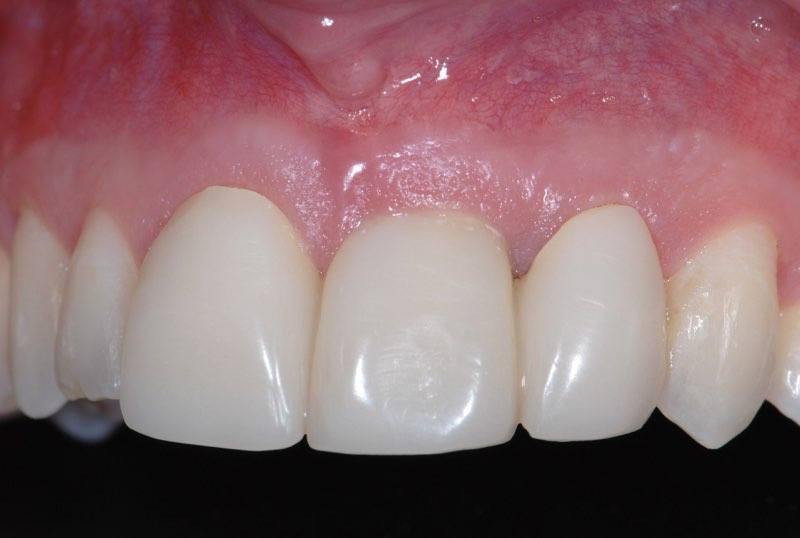
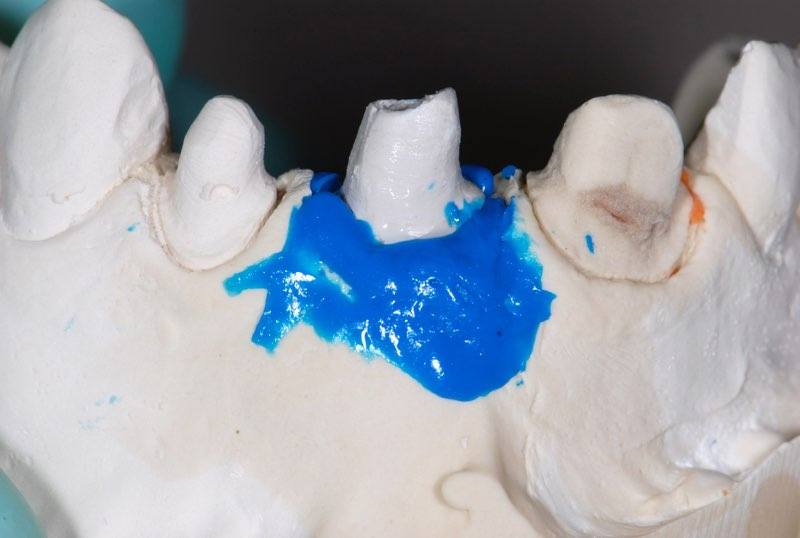
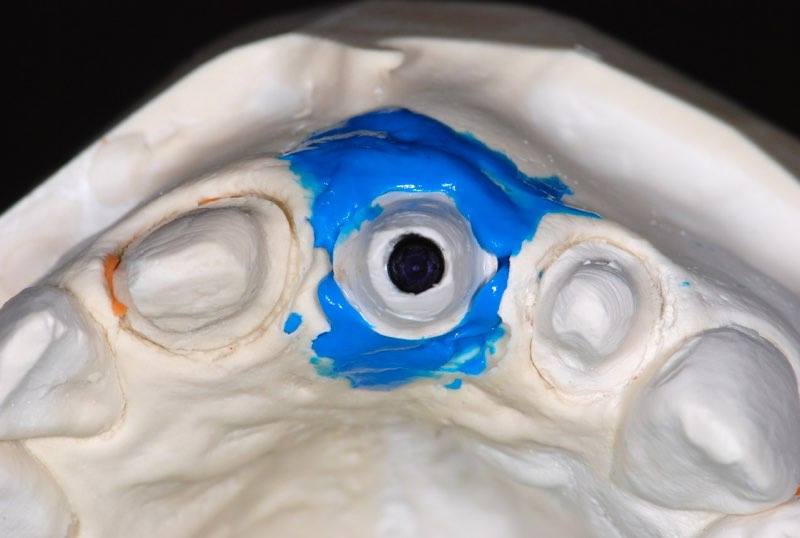
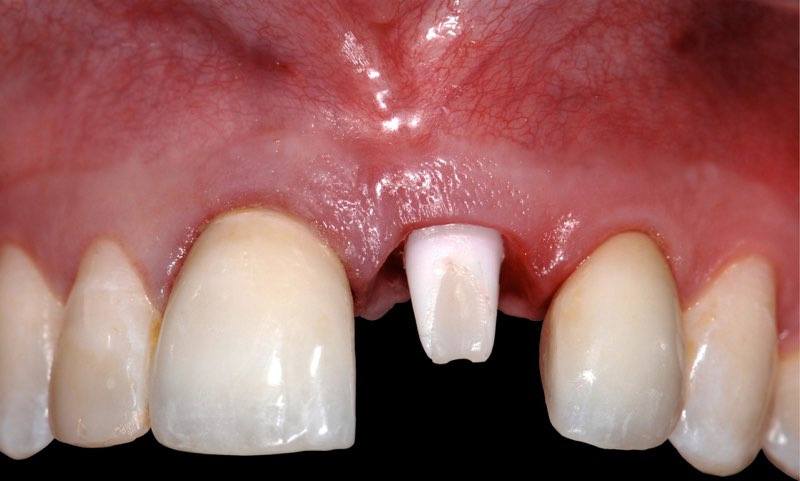
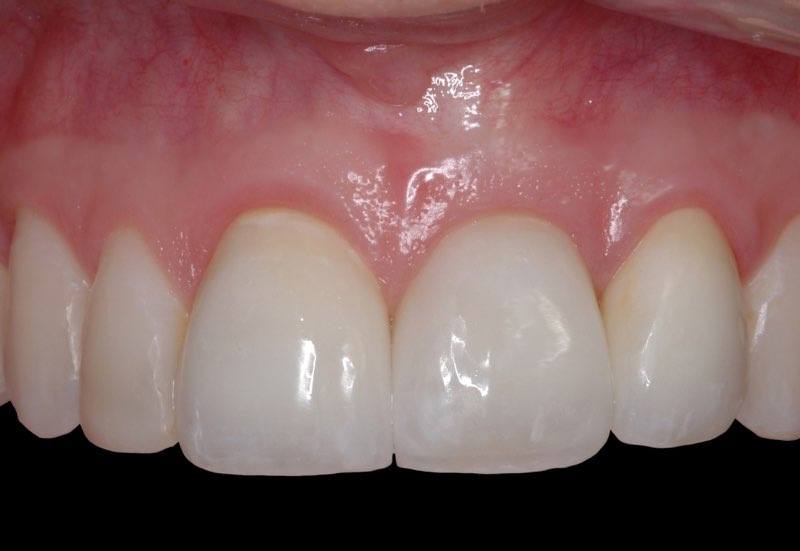
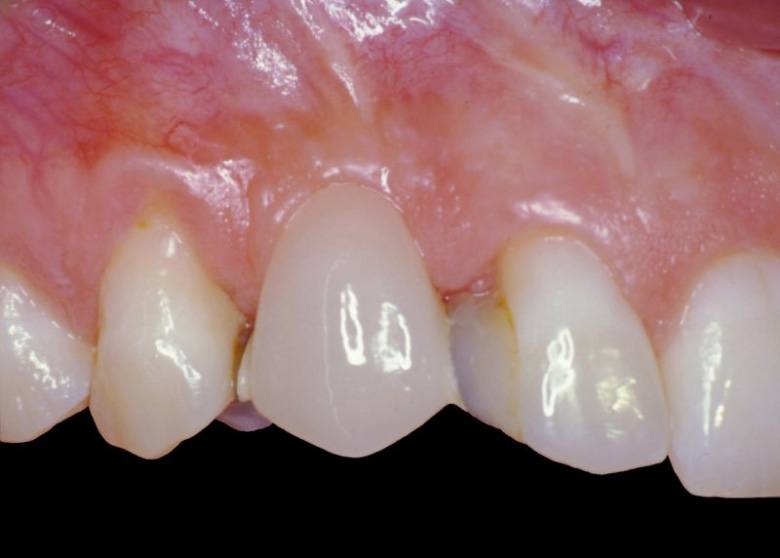
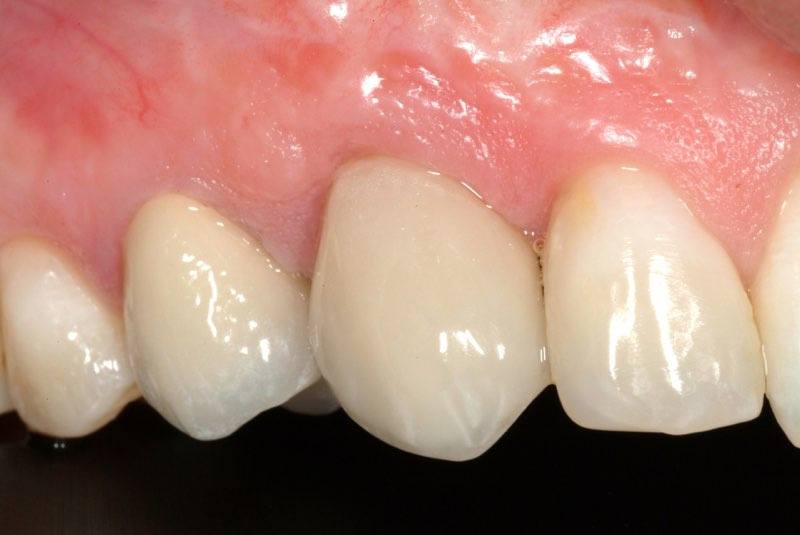
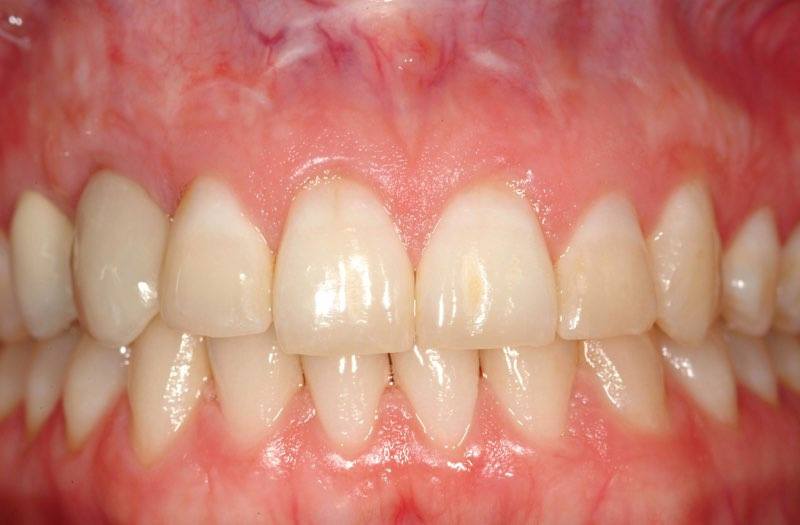
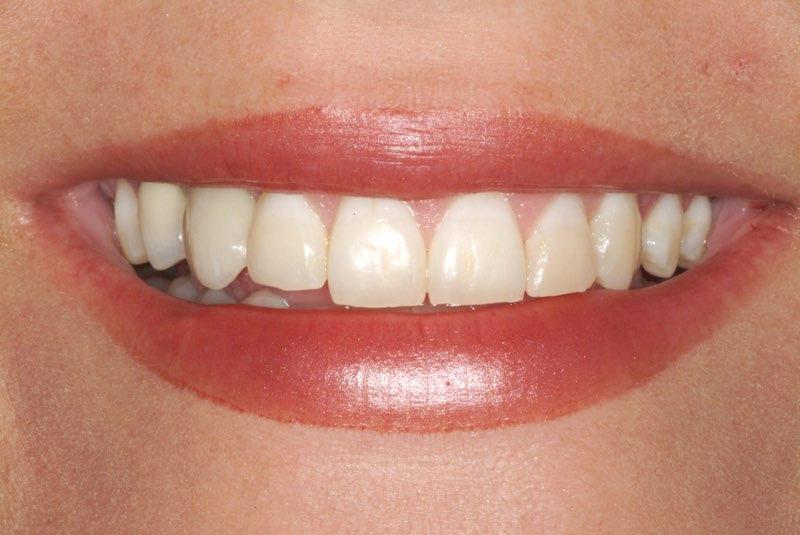
This patient was referred to us following the traumatic fracture of her upper left first premolar (tooth #12). Complicating the situation aesthetically and functionally was the presence of advanced gingival (gum) recession on the tooth in question as well as the adjacent canine #11. Careful implant placement in conjunction with soft and hard tissue augmentation yielded excellent tissue contours that her restorative dentist could confidently guide to a successful, aesthetic outcome.
When unfortunate accidents happen that result in the fracture of one or more teeth, we prefer to place the implant(s) immediately upon tooth extraction whenever possible in order to preserve the native tissue architecture and achieve the best aesthetic result.
Restorative work by: Dr. Lane Walsh (San Antonio, TX)
Extraction of a Failed Lower Front Tooth and Immediate Implant Placement
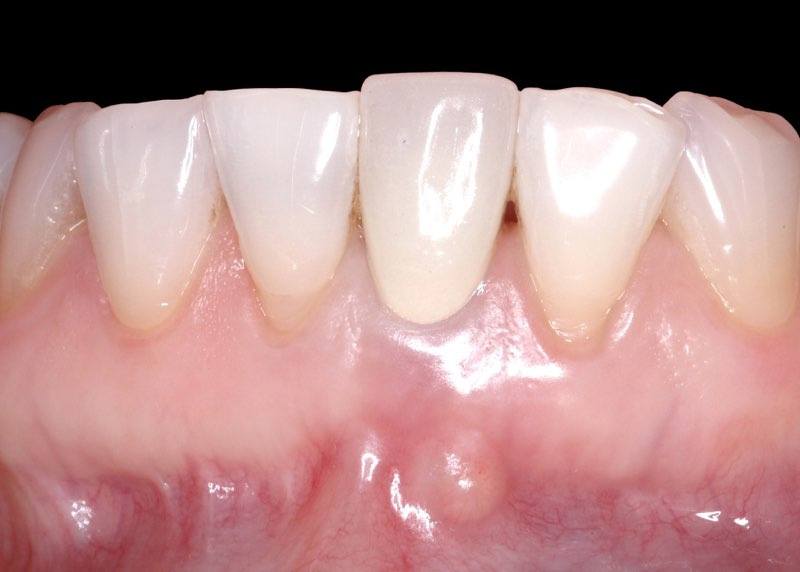
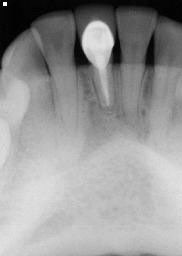
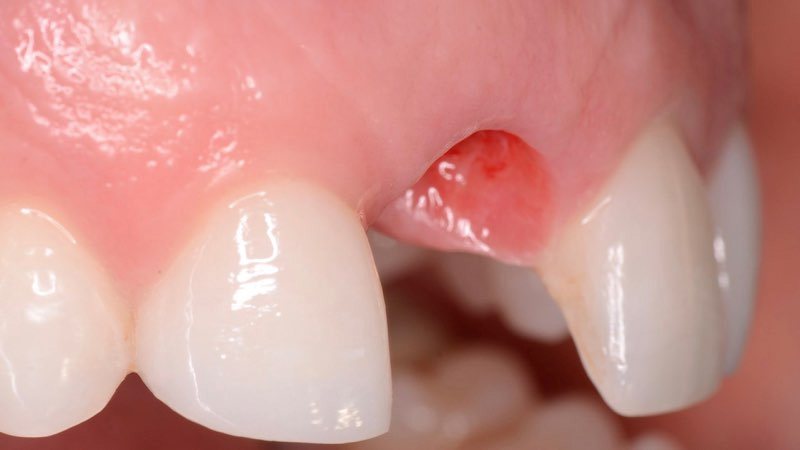
Melissa also had a long history of treatment for her lower left front tooth (#24). The tooth had been previously traumatized and a root canal and crown had been done previously. Unfortunately, the tooth failed, resulting in swelling in the gums directly over the tooth and constant discomfort.
Again, the tooth was carefully removed, the socket was thoroughly cleaned, an implant was placed, and the socket and surrounding bone were augmented with not only bone grafting material, but also with a soft tissue (gum) graft to help recreate the ideal contours of the surrounding tissue. After 4 months of healing, she was referred to her prosthodontist where the restorative phase began. A temporary crown was made and an impression was taken of the implant in order to make a custom abutment and crown.
Melissa was very concerned about the esthetic result of the final crown, even though the tooth is not visible when she smiles or speaks. Thanks to the collective efforts of both the surgical and restorative teams, her fears were set at ease with a much better result than how she began.
Restorative work by: Dr. Jason Gillespie (San Antonio, TX)
Initial Presentation - Note Swelling from Infection
There are many advantages to placing a dental implant at the time of tooth removal - saves time, can save cost, a single surgical procedure. However, there are occasions when placing a dental implant at the time of tooth removal is not possible, either due to the surrounding anatomy, the amount of infection present, incomplete treatment planning, among others. When this is the case, Dr. Lorenzana may recommend a procedure called ridge preservation.
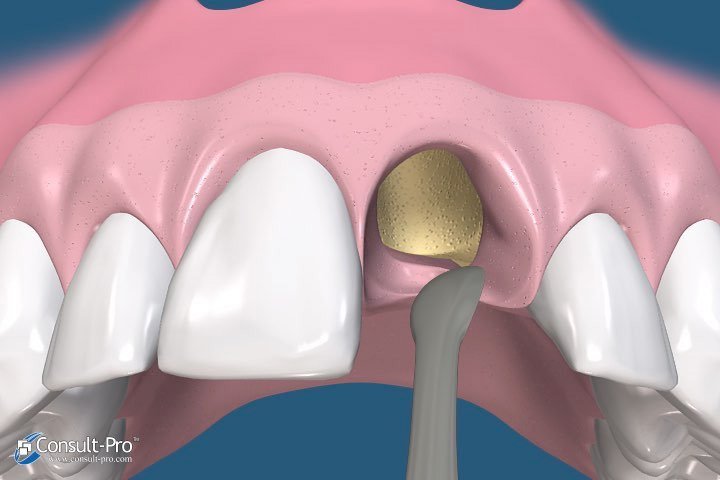
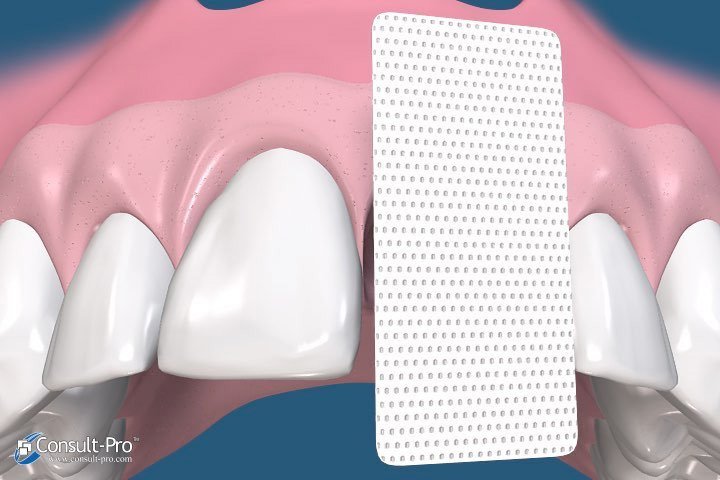
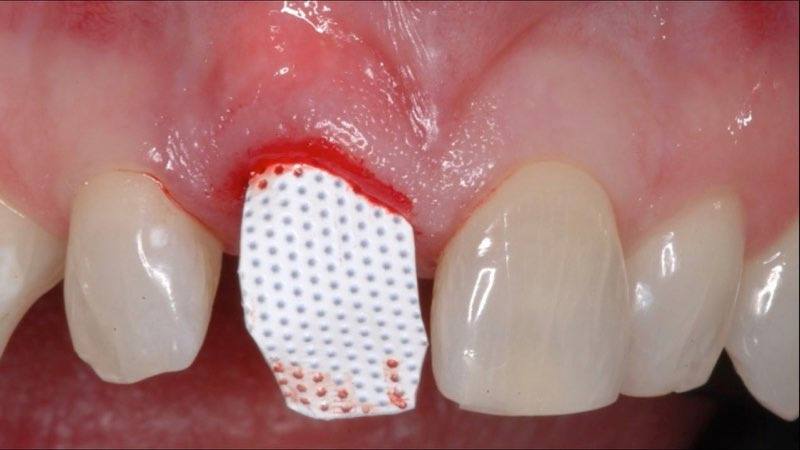
Ridge preservation involves the placement of bone grafting material into the extraction socket in order to preserve the dimensions of the bone for future dental implant placement. The scientific literature states that 50% of the natural bone width is lost within a year (Schropp et al, 2003b) and 2/3 of that loss occurs within the first 3 months. When ridge preservation is utilized, those bone contours are preserved, resulting in improved function, reduced damage to adjacent structures, less invasive procedures, less cost, and potentially better esthetics (Nevins et al, 2006; Darby et al 2009)
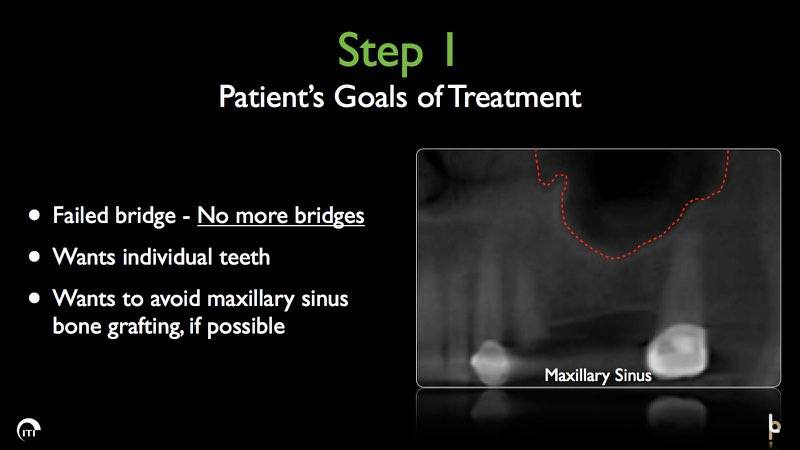
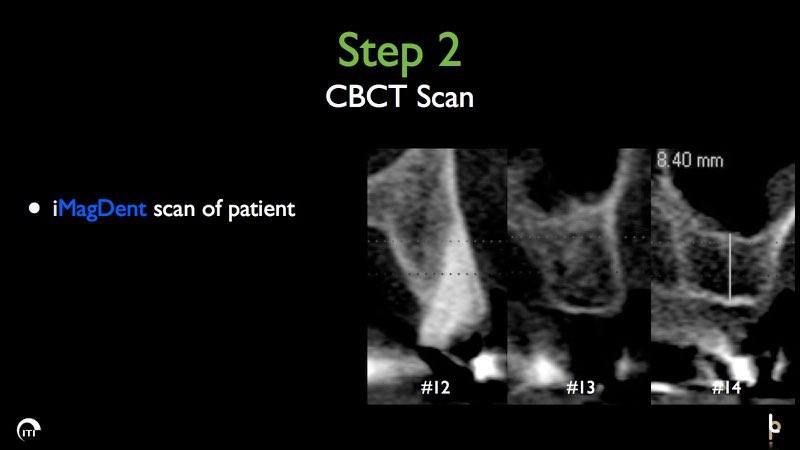
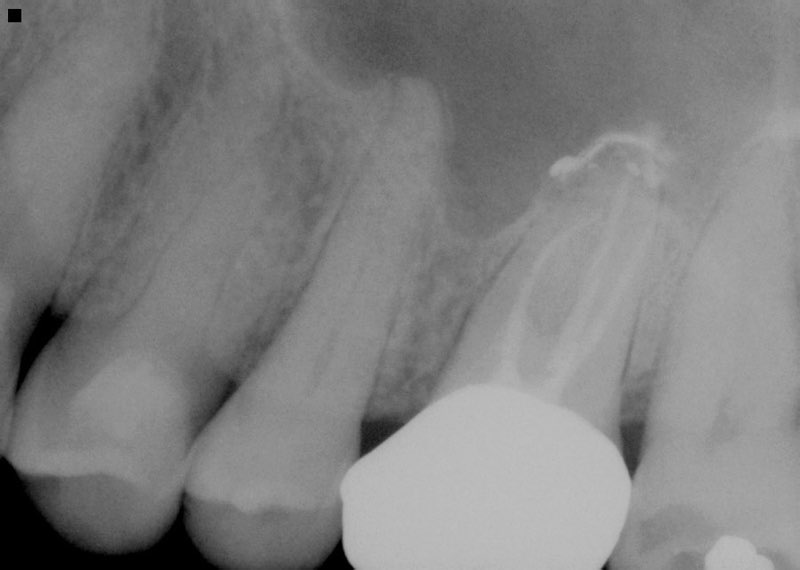
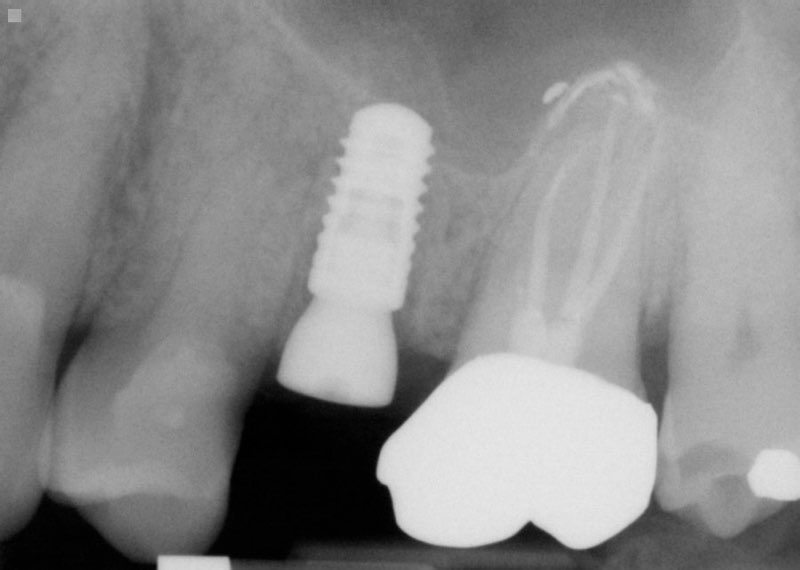
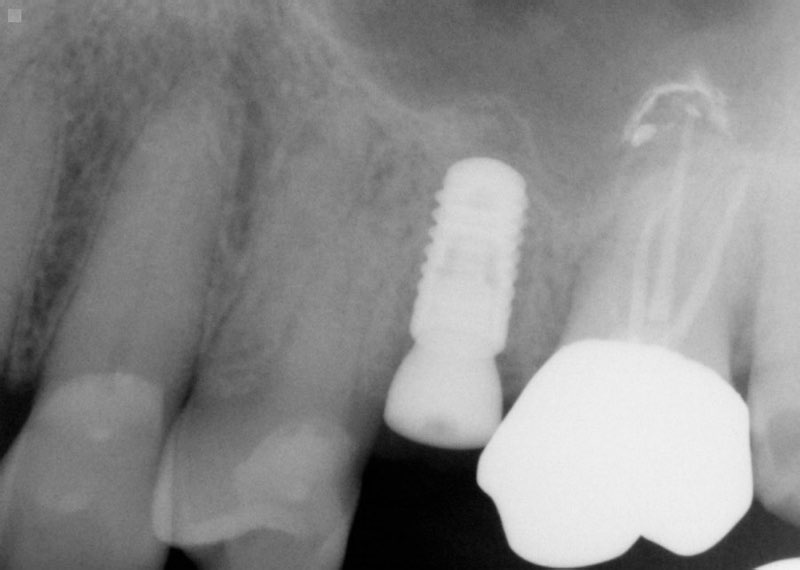
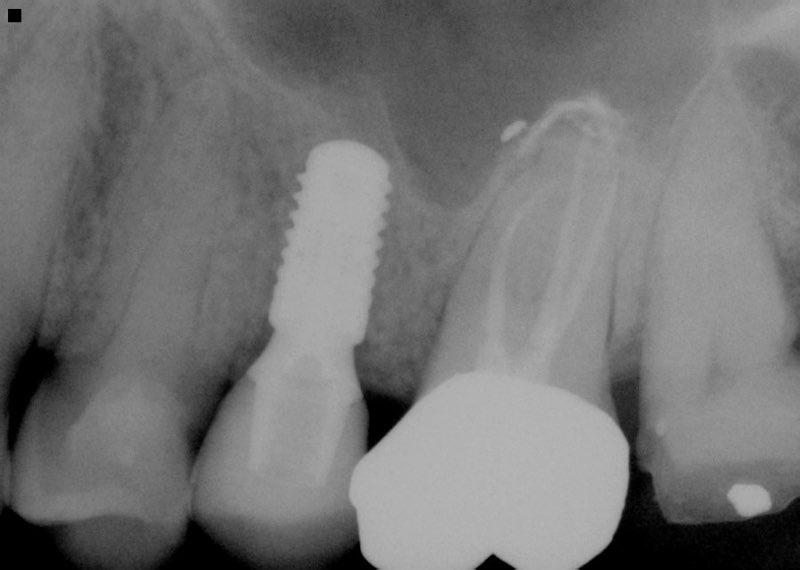
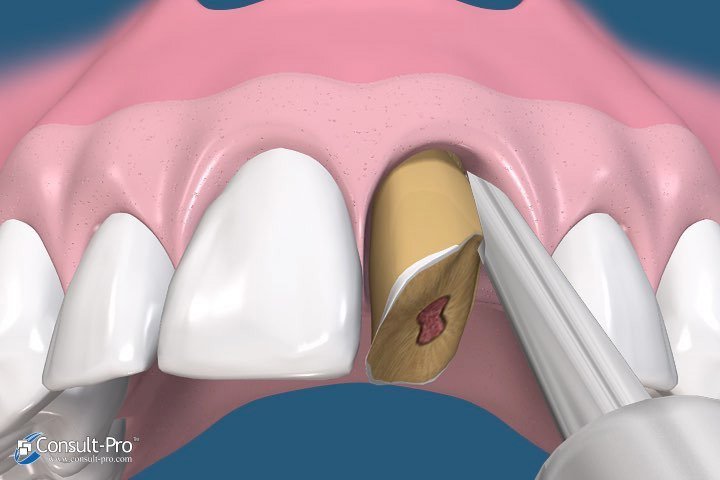
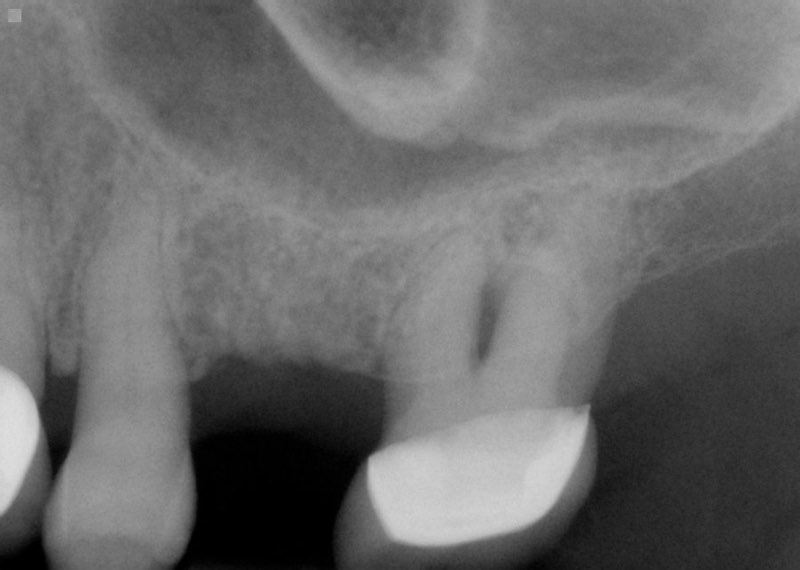
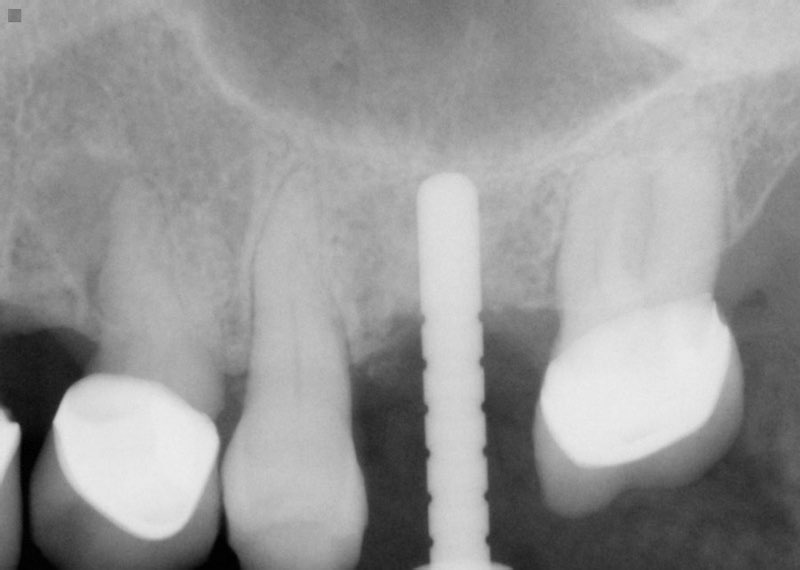
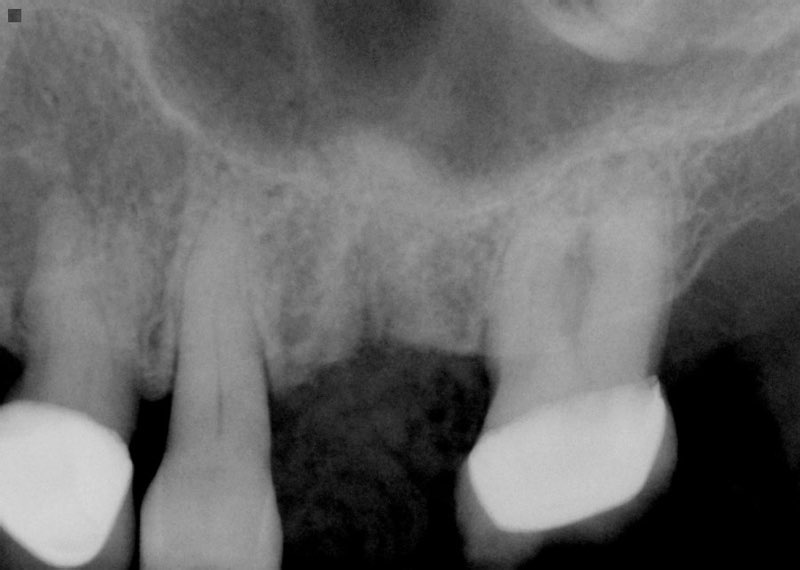
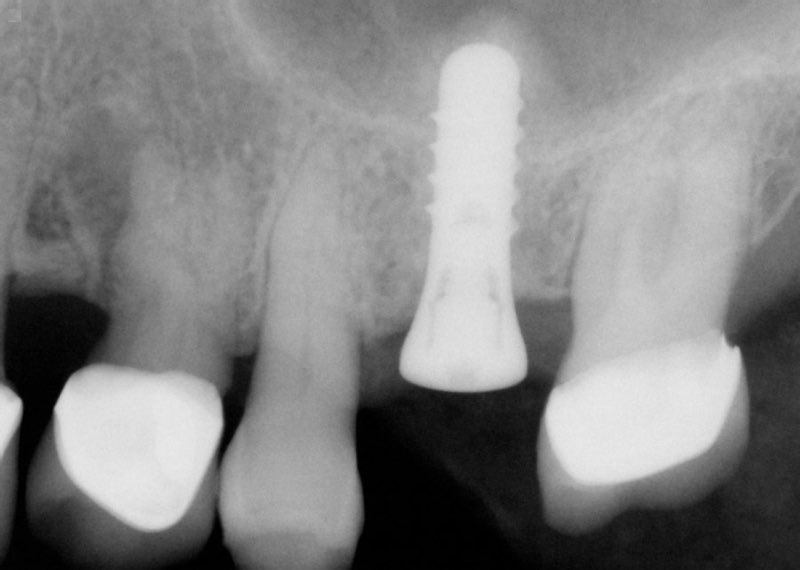
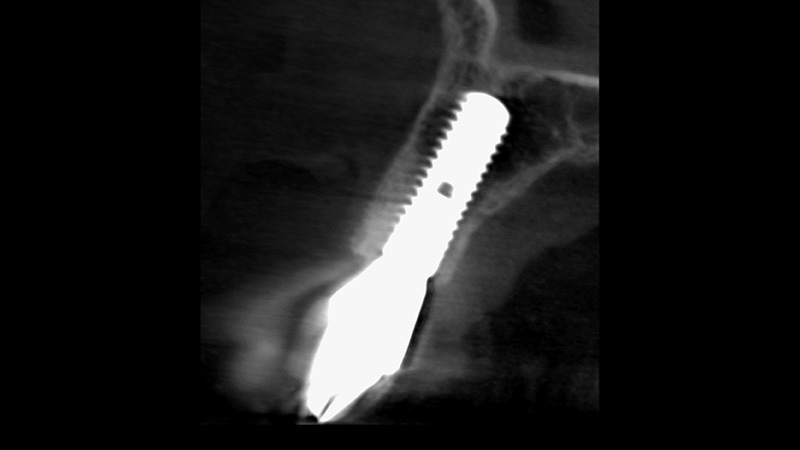
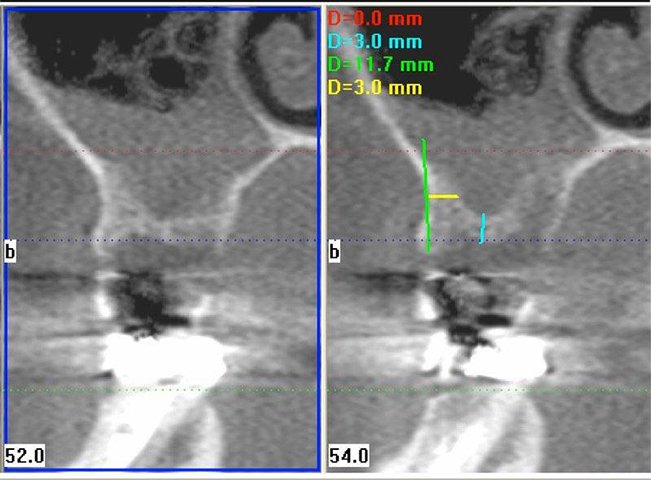
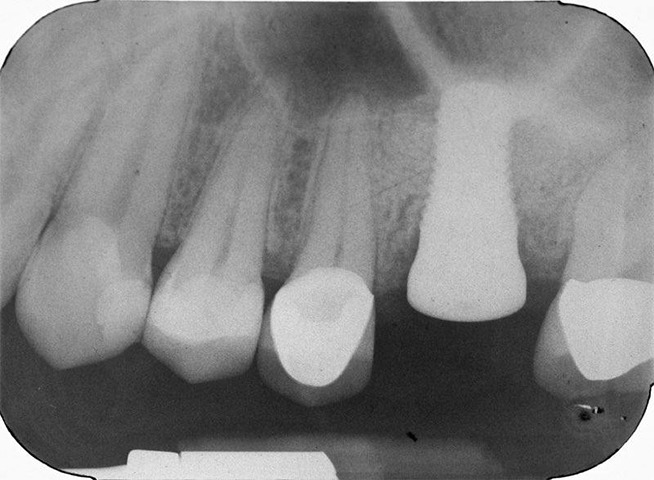
In the Case #1 below, tooth #13 (third unit from the right in the first x-ray) had a fracture that had effectively split the tooth, causing the patient pain. The tip of the root of the tooth was in close contact to the maxillary sinus. Dr. Lorenzana decided that there was too much risk for a sinus perforation to place the implant at the same time as the removal of the tooth. Therefore, a ridge preservation was performed (x-ray #2), and the graft was allowed to heal 4 months. At that time, the implant could successfully be placed away from the sinus. The final photograph shows the final result, with the implant restored with an all-porcelain crown.
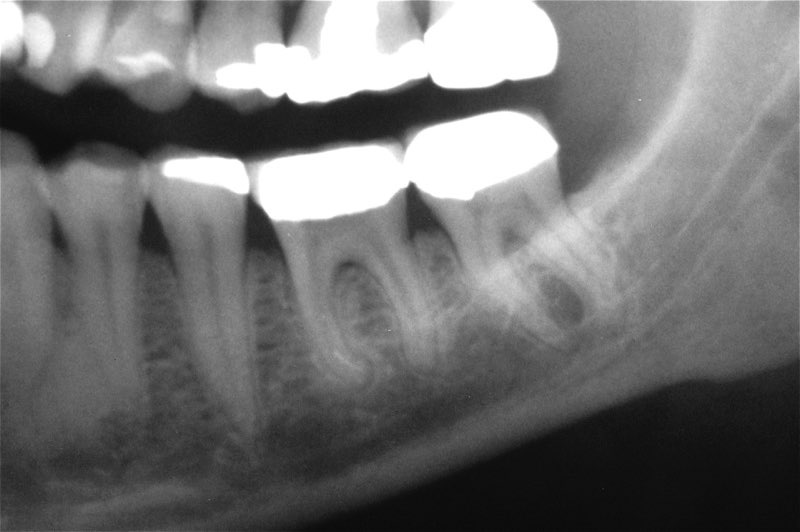
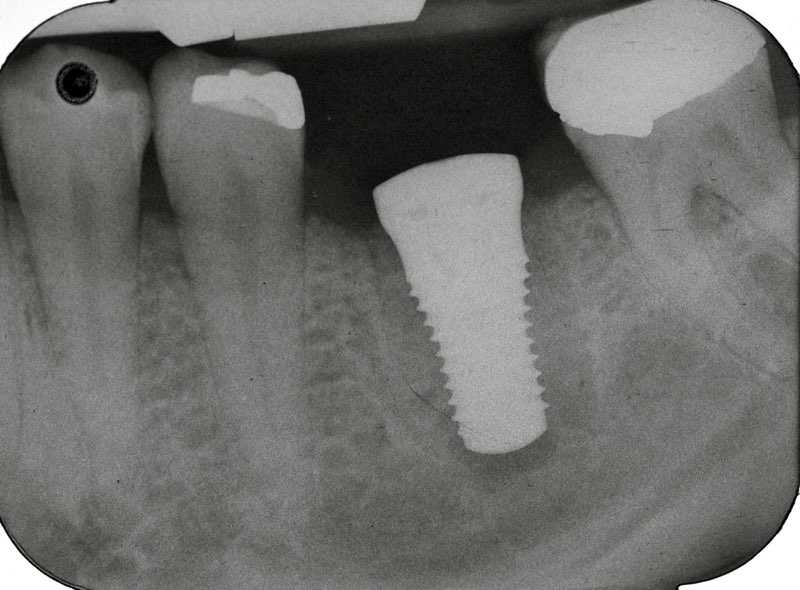
In patient Case #2, a ridge preservation was necessary due to a fracture on molar tooth #19 that had caused loss of bone around the socket. A ridge preservation was performed to repair the defect at the time of the extraction. Following 4 months of uneventful healing, the appropriate dental implant was placed into the healed bone and restored.
In patient Case #3, the patient’s situation was deemed unsuitable for simultaneous extraction and implant placement. However, he was also unsure when he would be able to have his implant placed due to his busy schedule. The decision was therefore made to perform a ridge preservation to allow implant placement at a later date without losing significant bone while he waited.
Restorative work by: Dr. David Karbach (Case #1), Dr. Joan Dreher (Case #2), and Dr. Kurt Riewe (Case #3) Special thanks: Osteogenics Biomedical (Lubbock, TX) for the diagrams
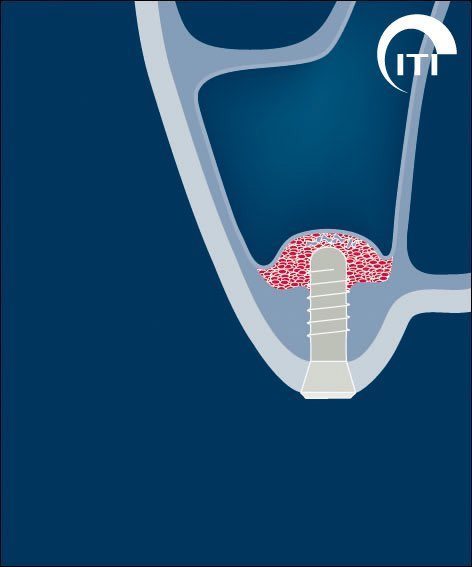
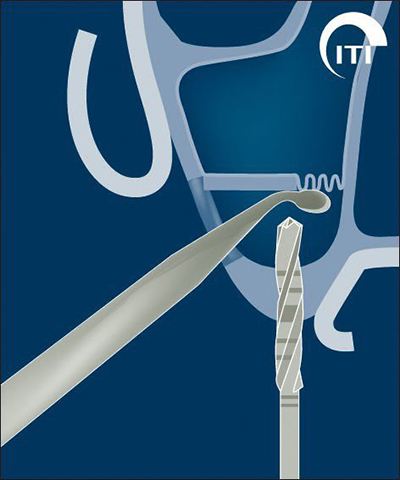
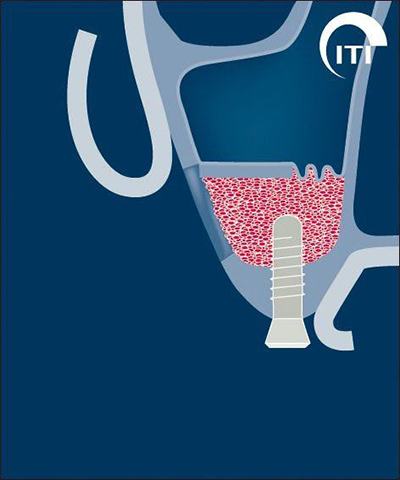
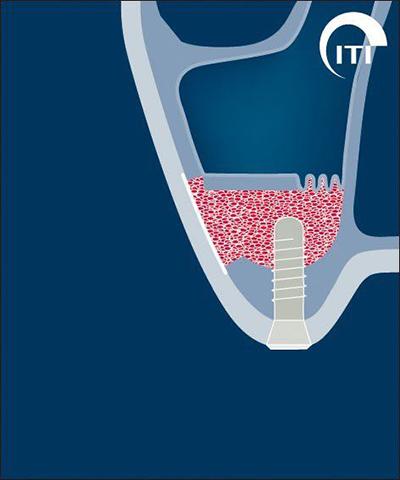
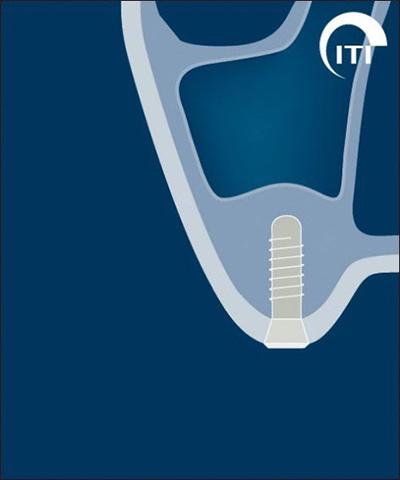
Sometimes, when there is just enough bone to secure the implant, but additional bone is necessary to place a sufficiently long implant, a more conservative osteotome sinus lift procedure can be performed.
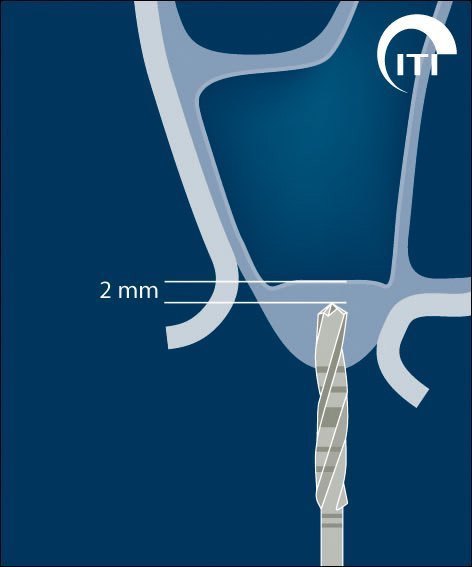
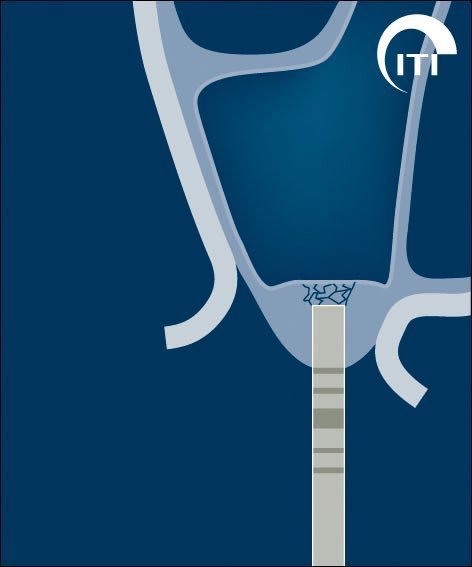
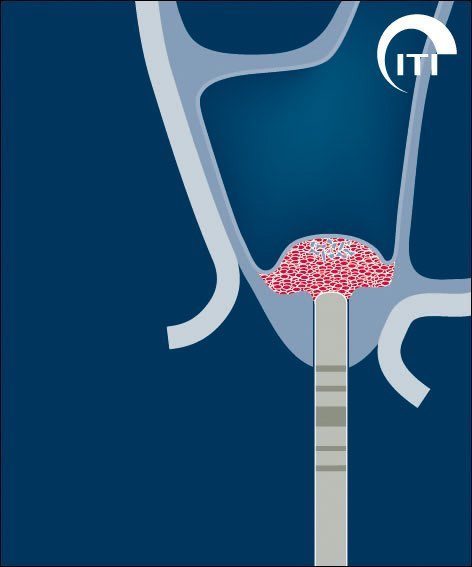
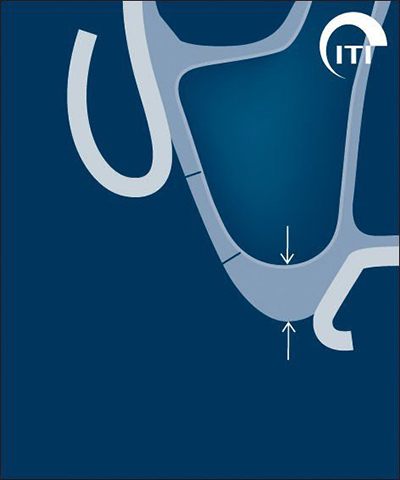
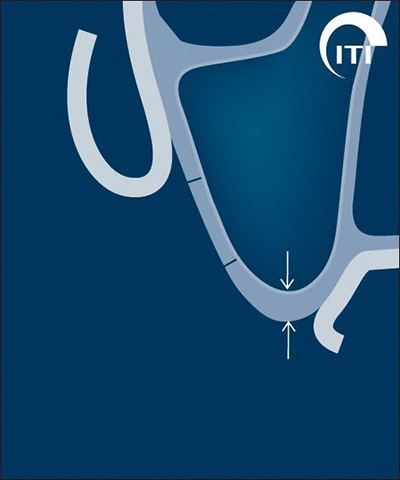
In this procedure, rather than making an opening through the side wall of the maxillary sinus, the sinus lift is performed through the same opening through which the implant will be placed. In the photos below, Figure 2 shows how the implant site preparation stops just short of the floor of the sinus. Using surgical osteotomes, the floor of the sinus is gently displaced upward to create room for bone graft material and the implant (Figure 3 and 4). The main advantage of this procedure is that a smaller incision can be made and there is usually less discomfort to the patient post-surgery.
It is important to note that this procedure is not for every indication and its success is dependent on prudent case selection. Please feel free to discuss this and any other procedure with Dr. Lorenzana.
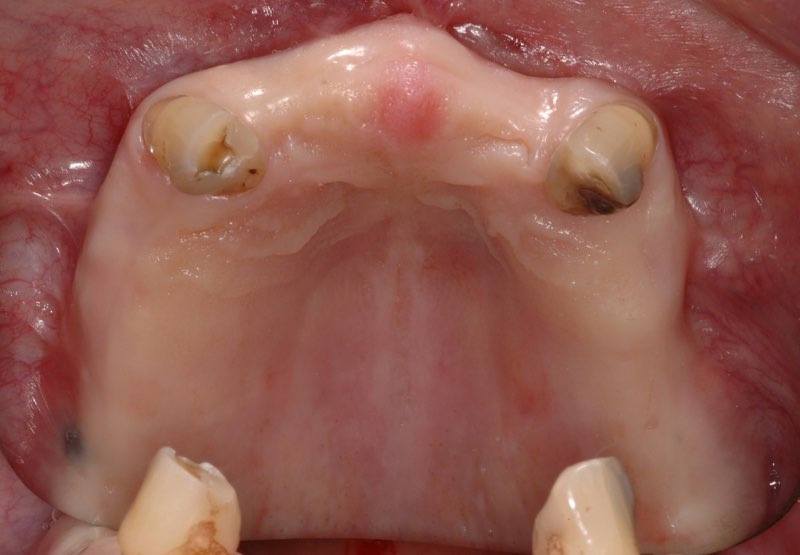
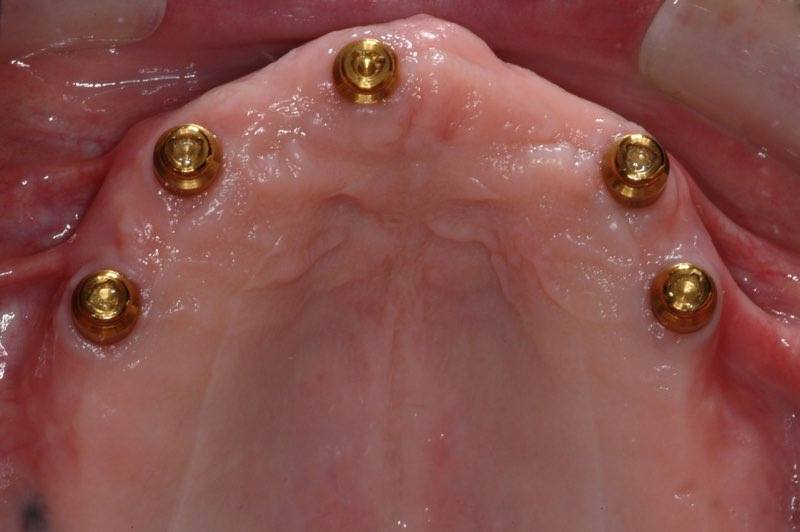
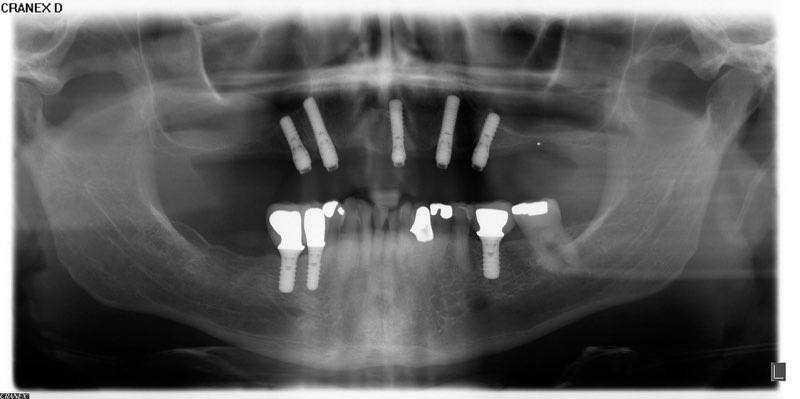
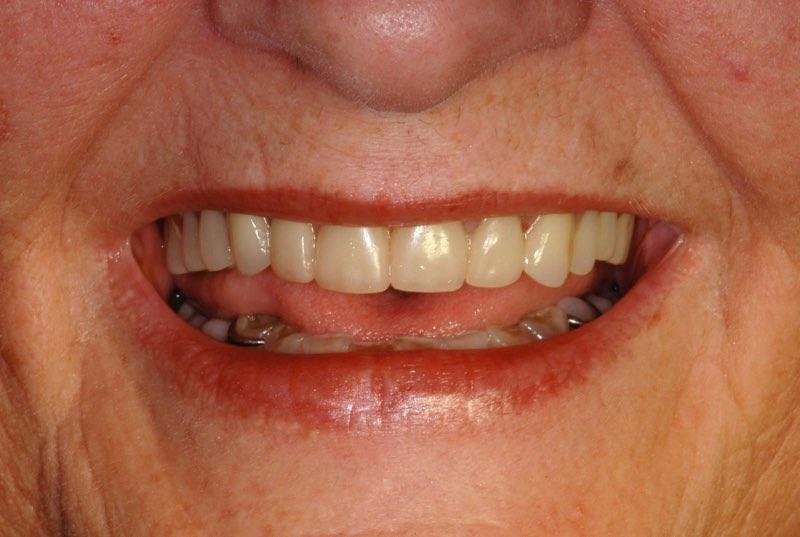
Improved Retention of a Denture with Dental Implants
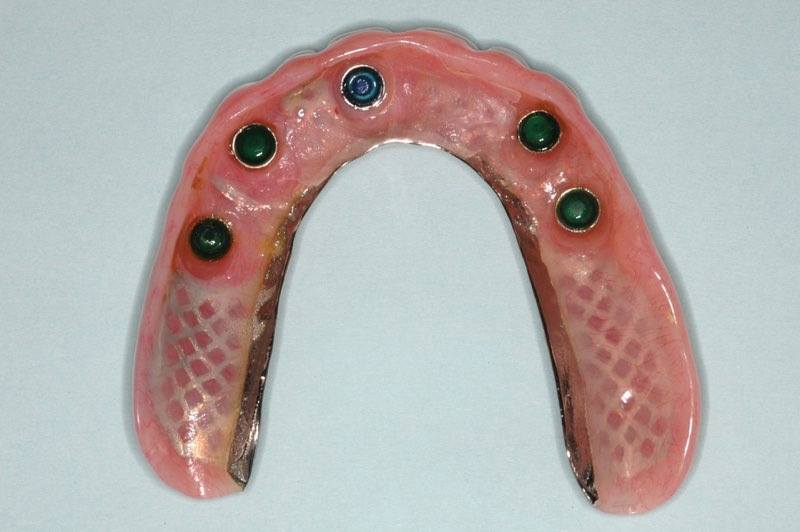
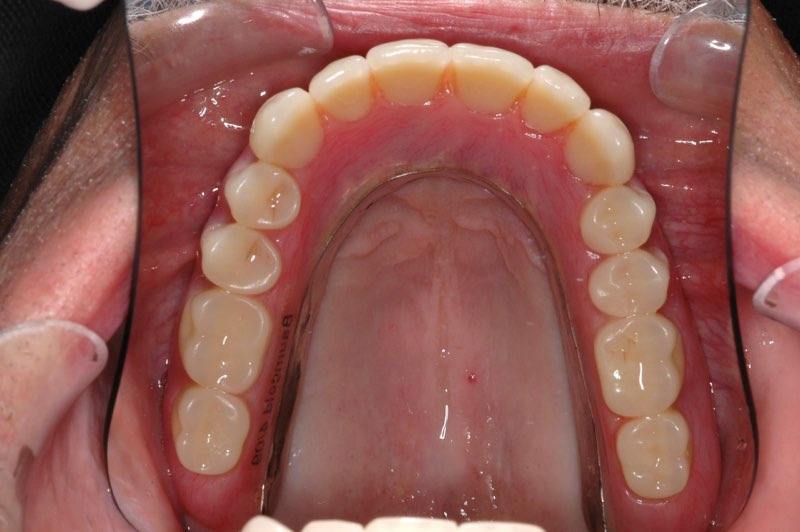
Most denture patients will tell you two things about their dentures: (1) the upper ones stay in OK, and (2) the lower ones don’t. By placing 2 -4 dental implants in the lower jaw, we can turn lower dentures from a nuisance to a success by providing fixed anchorage, leading to better function and renewed confidence. Upper dentures cover the entire palate and that can change how food tastes and feel bulky. 4-5 dental implants can improve this situation by allowing the elimination of the section that covers the palate, allowing patients to feel more freedom and taste their food as before.
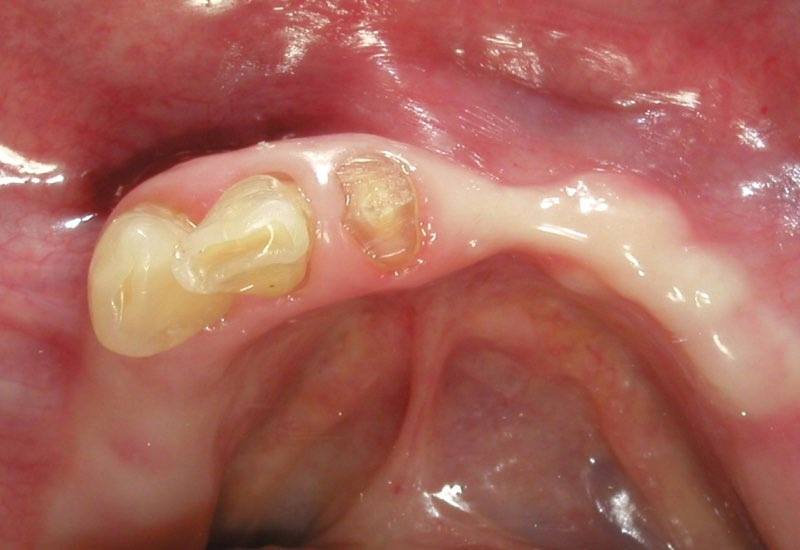
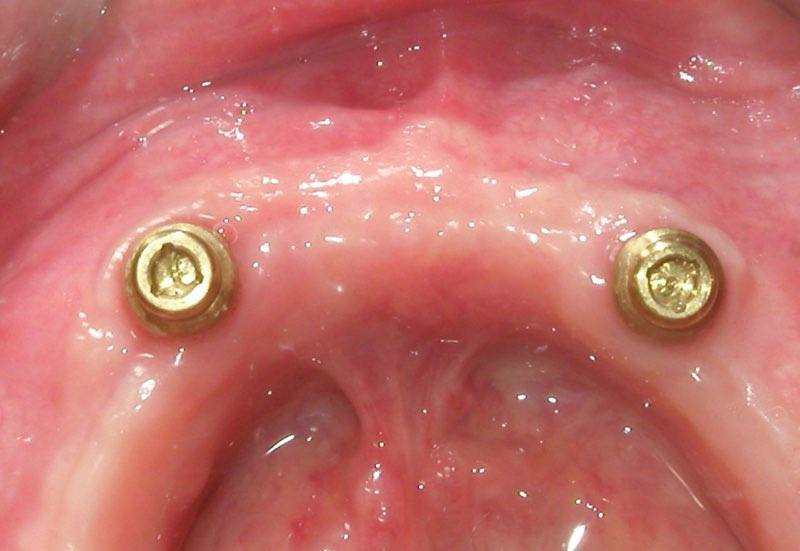
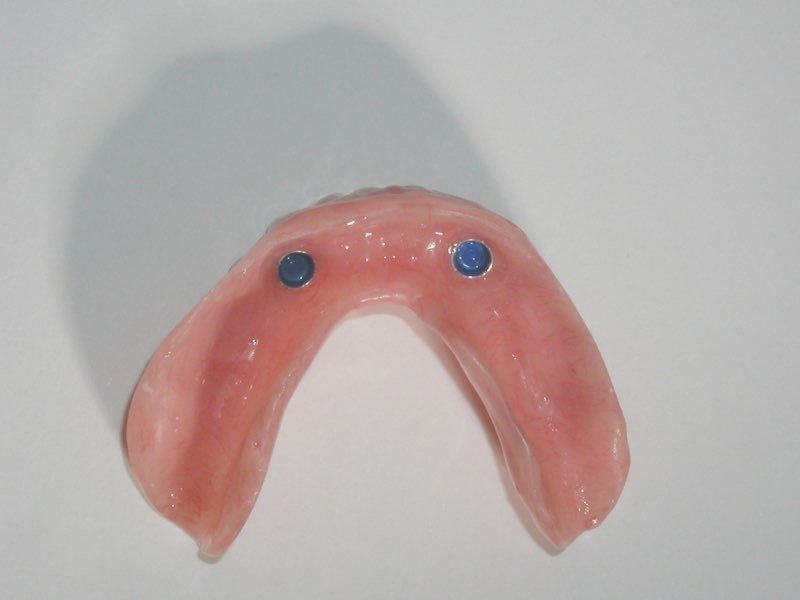
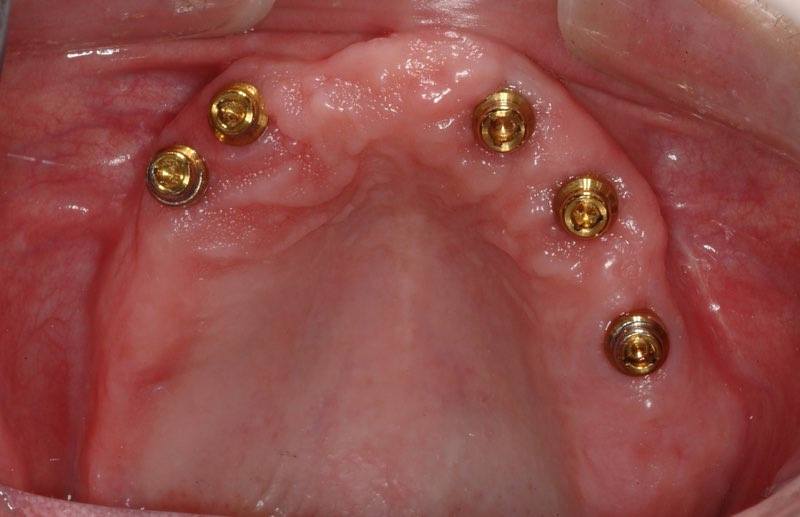
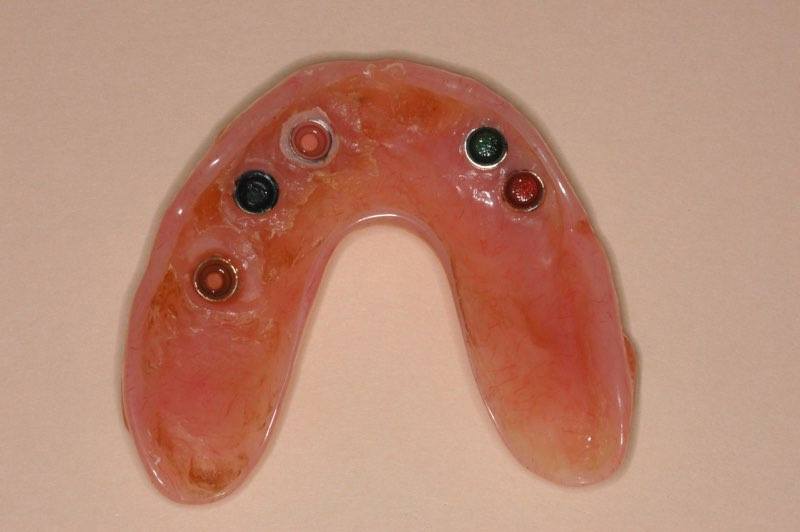
Patient #1 presented with only 3 teeth remaining to hold her lower partial denture. When one fractured, it was time to make the transition to an implant-supported denture. Locator attachments fit onto dental implants to provide a secure, removable, and cleansable solution for patients who cannot afford more implants or have limited available bone for implants.
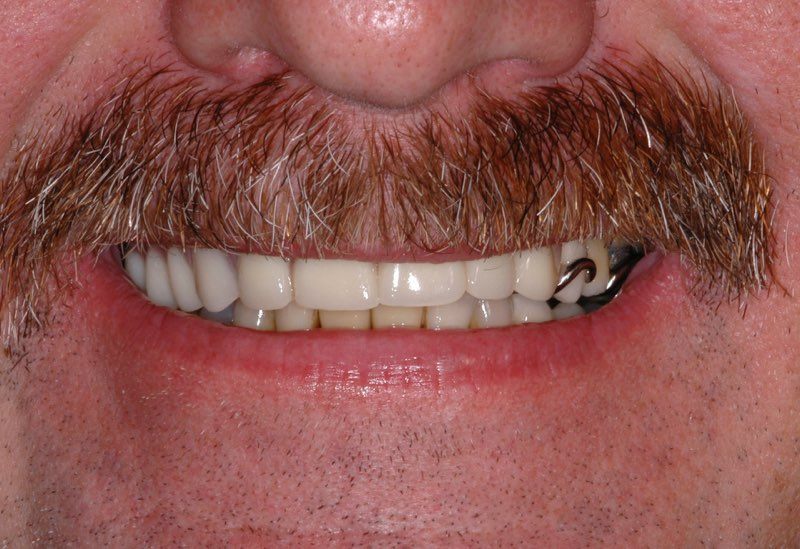
Patients #2 and 3
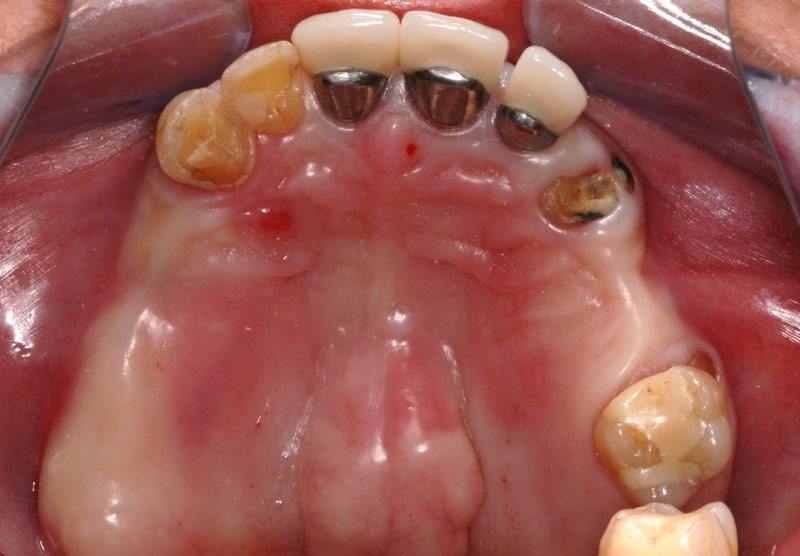
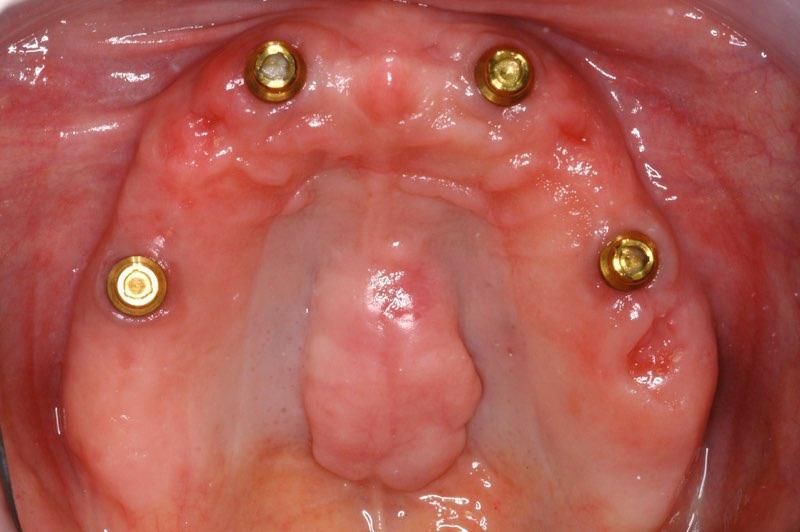
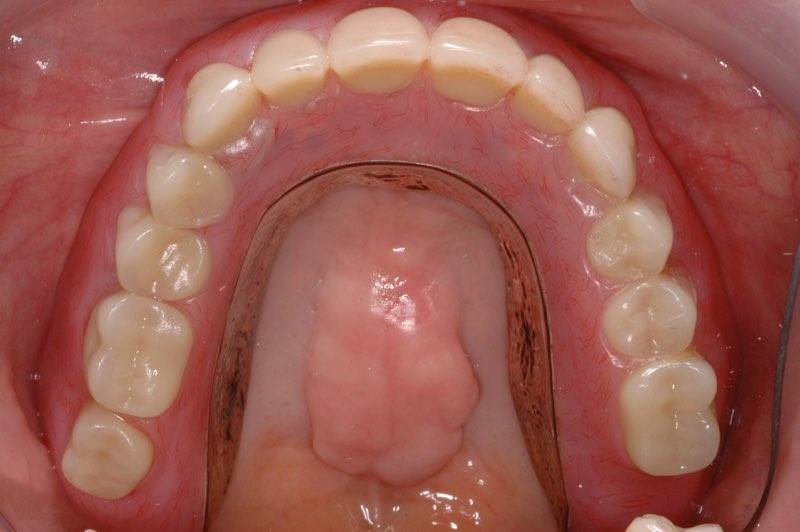
As retentive as upper dentures usually are, oftentimes patients would like to have their palate free of coverage. This would allow them a more natural feeling of function as well as improve their taste sensation. Some patients, such as Patient #3, have bony growths in the roof of their mouths (tori) that do not allow the use of a conventional denture. By placing 4-5 dental implants in the upper jaw, these patients got the best of both worlds: (1) no painful, complicated surgery to remove the palatal tori, and (2) no palatal coverage so they could enjoy and taste their foods as before.
Patient 1 Restorative work by: Dr. Alfonso Monarres (San Antonio, TX)
Patient 2 Restorative work by Dr. Michael Rothstein ( San Antonio, TX)
Patient 3 Restorative work by Dr. Kurt RIewe (San Antonio, TX)
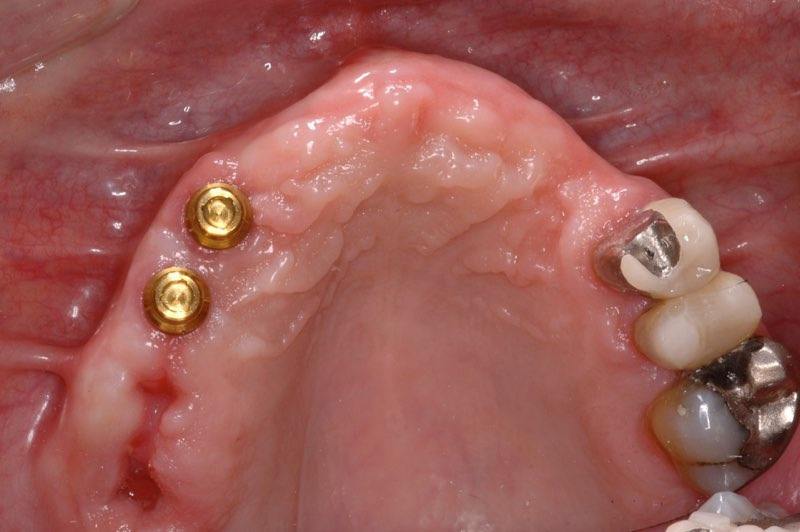
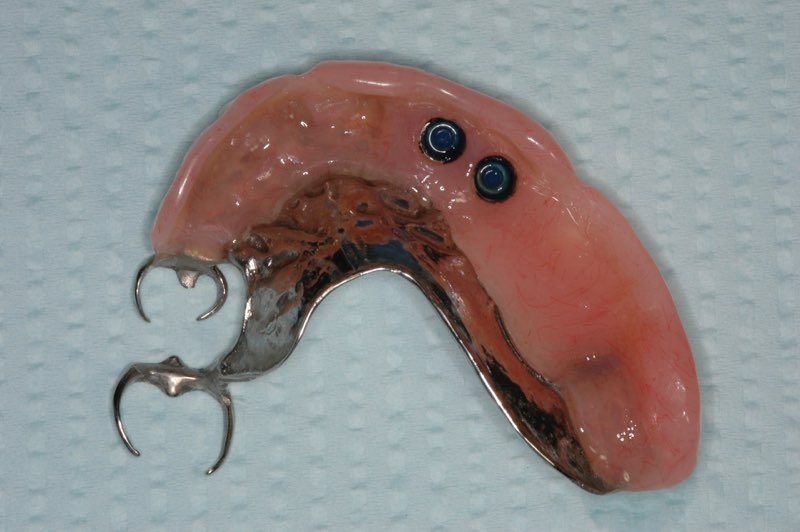
Dental implants are very versatile. This patient was not ready to commit to a denture so we placed two implants in order to help hold his partial denture until he is ready for a denture or for fixed bridgework. By simply replacing the components that fit onto the dental implant, the configuration and type of restoration can be changed depending on the patient’s wishes.
Restorative work by: Dr. David Lewis (San Antonio, TX)
Only 3 Remaining Upper Teeth
Two Implants Hold Partial Denture
Security, Stability and Function (2005)
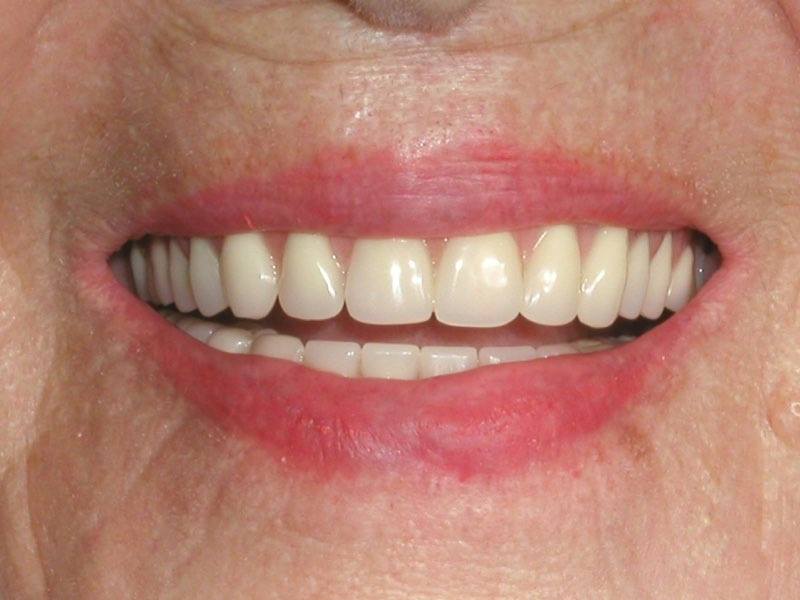
Transitioned to full upper denture - 3 years post-transition (2013)
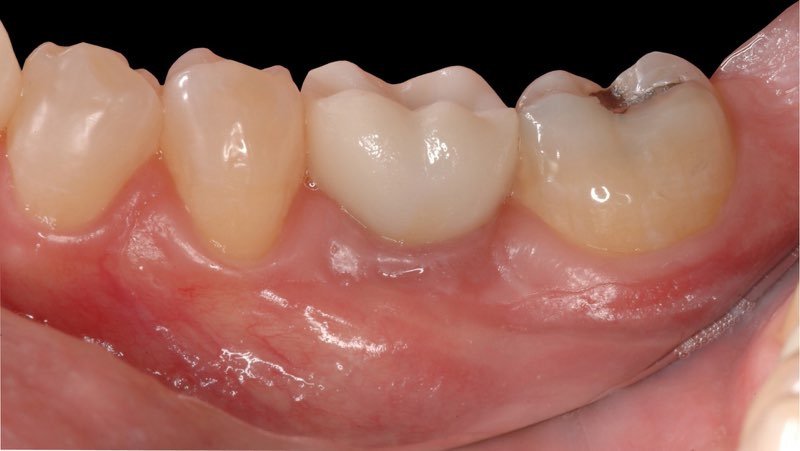
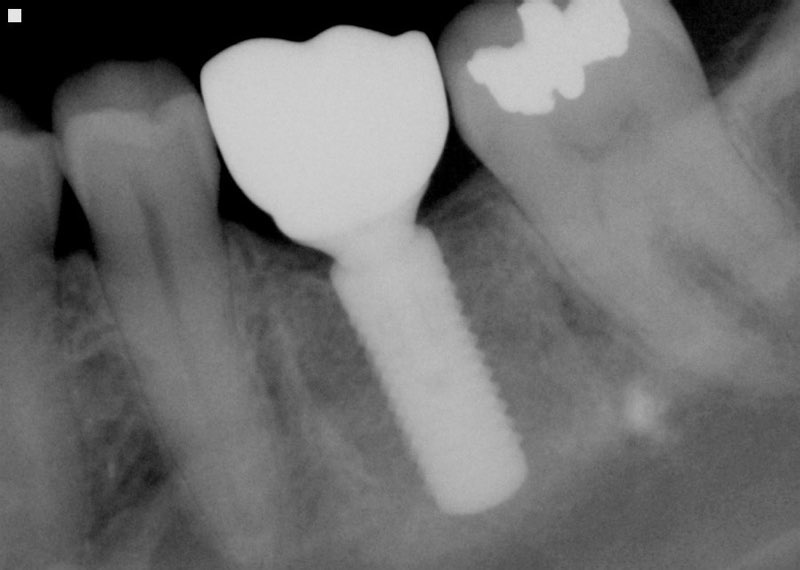
Implant Placement at a Lower Molar Site at the Time of Extraction
Implant placement in molar areas is made more complicated by the fact that molars have 2 to 3 roots as opposed to single-rooted teeth. In most cases, the failed molar has to be extracted and the socket carefully preserved for at least 3 months before an implant can be placed. Advances in surgical techniques and materials, as well as clinician experience and careful case-selection have made it possible to place implants at the time of extraction in certain situations.
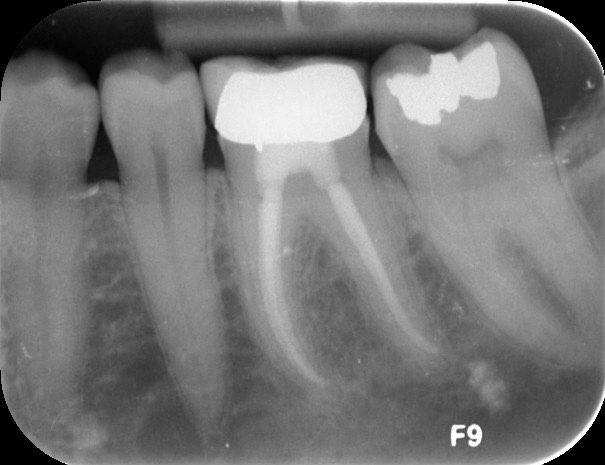
Dr. Lorenzana uses a Piezosurgery® unit to carefully remove the molar and its roots in the least traumatic fashion possible and to prepare the implant site, again causing minimal damage to the native bone. In the example below, the patient’s lower right molar needed to be removed due to painful cracked-tooth syndrome. A Straumann® Tapered Effect Wide-Neck implant was placed at the time of molar removal and the voids around the implant grafted with Bio-Oss® xenograft. 1 year follow-up photos and radiographs show the success of the procedure.
The advantage of this technique (when possible) is that a patient only has to go through only one surgery, only one recovery period, and only one time off from work. This saves our patients time and money. You can read this patient’s testimonial here.
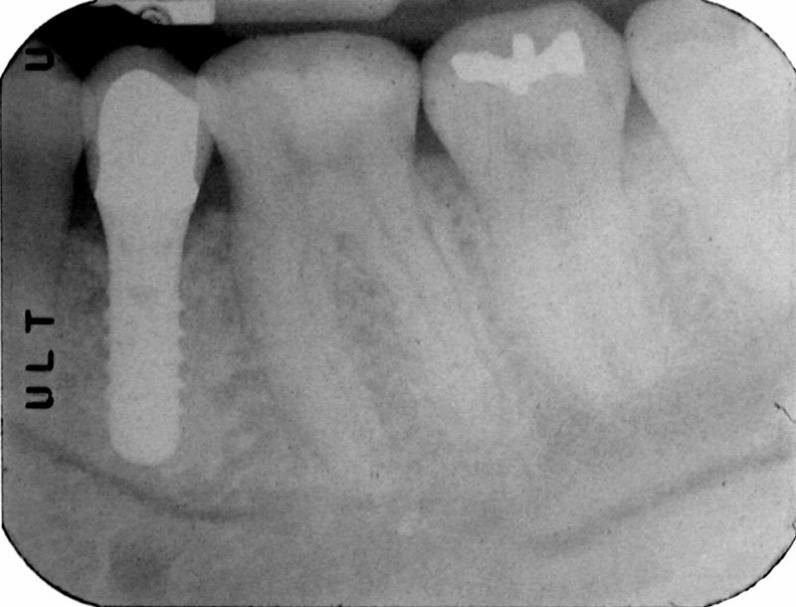
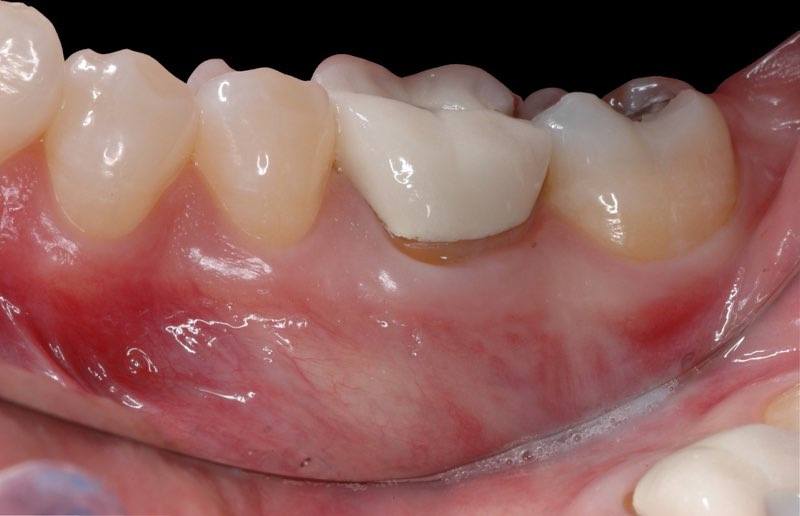
Failed Lower Left - First Molar #19
Immediate Implant Placement W/ Bone Graft
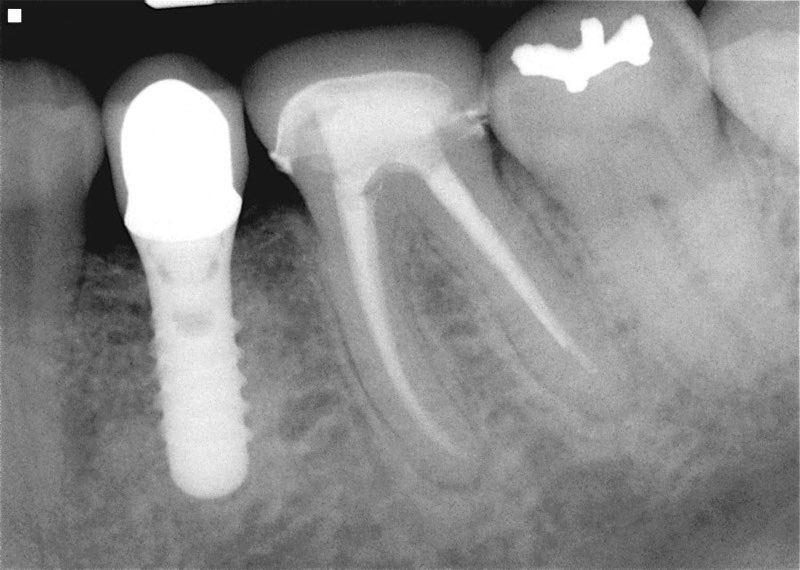
Final Result At One Year
Final Result At One Year
Final Result At One Year
Complex Solutions
Implant placement in esthetic situations
Implant placement in areas with significant bone and/or soft tissue defects
Anytime it is possible, we try to replace failed teeth immediately with a dental implant. This is called “Immediate Implant Placement.” Unfortunately, certain situations can arise that require what we call “Staged Implant Placement” in order to more predictably obtain the desired esthetic result. In this procedure, first, the tooth is removed and the extraction site is allowed to heal over with soft tissue. The site is then re-entered after a short waiting period to place the implant and rebuild the lost bone structure.
What type of situations might necessitate staged implant placement? These may include:
Esthetically important situations
High lip line (patient shows a lot of gum tissue)
Gingival (gum) recession at the site of the extraction
Presence of a large infection
Significant loss of bone
Other situations...
Generally speaking, Staged Implant Placement is the preferred mode of treatment when the desired esthetic outcome is considered unpredictable due to a few of the circumstances listed above.
In the case presented here, Karla presented to our office with a failed central incisor (tooth #8). She had both a high lip line that showed the entire length of her tooth, and the gingival margins of the two front teeth did not match. In fact, the tooth to be removed had a slight amount of recession, creating the potential for further tissue loss upon removal, Staged Implant Placement was performed in order to more predictably obtain the result Karla most wanted: A beautiful, natural-looking smile.
Restorative work by: Dr. Jon Oefinger (San Antonio, TX)
CT scan imaging by iMagDent (San Antonio, TX)
Note the high lip line and gum exposure
Recession, exposed crown margin, uneven gum line
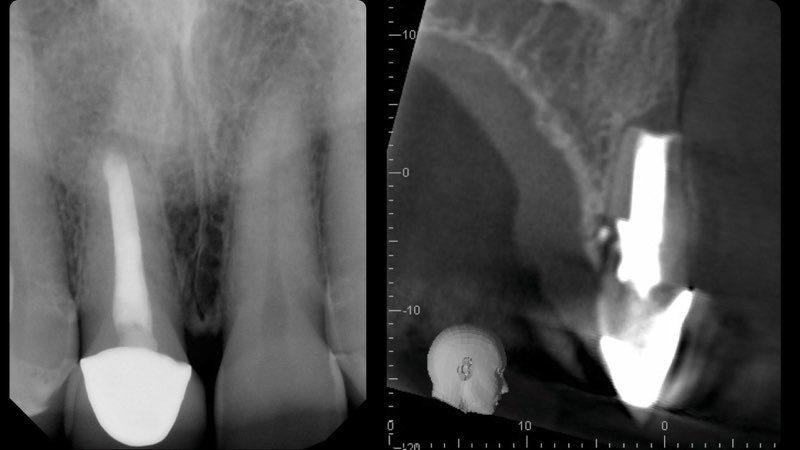
Initial x-ray and CT scan
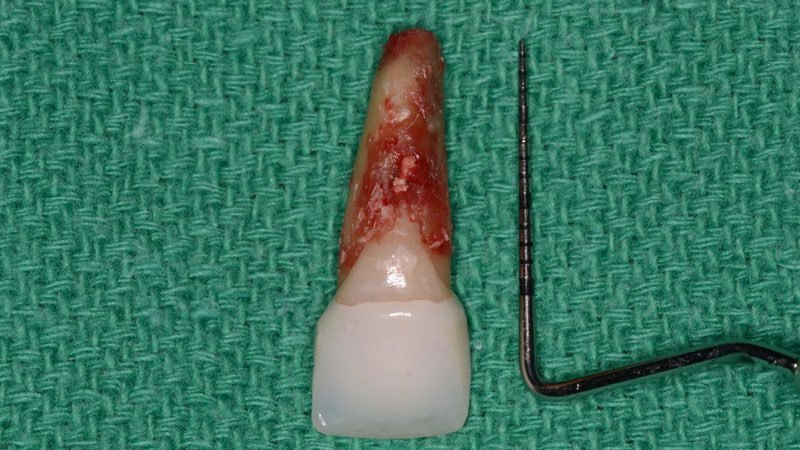
Root resorption visible after extraction
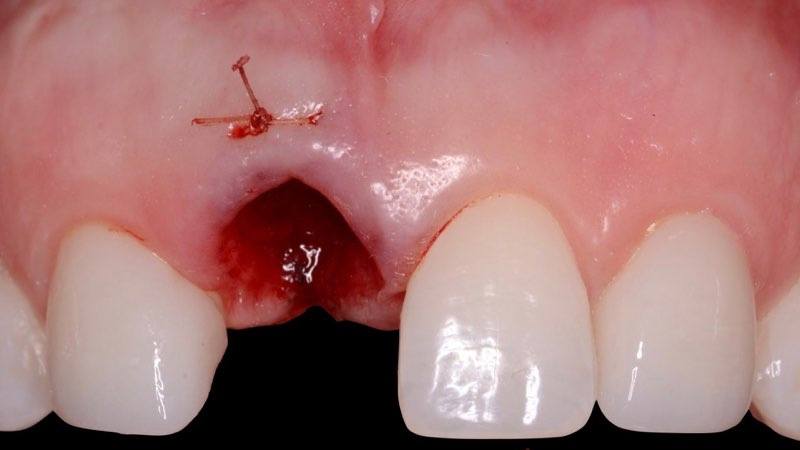
Minimally traumatic tooth removal, collagen plug in socket
Customized temporary partial denture (flipper)
Temporary in place, adjusted to support tissues
2 months healing, ready for implant
Bone Level dental implant
4.1 x 14 mm
Extraction socket at time of implant placement
Bone defect leaves implant partially exposed
Bone grafting of the defect is performed
First layer of collagen membrane in place
Second layer is placed to add volume and protect graft
Radiograph after implant placement
3 months healing
Uncovering of the implant
Tissue profile prior to shaping
Temporary crown adjusted to create ideal tissue profile
Provisional in place, tissue shaping begins
Tissue shaping complete; ideal tissue profile created
Before tissue shaping, and after
Tissue profile mimics the natural teeth
Recording tissue profile: provisional on master cast
Impression material captures tissue contours onto cast
Tissue profile recorded on cast, ready for laboratory
Tooth in a day! Replacement of a Resorbed Front Tooth w/Immediate Temporary Crown
Few things are as traumatic as moving to a new city. Now move to a new city and find yourself with an emergency involving your front tooth. This is the situation our patient found herself in after being transferred from Washington D.C. Her dentist in DC spoke with the Program Director of the prestigious Graduate Periodontics Department at UT Health Science Center at San Antonio Dental School, Dr. Brian Mealey, and he referred the patient to our practice and that of prosthodontist Dr. Jason Gillespie.
The initial examination revealed a deep pocket on the palatal side of her front left central incisor (tooth #9). Her previous dentist advised that he had observed root resorption occurring previously and recommended we discuss removal of the tooth. After discussing the options with the patient, it was decided to remove the tooth, place an implant, and if possible, create a temporary tooth on the same day for the patient. Although not always possible for every patient, fabricating a tooth or several teeth in a day is a reality. Contact us for more information.
During the pre-surgical evaluation, it was noted that the gingival levels were uneven, with slight gum recession on tooth #9 (see photo 2). It is usually expected that the gum recedes at least 1 mm once a tooth is removed. In this patient’s case, that would have been disastrous for her smile, as she has a high lip line. This is where our ability as periodontists to diagnose and treat esthetic dilemmas becomes important in dental implant surgeries where the final esthetic outcome is critical. Therefore, along with the requisite bone grafting within the socket, it was decided to add soft tissue in the form of a gingival graft in order to help preserve and enhance the final esthetic outcome (see photos 6 and 7 below). As you can see, it was well worth it in the final result.
Restorative work by: Dr. Jason Gillespie (San Antonio, TX)
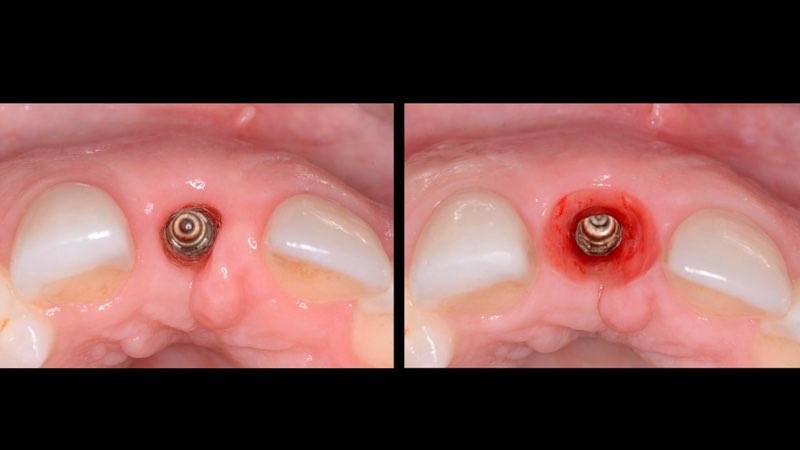
Extraction of a Fractured Tooth and Immediate Implant Placement
Similar to patient #13, Linda presented to our office upon referral from her dentist for a failed front tooth. In this case, Linda found herself with a fractured left front tooth (tooth #9). She had long ago traumatized both front teeth and had multiple procedures done over the years to try to hold on to them: at least 2 root canals, root canal surgery, build ups, pins, and multiple crowns. Finally, tooth #9 fractured. Figure 2 shows arrows pointing to the fracture line visible on the x-ray.
Following careful removal of her tooth root, an implant was placed and the socket grafted with bone grafting material. A customizable healing cap was also placed to help preserve the overall tissue contours by preventing tissue collapse. After 3 months of healing, an impression was taken of the implant in order to fabricate the custom abutment and crown (Figure 6 and 7). In contrast to Patient #13 in the previous album, a temporary crown was not made the day of surgery. There are many reasons as to why an temporary crown might not be made at the same time as implant placement: the patient’s own wishes, cost, an unfavorable bite or tooth position, presence of infection, or lack of stability of the implant, among other reasons.
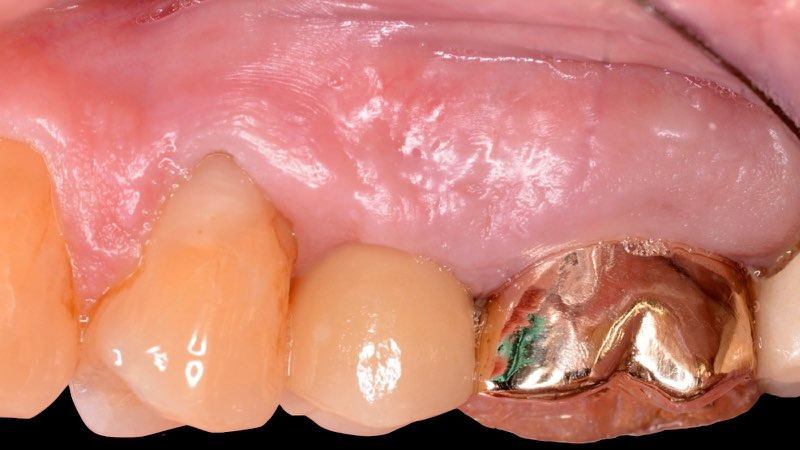
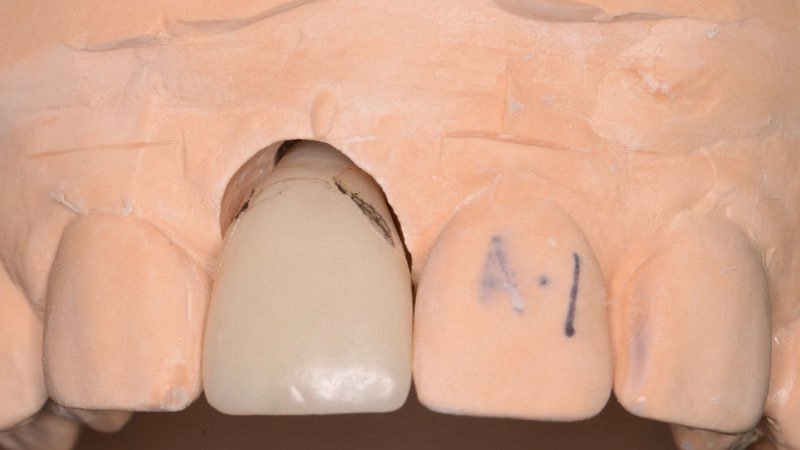
The final photo shows an esthetic result that is a significant improvement over what Linda came in with. Note the ideal tissue position as well as ideal crown contours and color match provided by her dentist. The gray crown margin visible at the gumline at the initial visit is gone as well. After two years, the results continue to look fantastic.
Restorative work by: Dr. Michael Miller (San Antonio, TX)
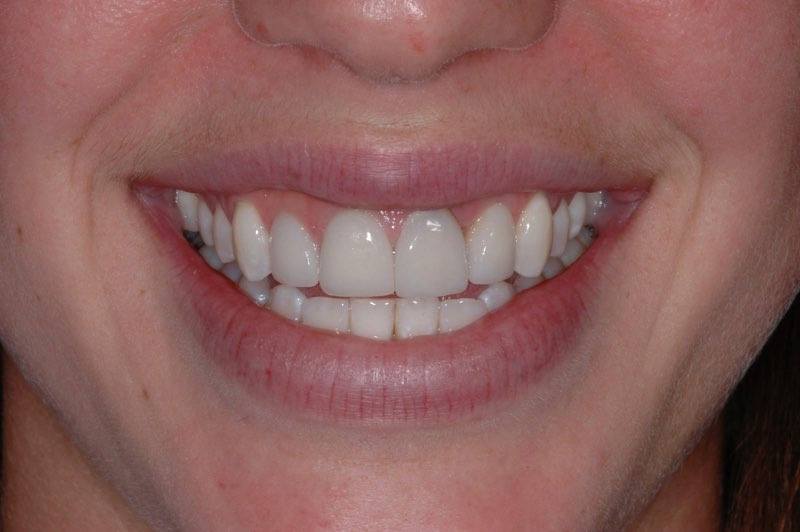
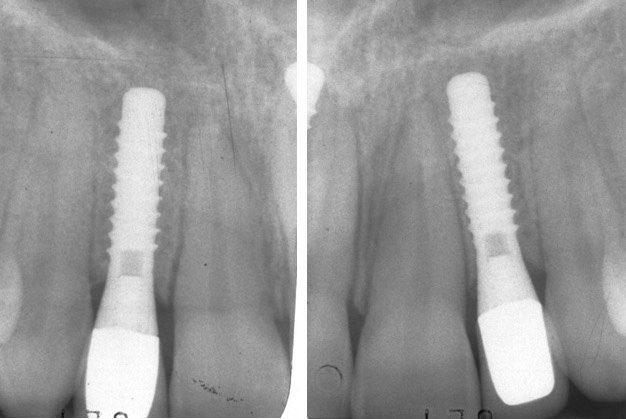
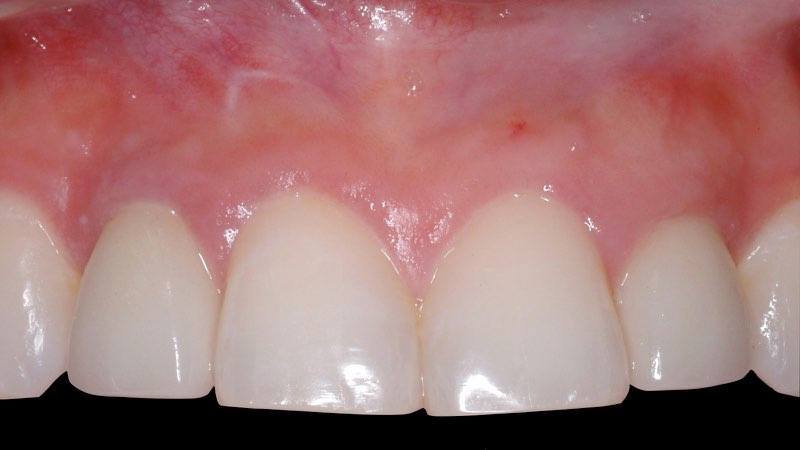
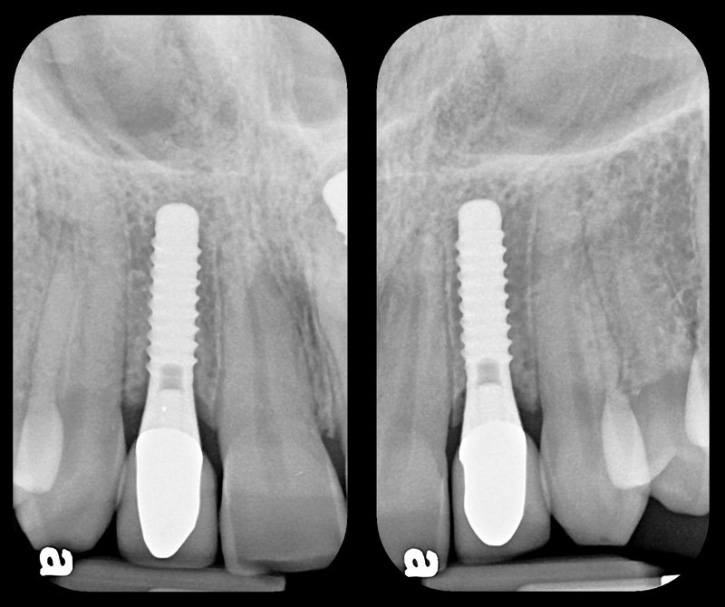
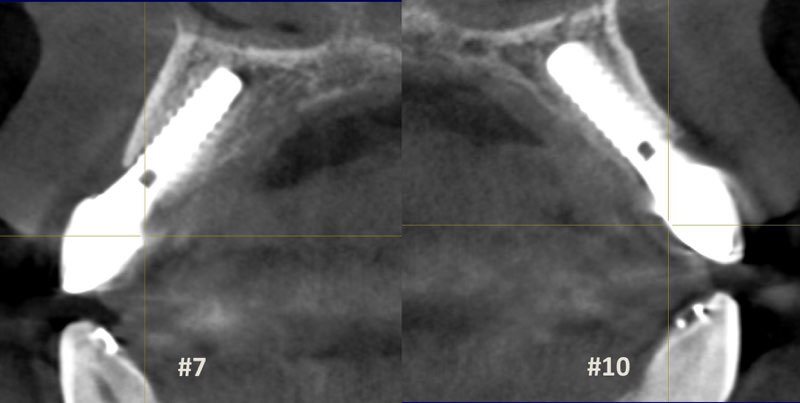
This patient was referred to us for dental implant placement to replace congenitally missing (meaning she was born without them) lateral incisors #7 and #10. Aesthetic recontouring was performed to create the ideal tooth length for all of the front teeth and tissue sculpting was expertly performed by the restorative dentist to create the impressive final result. Her dental reconstruction was the beginning of a complete transformation for this patient.
Restorative work by: Dr. Will Martin (Gainesville, FL)
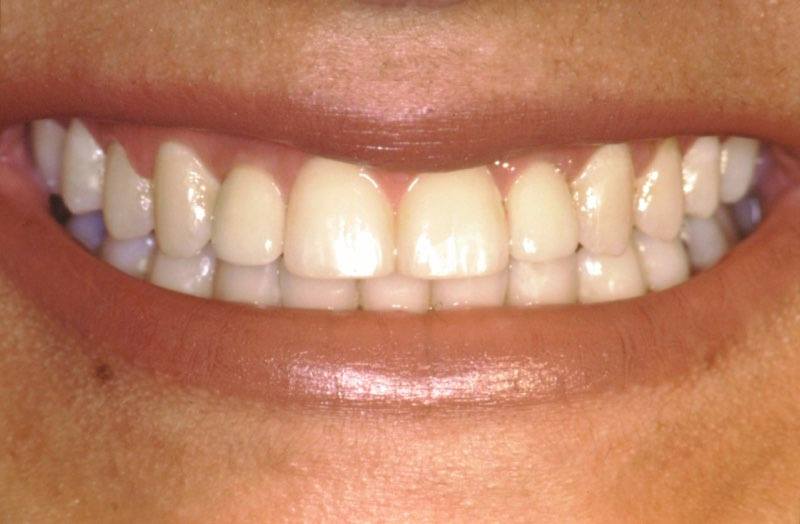
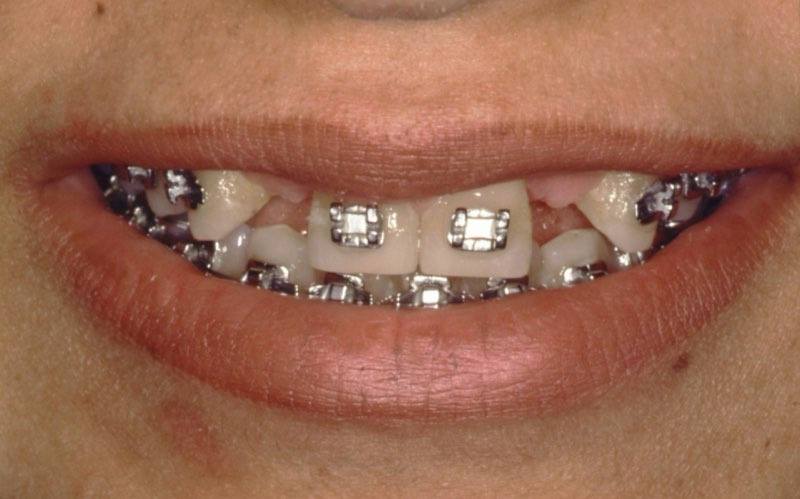
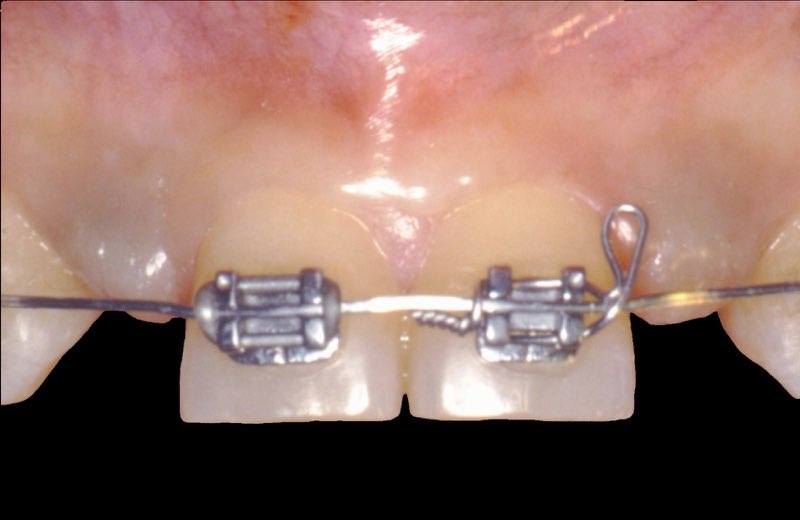
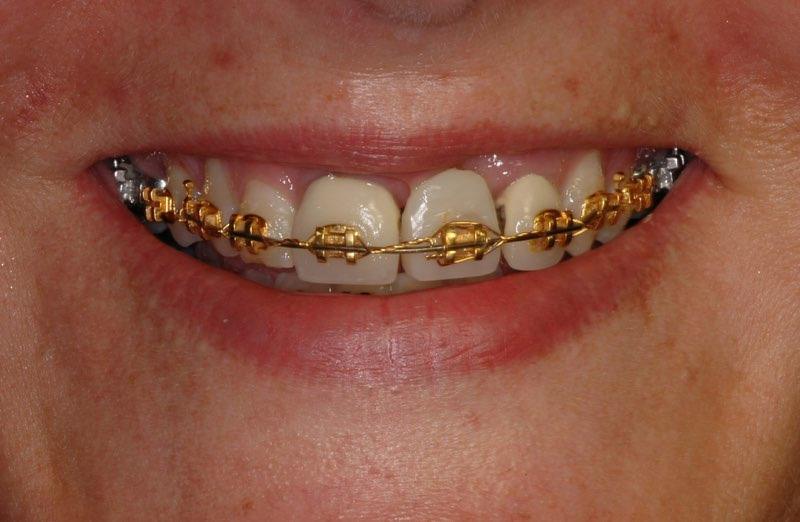
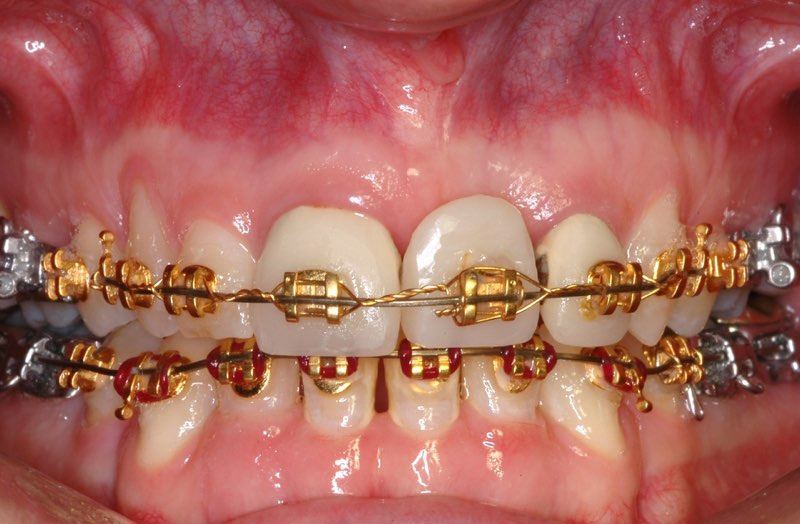
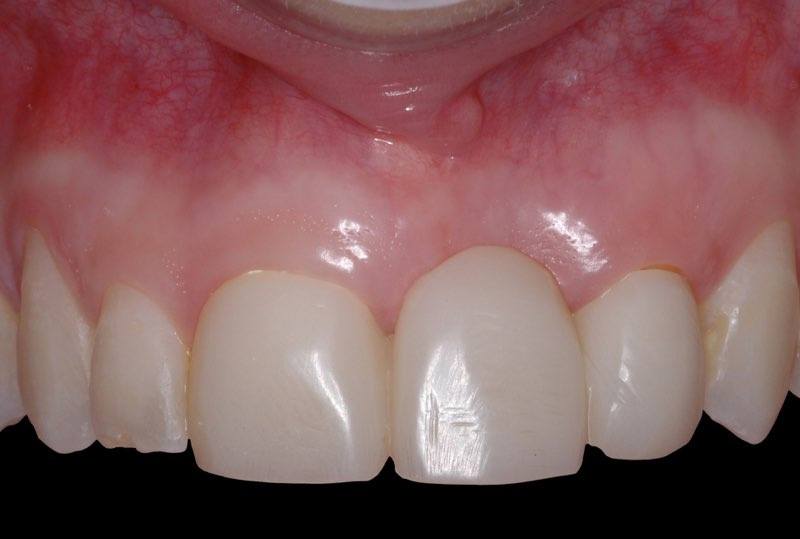
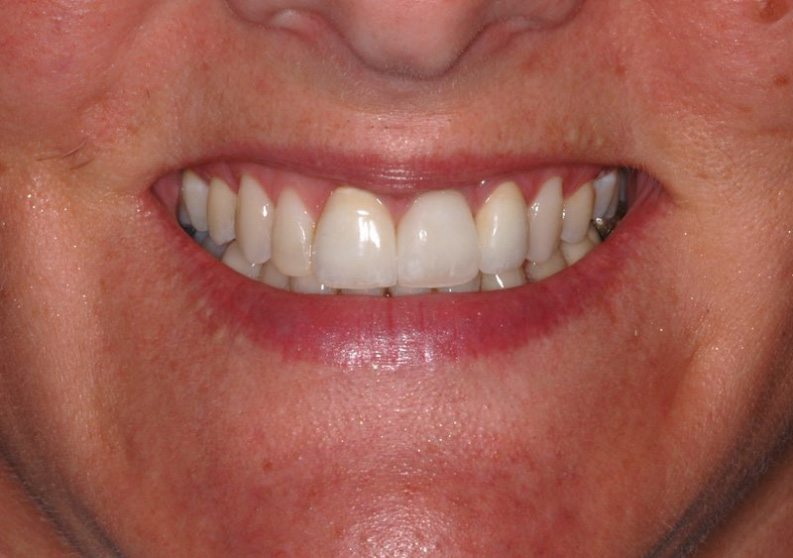
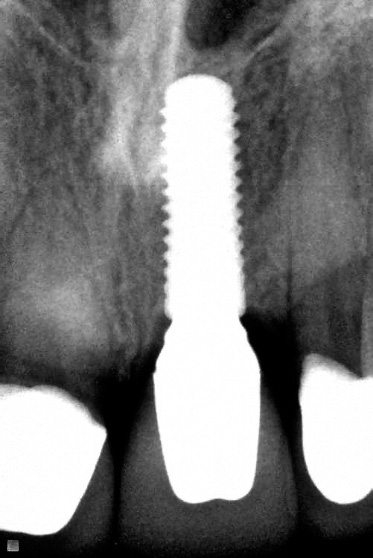
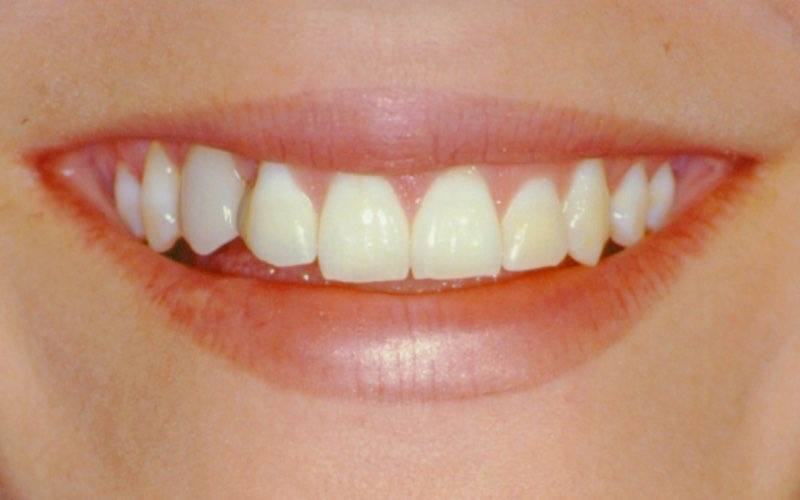
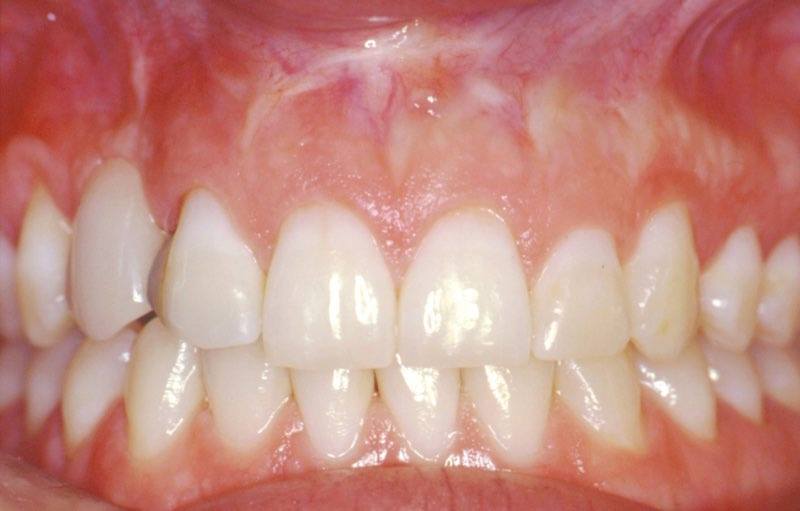
Tiffany presented to our office upon referral from her orthodontist. Tiffany had lost her front tooth (#9) traumatically years earlier and had just finished orthodontics (braces) when she was referred for an evaluation for an implant. Tiffany had a bridge before and was unhappy with the function and esthetics of the bridge so she chose to pursue dental implant treatment.
Prior to surgery, Tiffany was referred to iMagDent Digital Dental Imaging Center for a cross-sectional CT scan and virtual implant planning. This allowed us to visualize the proposed implant position, as well as the bony contours, prior to surgery. With the CT scan, many possible complications can be avoided and we can obtain a more predictable esthetic result. We partner with iMagDent to provide all our implant patients state-of-the-art imaging technology.
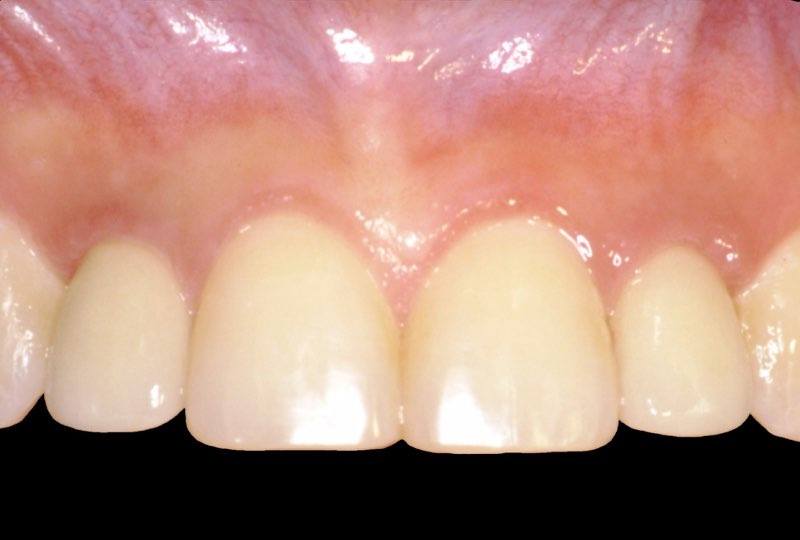
In addition to implant placement, we also performed esthetic crown lengthening on Tiffany’s adjacent teeth to help her get the esthetics and function she was looking for.
Orthodontic work by: Dr. Brad Bruchmiller (San Antonio, TX)
Restorative work by: Dr. Jason Gillespie (San Antonio, TX)
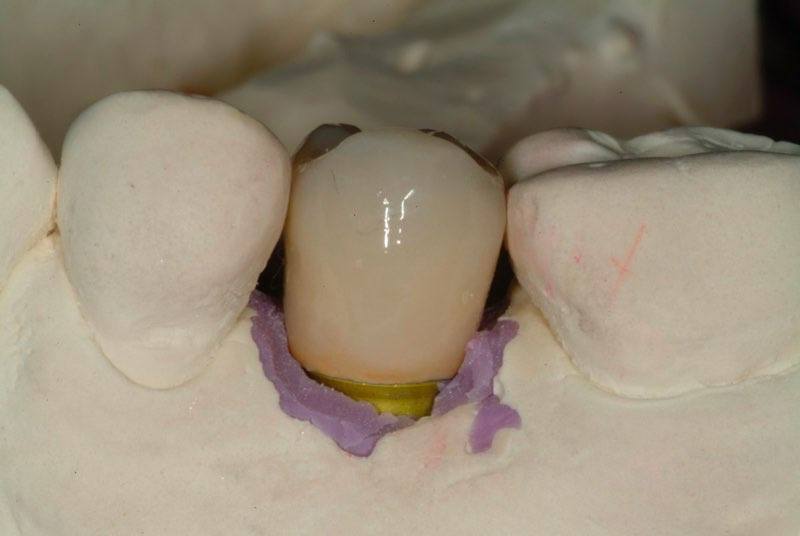
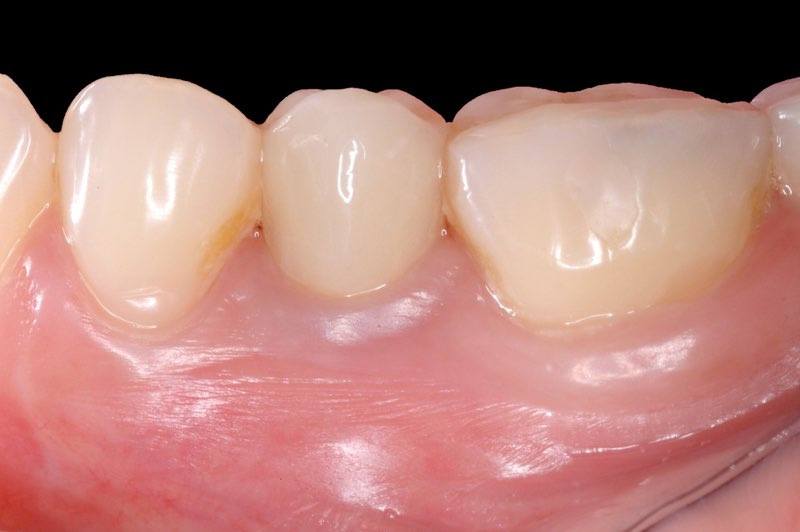
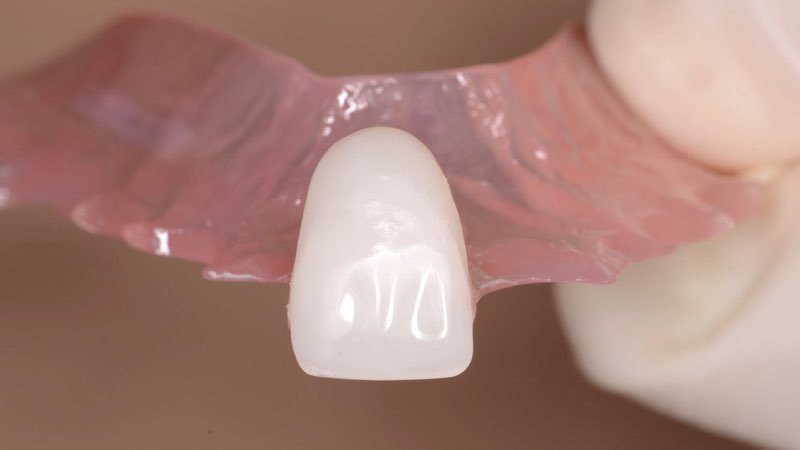
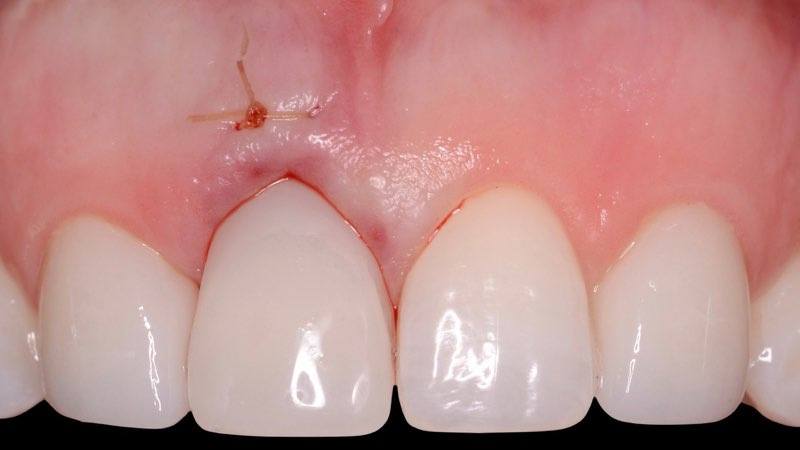
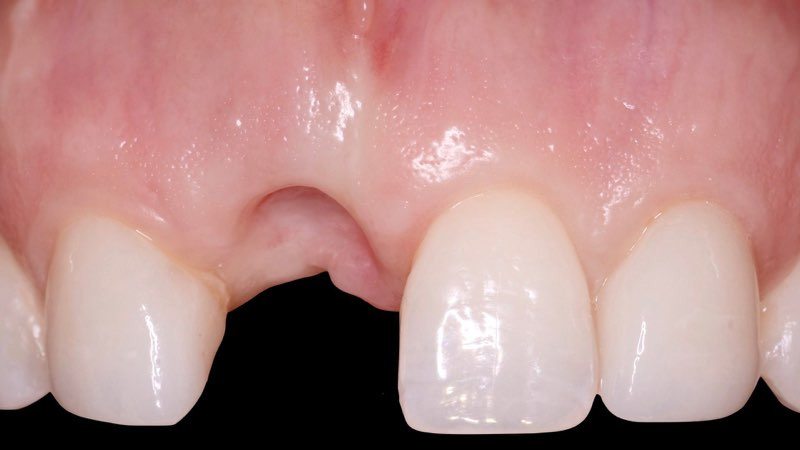
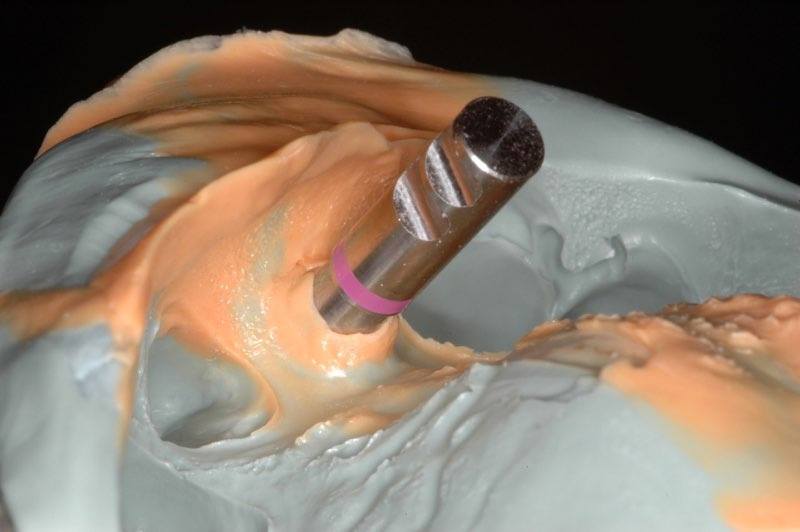
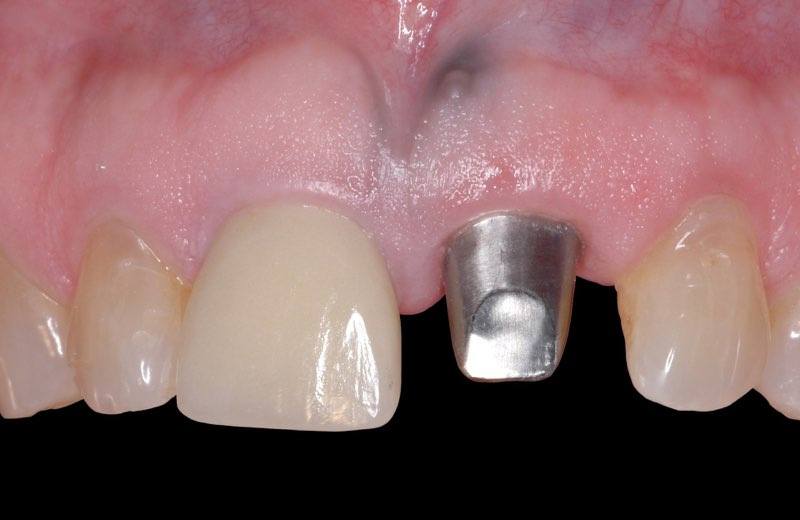
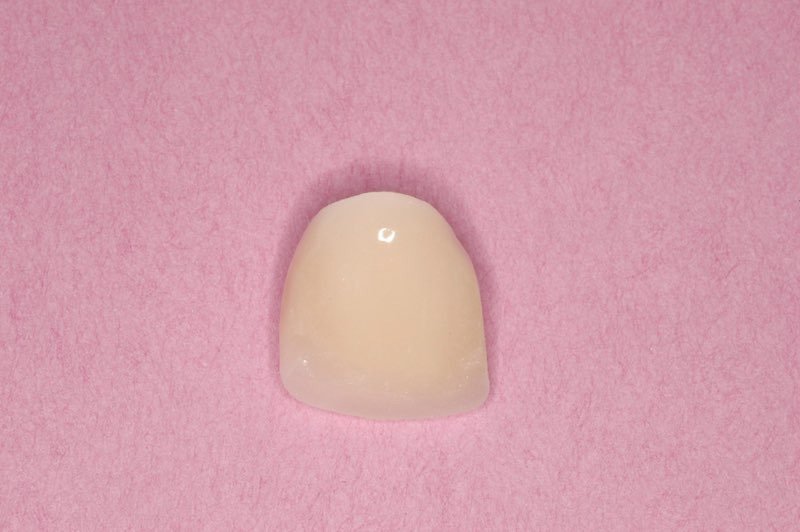
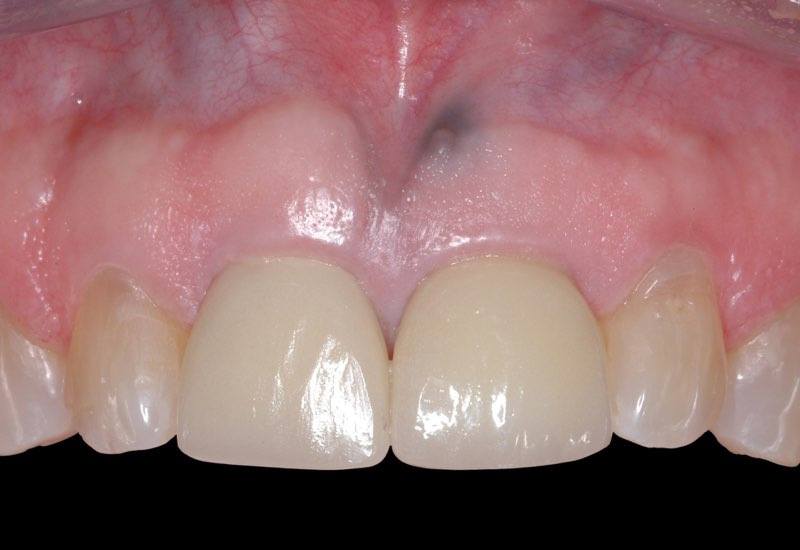
Our patient had an old Maryland bonded bridge that had decayed and fractured. Rather than further damage her adjacent teeth in order to make a larger bridge, she chose a dental implant in order to get closer to natural function and aesthetics. Her treatment was documented and chosen to be published as part of a dental implant aesthetics competition in 2005 titled “Esthetics Casebook” published by Institut Straumann AG.
Restorative work by: Dr. Jason Gillespie (San Antonio, TX)
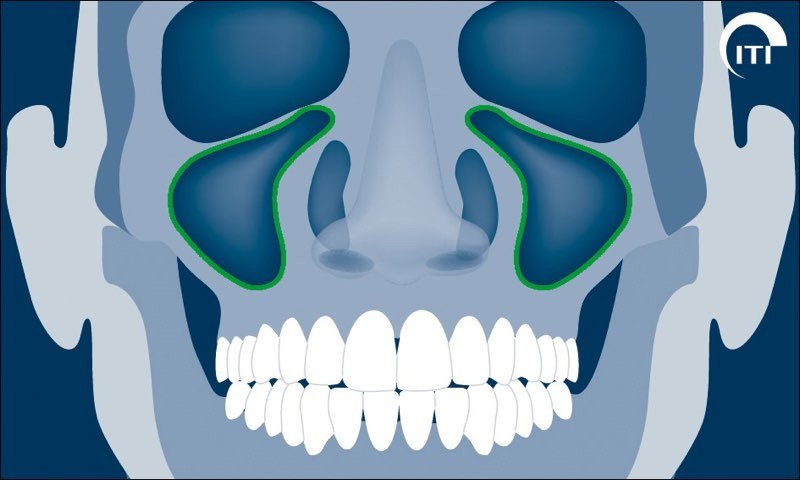
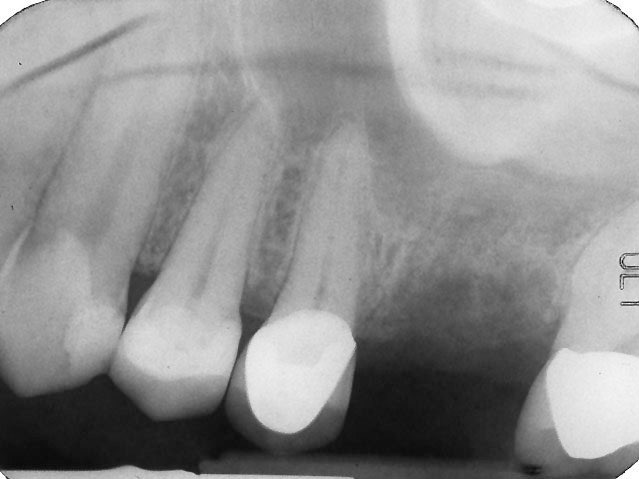
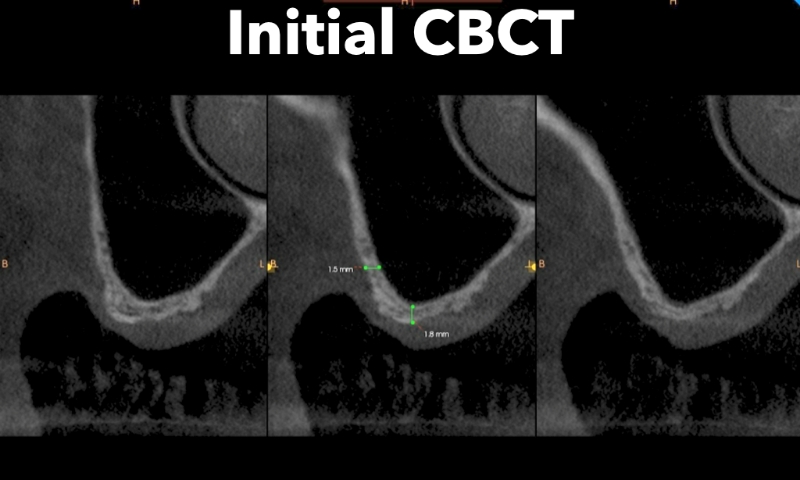
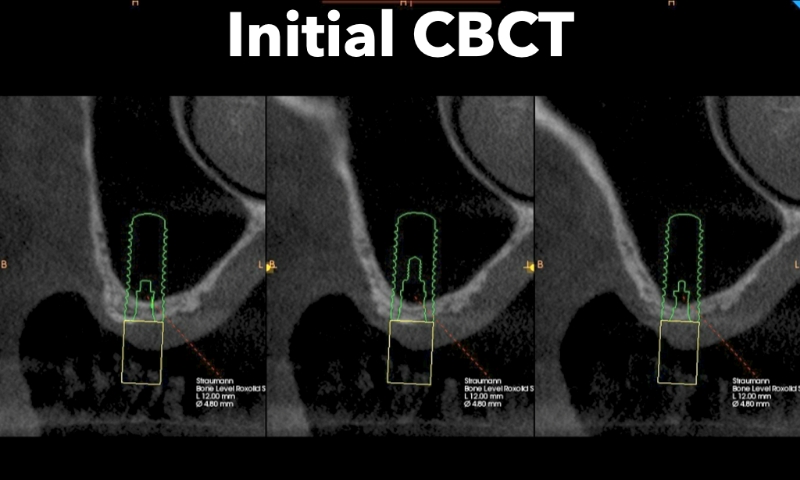
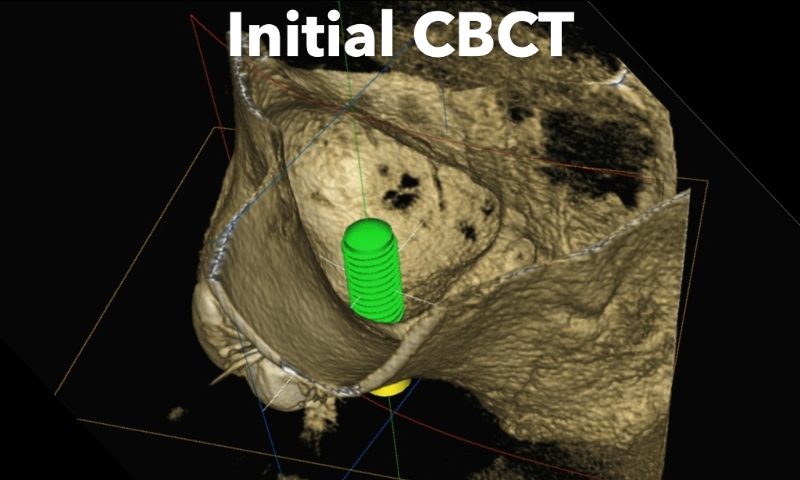
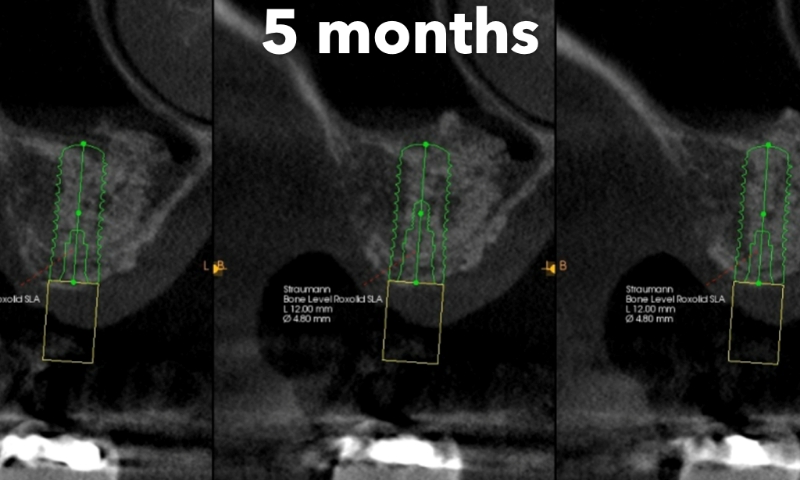
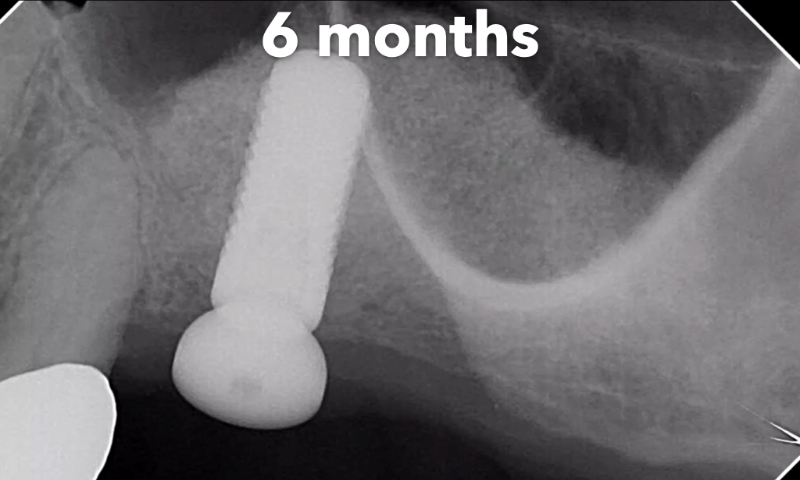
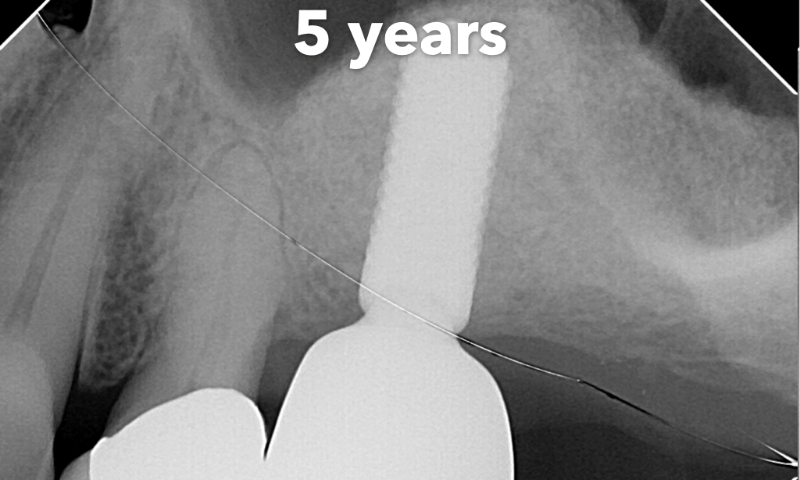
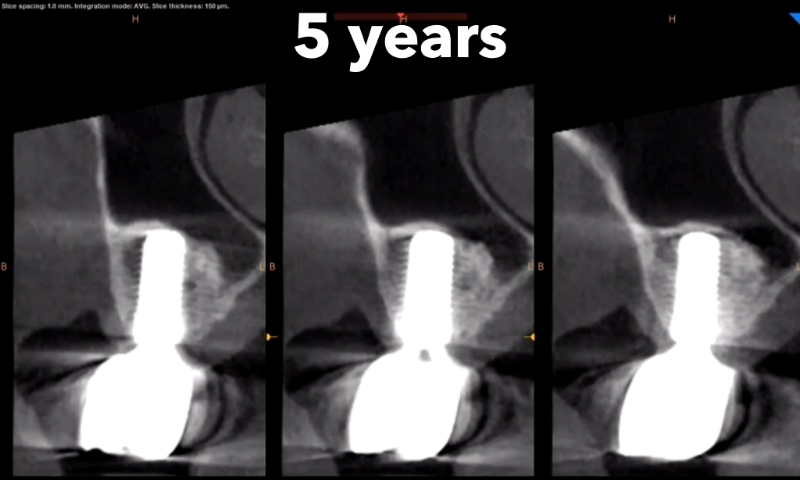
When there is insufficient bone in the area of the back molars in the upper arch and an implant is the preferred choice to replace missing teeth, a sinus lift procedure is used to create additional bone. The photos below show a typical case where CT scanning from iMagDent Digital Dental Imaging Center was used to evaluate the existing bone available, the amount to be augmented, and the presence of any irregularities or pathology.
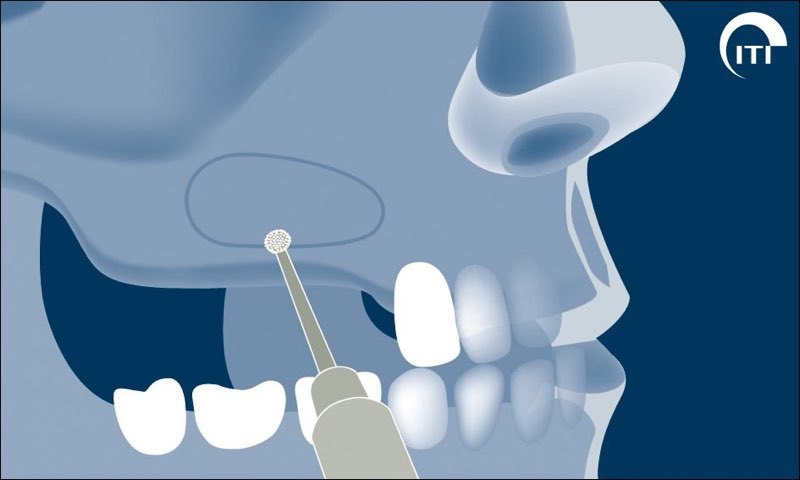
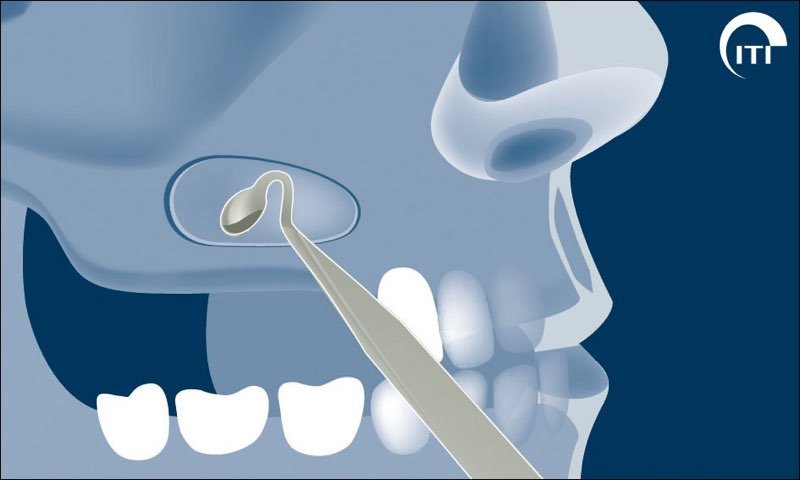
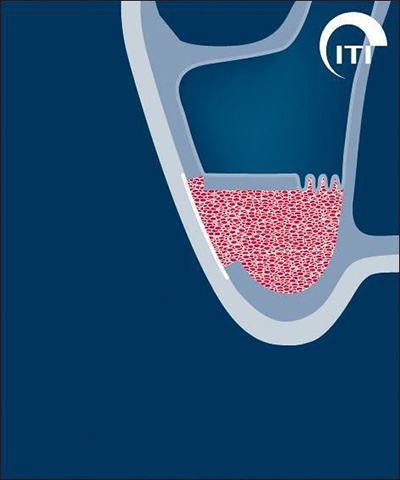
After the relevant information was collected and analyzed, a treatment plan of simultaneous sinus elevation (a.k.a. sinus lift) and implant placement was presented to the patient. In a sinus lift procedure, a small opening is made on the side of the upper jawbone that exposes the fragile sinus membrane. This membrane is carefully preserved and then elevated to create room for bone grafting material. Once the bone grafting material is placed beneath the membrane, the implant can be placed if sufficient bone is present to allow for stable implant placement. The access opening is sealed with a resorbable barrier membrane and the area sutured. Following 5 months of healing, the patient presented here was referred back to her general dentist for fabrication of the final crown.
Restorative work by: Dr. Lane Walsh (San Antonio, TX)
Images courtesy the International Team for Implantology (ITI) - unauthorized use is prohibited.
Outline of the right and left maxillary sinuses
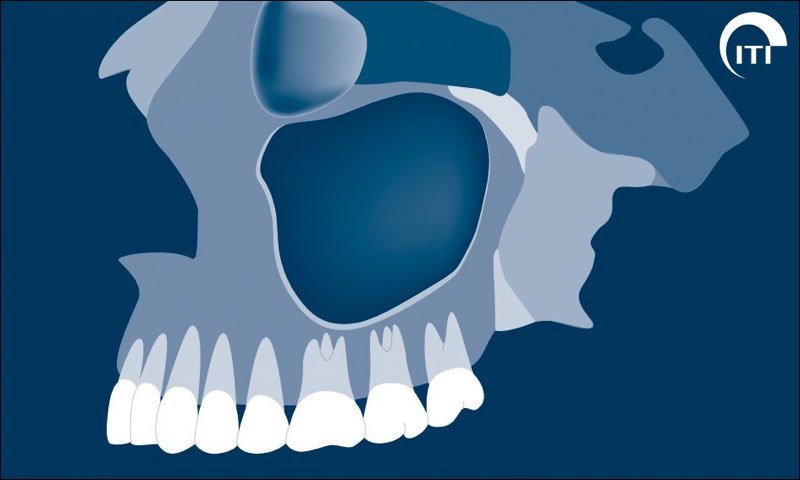
Side view of a normal maxillary sinus
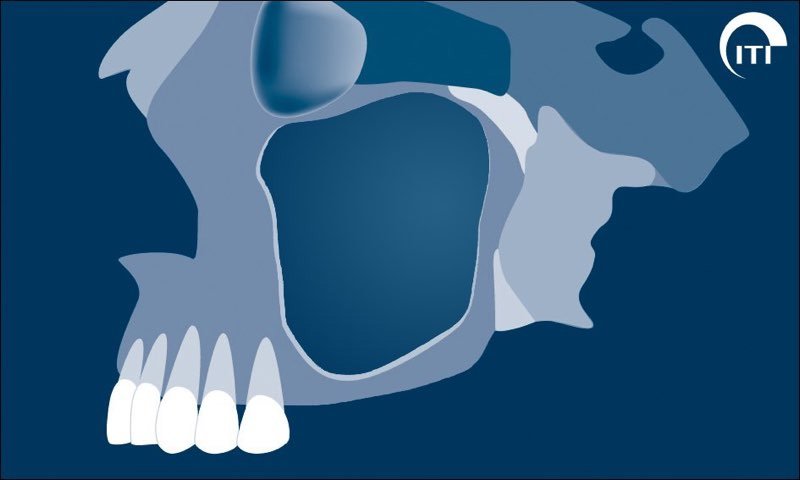
Expansion of the sinus when molars are missing
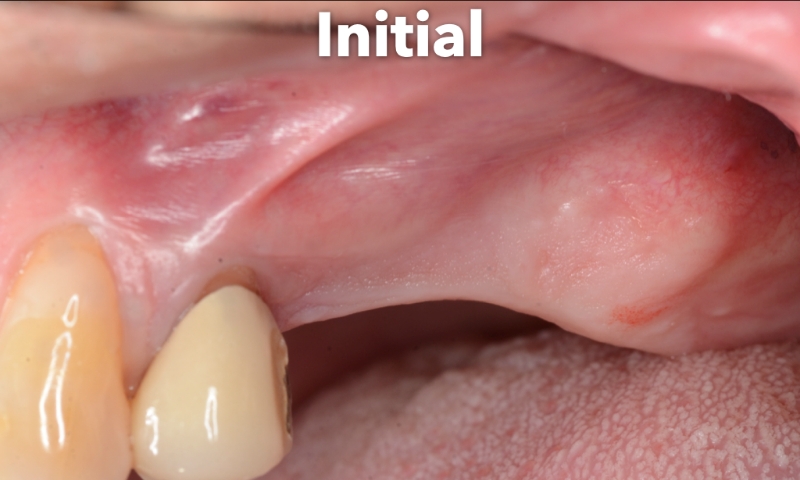
Initial Presentation. Note lack of bone for implant